Sensor network to monitor soil moisture
Author: Petre Ionut-Claudiu
Master: AAC2
1. Project Objective
Based on several sensors, the soil moisture of an area will be monitored remotely. The area will be divided in smaller portion so that one sensor will correspond to a dedicated zone. The collected data will be centralized by a master node which will publish in a data base, using InfluxDB which will be available to the user. An alert will be sent if the overall soil moisture drops below a given threshold.
2. Hardware
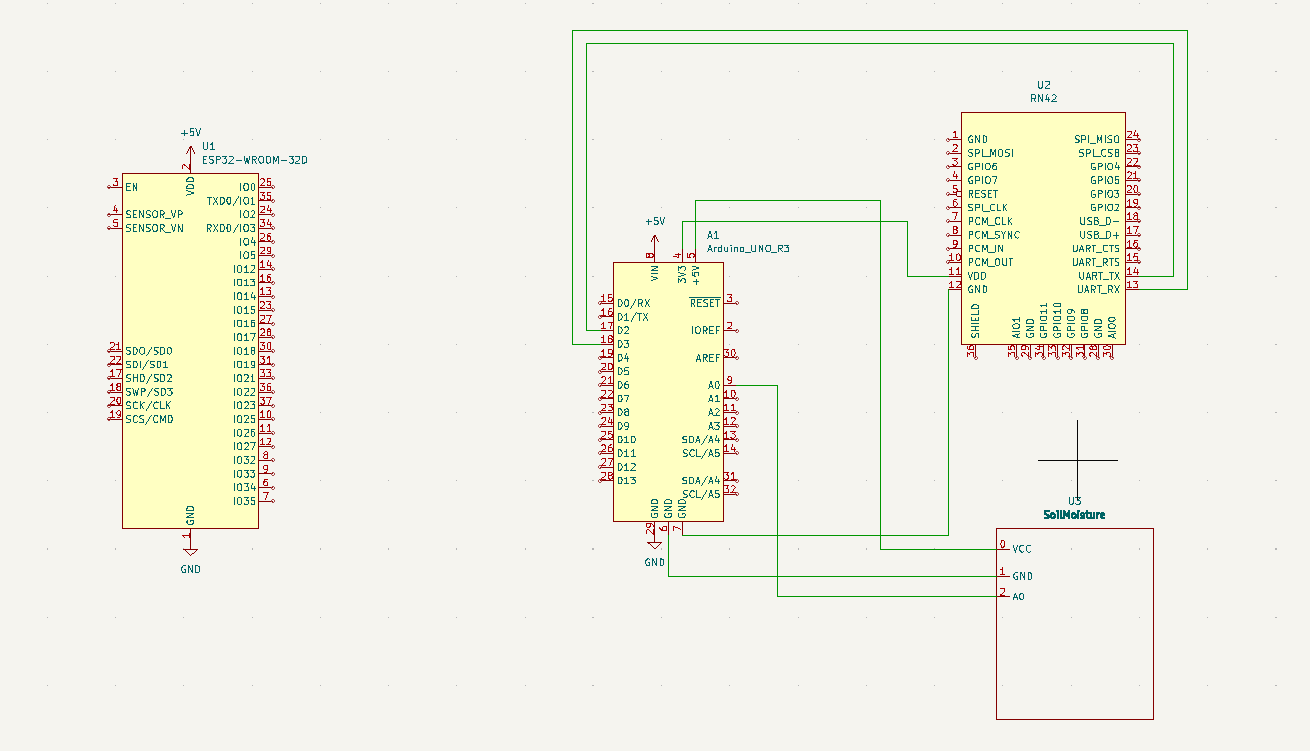
2.1. Hardware Architecture
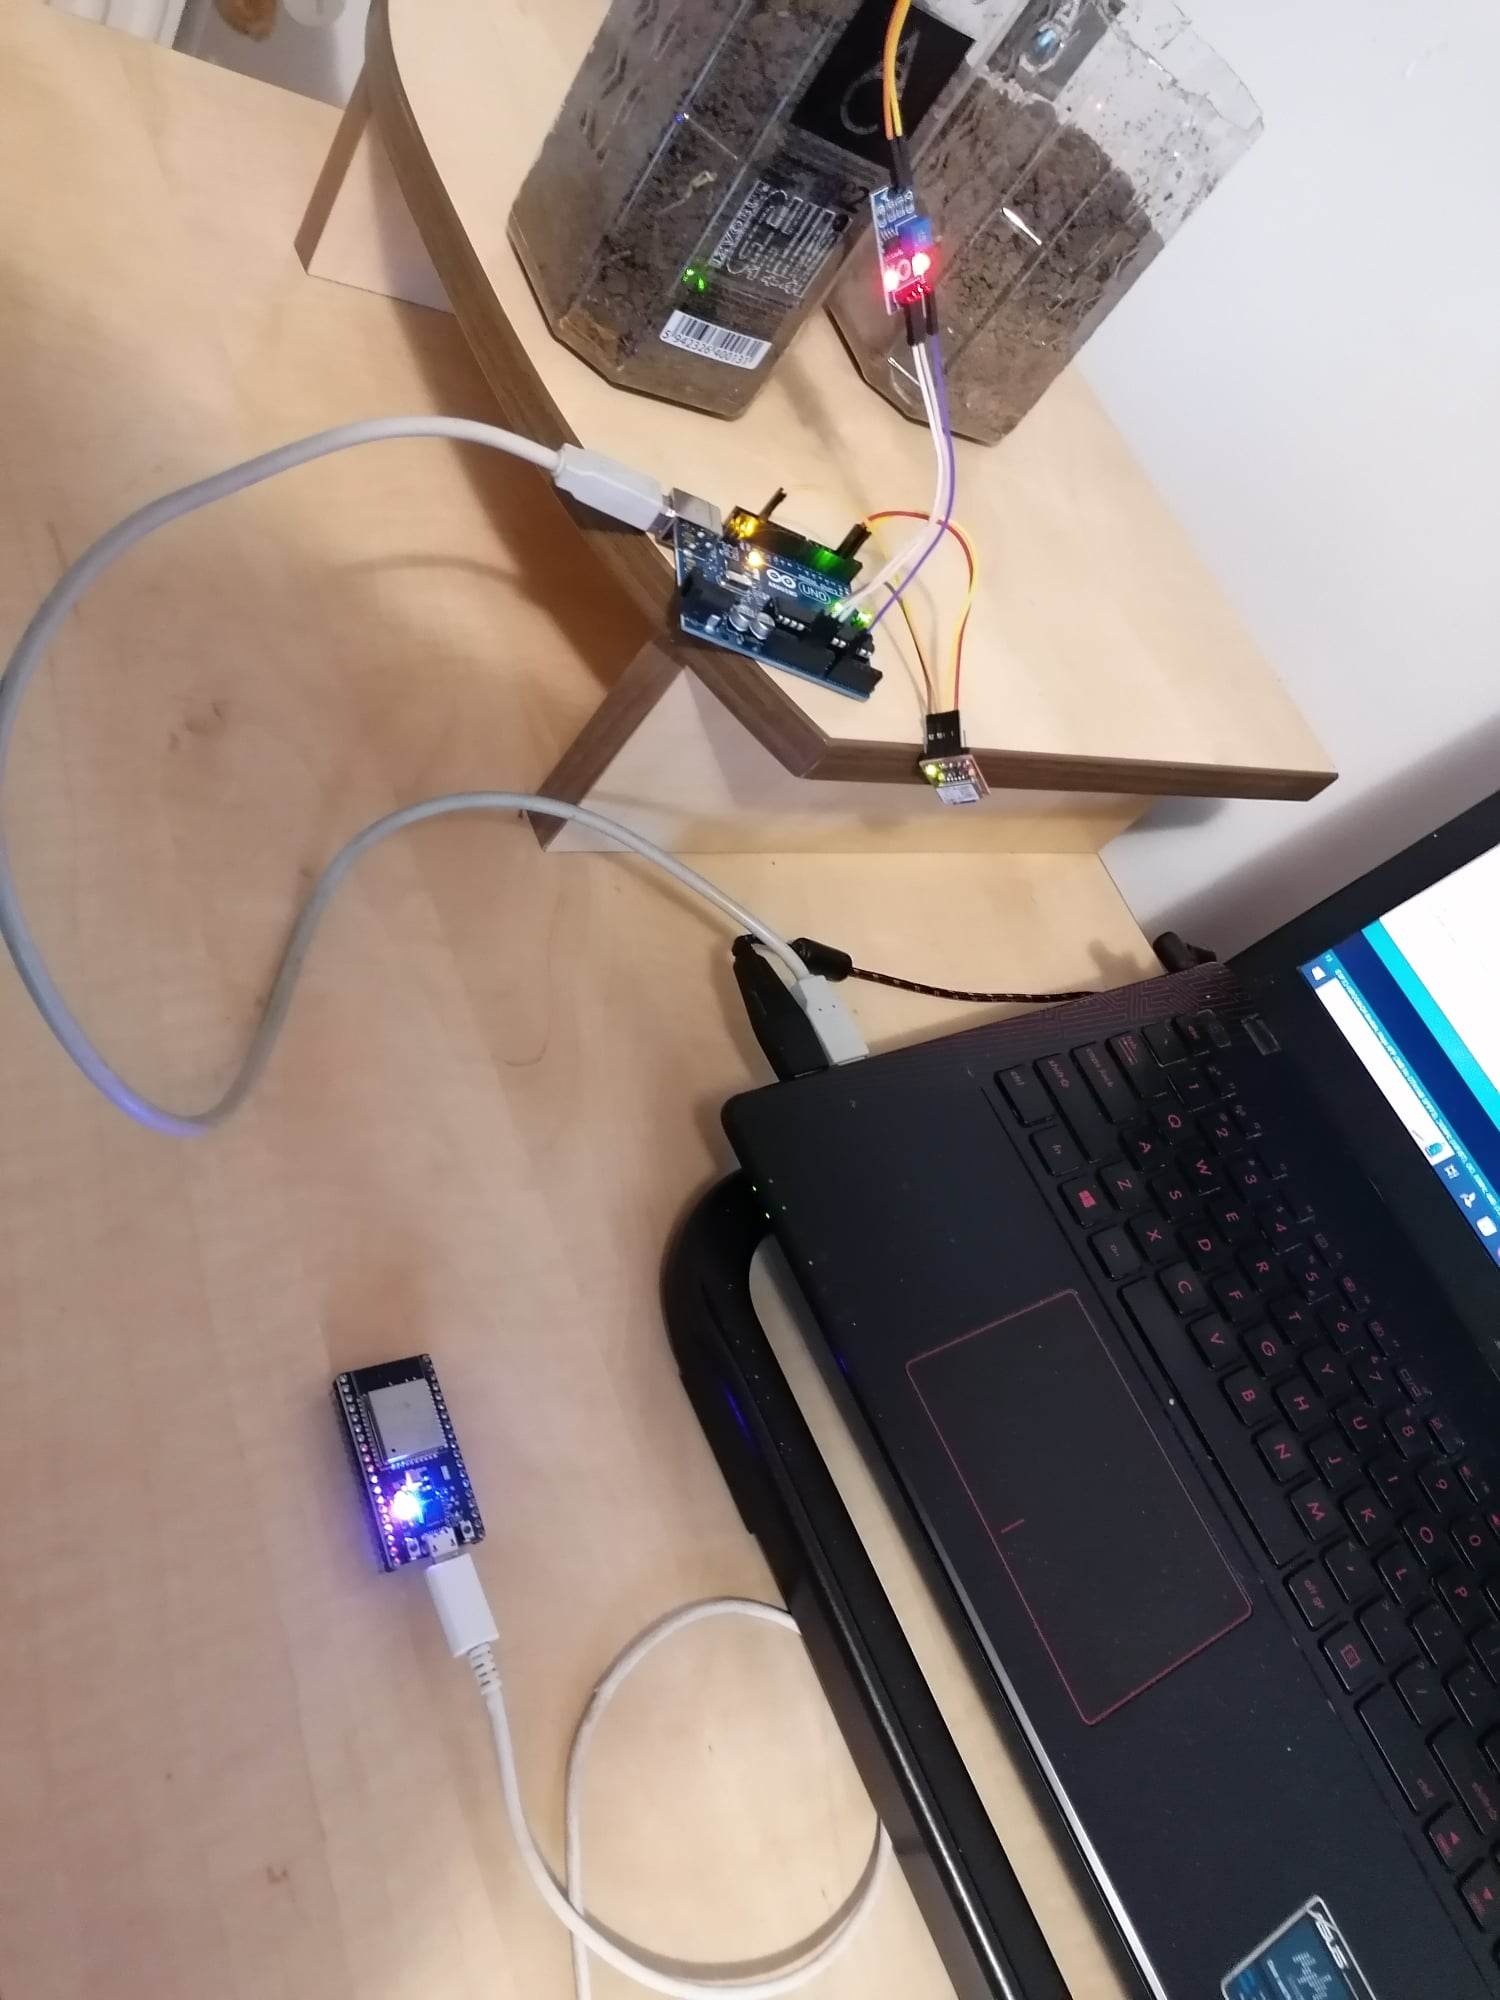
2.2. Hardware set-up
3. Software
3.1. ESP32 Software Architecture
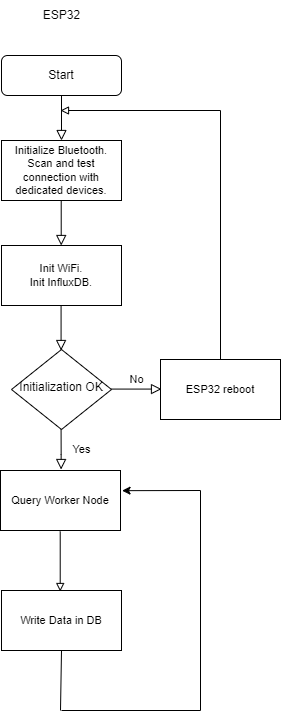
The succeeding flowchart diagram presents the state in each step of the ESP32 master node. First, the serial connection will be established for debugging purposes.
Then it will activate Bluetooth and will start to search for nodes from its own network (this list is previously established). If it finds any, it will test the connection with it and store it in case of success.
  if (! SerialBT.begin("ESP3", true) ) {
    Serial.println("==== BluetoothSerial failed! ====");
    abort();
  }
  ...

      if (btDeviceList->getCount() > 0) {
      String deviceName;
      Serial.printf("Found devices: %d\n", btDeviceList->getCount());
      for (int i=0; i < btDeviceList->getCount(); i++) {
        // Get BT object
        BTAdvertisedDevice *device = btDeviceList->getDevice(i);

        ...
      }
      // Connect to BT devices
      if(addr) {
        Serial.printf("connecting to %s - %d\n", addr.toString().c_str(), channel);
        SerialBT.connect(addr, channel, sec_mask);
      }
      else {
        Serial.println("Unable to connect");
      }
    }
The next step is to manage the Wi-Fi connection, followed by the access to InfluxDB dedicated bucket.
  WiFi.mode(WIFI_STA);
  wifiMulti.addAP(WIFI_SSID, WIFI_PASSWORD);

  // SW trace to inform about wifi connection
  Serial.print("Connecting to wifi");
  while (wifiMulti.run() != WL_CONNECTED) {
    cnt++;
    Serial.print(".");
    delay(100);

    if (cnt > WIFI_ATTEMPTS_MAX) {
      break;
    }
  }
  ...
  // Check server connection
  if (client.validateConnection()) {
    Serial.print("Connected to InfluxDB: ");
    Serial.println(client.getServerUrl());
  } else {
    Serial.print("InfluxDB connection failed: ");
    Serial.println(client.getLastErrorMessage());
    ESP_STATUS = false;
  }

  // Add tags to the data point
  soilMoistureSensor.addTag("device", DEVICE_NODE_1);

  WiFi.disconnect();
The end of the initialization phase is marked by an overall check, including all of the above. If any has failed, ESP32 will reboot.
The Query Worker Node process includes the following steps:
- Activate, again, Bluetooth and connect to the other node
- Send request command
- Wait for response
- Store response
- Disconnect and deactivate Bluetooth
The Write Data in DB process includes the following steps:
- Activate, again, Wi-Fi
- Write data in DB
- Deactivate Wi-Fi
3.2. Worker Node Software Architecture
The succeeding flowchart diagram presents the state in each step of the worker node. Its initialization phase is simpler that the one of the master node, being composed of:
- Bluetooth initialization
- Moisture sensor initialization
Once the set-up is complete, it will just wait and serve the queries from the ESP32 node.
4. Experimental results
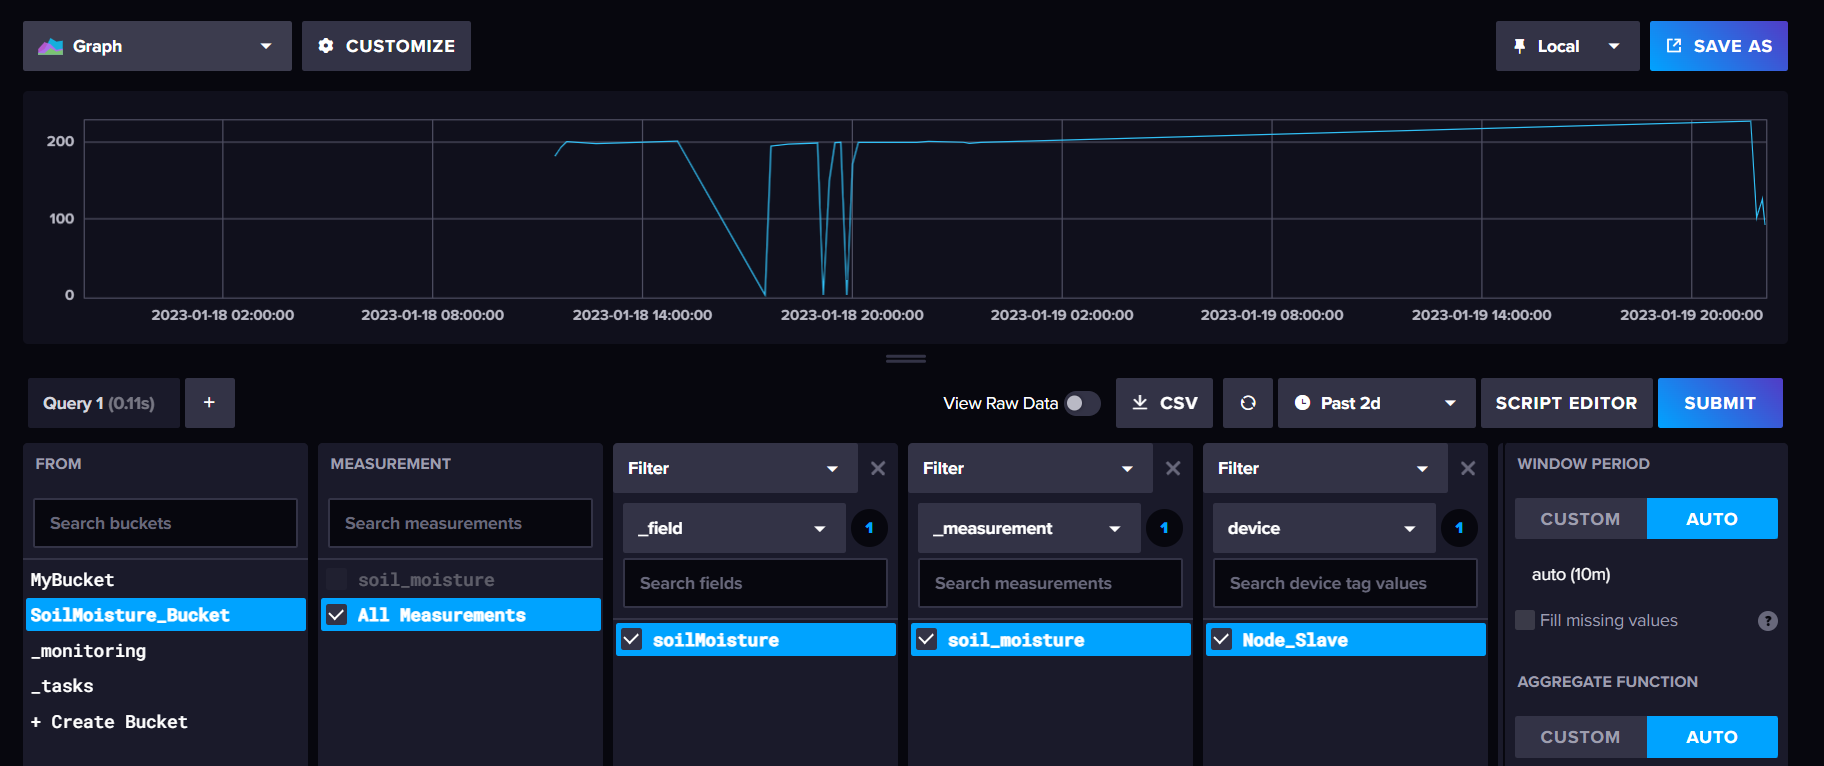
Results can be analyzed using InfluxDB API. It is measured in a range from 0 to 255.
In the snapshot from below, an overview over the last 2 days is shown. Drops can be observed due to the fact that the system was offline.

To get the min/mean/max value from the last two days, we can use the InfluxDB query language. The following code snippet is used for retrieving the mean.
from(bucket: "SoilMoisture_Bucket")
    |> range(start: - 2d)
    |> filter(fn: (r) => r._measurement == "soil_moisture")
    |> filter(fn: (r) => r._field == "soilMoisture")
    |> filter(fn: (r) => r.device == "Node_Slave")
    |> aggregateWindow(every: 2d, fn: mean, createEmpty: false)
5. Further work
Further work will involve:
- explore and find a solution to connect to a water supply system
- built a packing for each node
- explore InfluxDB query language and handle them from ESP32
6. Source code
7. Demo
8. Resources
https://www.espressif.com/sites/default/files/documentation/esp32_datasheet_en.pdf http://cdn.sparkfun.com/datasheets/Wireless/Bluetooth/Bluetooth-RN-41-DS.pdf http://cdn.sparkfun.com/datasheets/Wireless/Bluetooth/bluetooth_cr_UG-v1.0r.pdf https://docs.espressif.com/projects/esp-idf/en/latest/esp32/get-started/index.html


