
This is an old revision of the document!
Smart air quality sensor
Introduction
This project aims to implement a smart air quality sensor capable of making predictions regarding air quality for the day. The purpose of it is to give recommendations on outdoor activities based off air quality, as well as display real-time sensor data to the user. This device is of use to those wary of their health and well-being who may wish to do various outdoor activities, such as running or going for a walk around the block.
General description
The device actively polls for air quality data from its sensors and displays it on its LCD screen. It stores the hourly sensor data and makes a prediction of air quality for the day every morning. The prediction is made using a model used and trained using the Edge Impulse API. The predicted data is sent off to a Telegram bot for the user to see.
Hardware Design
Components
The device consists of the following hardware components:
| Component | Details | Interface | Source |
|---|---|---|---|
| ESP32 | module with integrated Wi-Fi | - | emag |
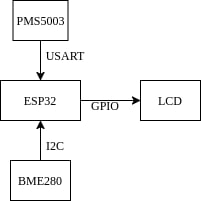
| PMS5003 | particulate matter (PM1, PM2.5, PM10) sensor | USART | emag |
| BME280 | temperature, atmospheric pressure and humidity sensor | I2C | emag |
| LCD2004 | 4×20 character display | GPIO | emag |
This choice of components was a result of various considerations pertaining to the project's specifications. The ESP32 is a powerful, dual core chip better fit for predictive analytics in contrast with its counterparts. It features on-board Wi-Fi, crucial for remotely sharing predictive data. The BME280 and PMS5003 sensors were picked for availability reasons. A large 4×20 character display was chosen over its more common 2×16 alternative to better fit all the sensor data.
The BME280 module interfaces with the ESP32 board using its default I2C SCL and SDA pins, which need not be set in software. Its power is supplied by the board using the 3V3 pin, according to specification.
The PMS5003 sensor communicates with the ESP32 module via the serial interface. The RX and TX pins of the sensor are connected to the TX2 and RX2 pins of the module, respectively. The RX2 and TX2 pins were chosen over the RX0 and TX0 for spacial convenience. As per the specification, it is powered via the VIN pin of the ESP32 module which, while powered via USB, outputs 5V. This voltage is necessary for the sensor to function properly.
The LCD2004 display communicates with the ESP32 module via GPIO. The display can function under normal conditions while only using four data pins (D4:7). These four pins are connected to GPIO33, GPIO25, GPIO26, GPIO27, respectively for spacial convenience. The E (enable) and RS (cursor) pins of the LCD are connected to the GPIO14 and GPIO32 pins of the ESP32 module, respectively. The VO pin, which pertains to contrast control is also connected to a GPIO pin (GPIO4) which is capable of PWM. This enables contrast control from software, without the use of a potentiometer. The RW pin is pulled low via a connection to GND, which allows writing to the display. The display is powered via the VIN port of the ESP32 module, which outputs 5V while the board is powered using USB. The backlight, however, is undervolted to 3V3 (as opposed to its specified upper limit of 5V). This decision was made in consideration of power usage, despite the dimness.
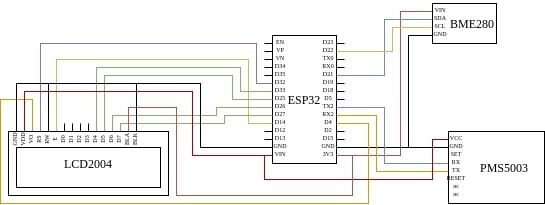
Circuit diagram
Proof of work
LCD output and data readings from PMS5003 and BME280 respectively:


Software Design
The program running on the microcontroller was developed using ESP-IDF - Espressif’s official IoT Development Framework for the ESP32. After an initial warm-up time of 30 seconds (as per PMS5003's specification), the device makes predictions every 60 seconds (as per BME280's specification) and displays them on the LCD. Every hour, the particulate matter measurements are converted to an AQI, which is placed in a features buffer. At the initialization of the device, it attempts to connect to a wireless access point via Wi-Fi and starts an HTTP server. Any HTTP GET request to said server receives a response containing an AQI prediction for the next hour. This prediction is made using the features from the aforementioned features buffer.
External libraries:
- ESP-IDF and its various wrappers and drivers
- Edge Impulse for training and deploying a regression model
- HD44780-compatible LCD controller driver implemented in this library
- librării şi surse 3rd-party (e.g. Procyon AVRlib)
- algoritmi şi structuri pe care plănuiţi să le implementaţi
- (etapa 3) surse şi funcţii implementate
Rezultate Obţinute
Concluzii
Download
Fişierele se încarcă pe wiki folosind facilitatea Add Images or other files. Namespace-ul în care se încarcă fişierele este de tipul :pm:prj20??:c? sau :pm:prj20??:c?:nume_student (dacă este cazul). Exemplu: Dumitru Alin, 331CC → :pm:prj2009:cc:dumitru_alin.
Jurnal
- 13 - 16 of May: arrival of components
- 17 - 18 of May: assembly of device
Bibliografie/Resurse
