SAFEBOX
Introducere
Scopul acestui proiect constă în dezvoltarea unui sistem de securitate pentru un seif, care implică următoarele aspecte: ● Crearea unui seif dotat cu o încuietoare avansată. Accesul la seif este permis doar prin scanarea unui card RFID. ● În cazul în care cardul RFID nu este recunoscut, se va utiliza o măsură alternativă de securitate. Utilizatorul are la dispoziție maxim 10 secunde pentru a introduce o parolă pe un tastator numeric. În acest timp, un LED va clipi intermitent, indicând disponibilitatea introducerii parolei. ● Dacă timpul maxim este depășit fără a se introduce o parolă corectă, un buzzer va emite un zgomot puternic, semnalizând o potențială tentativă de acces neautorizat. ● În cazul în care autentificarea prin parolă este reușită, seiful se va deschide prin acționarea unui servomotor. ● După deschiderea seifului, acesta poate fi închis din nou prin scanarea unui card RFID corect. ● Scopul final al acestui proiect este de a oferi o modalitate sigură de depozitare a bunurilor.
Descriere generală
Hardware Design
— Listă de piese:—
● Arduino UNO
● breadboard
● keypad
● modul RFID (RC522)
● card, tag de proximitate RFID
● servomotor
● buzzer
● LED multicolor
● rezistențe (1 x 100Ω, 2 x 220Ω)
● jumpere
● headere
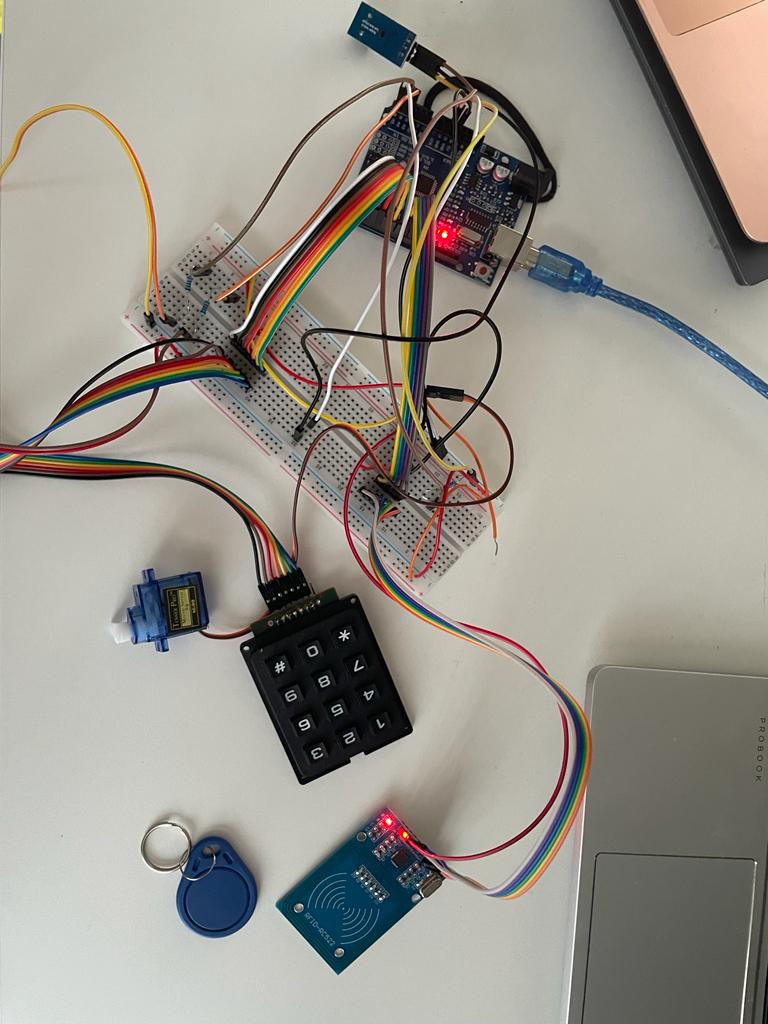
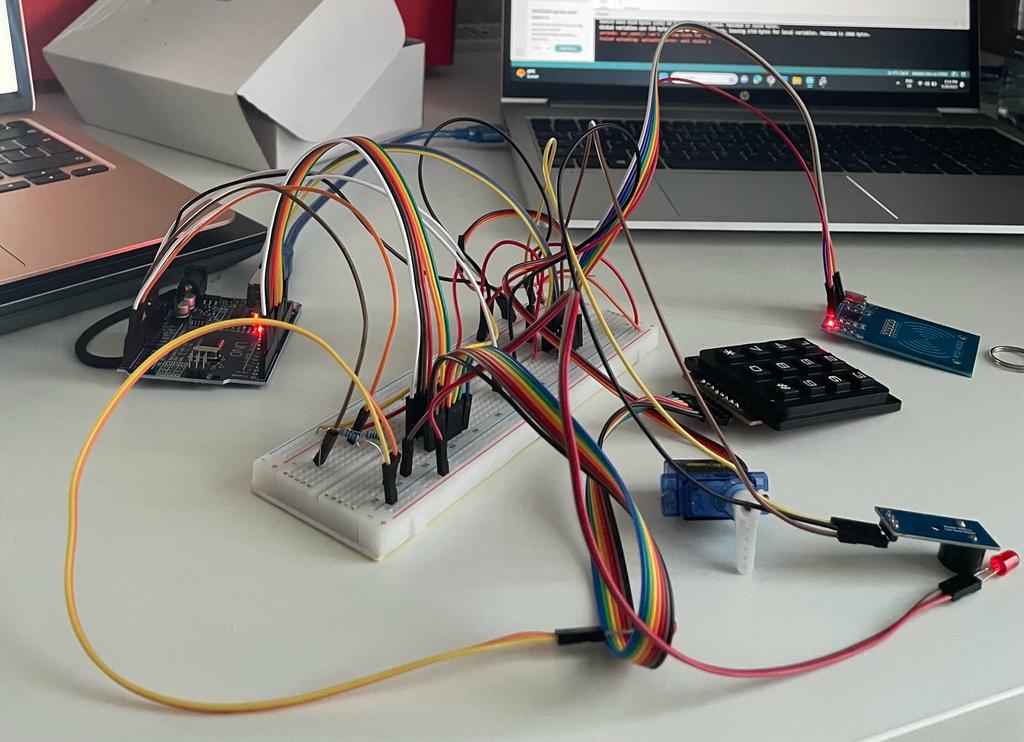
— Poza circuit —
Software Design
#include <SPI.h>
#include <Servo.h>
#include <Keypad.h>
#include <MFRC522.h>
#define SERVO_PIN 2
#define LED_GREEN_PIN A3
#define LED_RED_PIN A4
#define BUZZER_PIN A5
#define SDA_PIN 10
#define RST_PIN 9
#define WAIT 1000
#define WARNING_BUZZ_INTERVAL 700
#define WARNING_TIMEOUT 10000
#define MAX_PASSWD_LENGTH 64
Servo servo;
const byte ROW_NUM = 4; four rows const byte COLUMN_NUM = 3; 3 columns
char keys[ROW_NUM][COLUMN_NUM] = {
{ '1', '2', '3' },
{ '4', '5', '6' },
{ '7', '8', '9' },
{ '*', '0', '#' }
}; https : electropeak.com/learn/interfacing-4×3-membrane-matrix-keypad-with-arduino/
       //byte pin_rows[ROW_NUM] = {5, 10, 9, 7}; //connect to the row pinouts of the keypad
         //byte pin_column[COLUMN_NUM] = {6, 4, 8}; //connect to the column pinoutsof the keypad
           byte pin_rows[ROW_NUM] = { 3, 8, 7, 5 };  //connect to the row pinouts of the keypad
byte pin_column[COLUMN_NUM] = { 4, A2, 6 };  //connect to the column pinouts of the keypad
// Init keypad
Keypad keypad = Keypad(makeKeymap(keys), pin_rows, pin_column, ROW_NUM,
                       COLUMN_NUM);
Init RC522 MFRC522 rc522(SDA_PIN, RST_PIN); String enteredPasswd; const String correctPasswd = “5575”; const byte correctCodeSize = 4; const byte correctCode[4] = { 99, 88, 50, 25 }; volatile int safeState; 0 = open, 1 = closed void setup() {
Serial.begin(9600);
SPI.begin();
rc522.PCD_Init();
Serial.println("Aproprie cardul..");
enteredPasswd = "";
pinMode(BUZZER_PIN, OUTPUT);
pinMode(LED_GREEN_PIN, OUTPUT);
pinMode(LED_RED_PIN, OUTPUT);
servo.attach(SERVO_PIN);
servo.write(0);
delay(500);
} volatile int servoPos = 0; var to store the servo pos volatile bool wrongTag = false; volatile bool proceed = false; volatile bool state = 0; 0 = closed, 1 = open volatile unsigned long lastReadTime = 0; volatile unsigned long previousMillisBuzz = 0; volatile unsigned long warningStateStart = 0; bool checkPasswd(String enteredPasswd) {
int length = enteredPasswd.length();
if (length != correctPasswd.length()) {
  return false;
}
for (int i = 0; i < length; i++) {
  if (correctPasswd[i] != enteredPasswd[i]) {
    return false;
  }
}
return true;
} void actLED() {
if (!state) {
  analogWrite(LED_GREEN_PIN, 0);
  analogWrite(LED_RED_PIN, 255);
} else {
  analogWrite(LED_RED_PIN, 0);
  analogWrite(LED_GREEN_PIN, 255);
}
} void actBuzzer() {
if (!state) {
  tone(BUZZER_PIN, 100, 300);
} else {
  tone(BUZZER_PIN, 100, 100);
  delay(200);
  tone(BUZZER_PIN, 300, 100);
}
} void warningBuzz() {
unsigned long currentMillis = millis();
if (currentMillis - previousMillisBuzz >= WARNING_BUZZ_INTERVAL) {
  previousMillisBuzz = currentMillis;
  tone(BUZZER_PIN, 350, 200);
}
} void wrongPasswordBuzz() {
tone(BUZZER_PIN, 450);
delay(1000);
noTone(BUZZER_PIN);
} void angryBuzz() {
Serial.println("INTRUDER");
for (int i = 0; i < 80; i++) {
  if (i % 2 == 0) {
    analogWrite(LED_GREEN_PIN, 0);
    analogWrite(LED_RED_PIN, 255);
  } else {
    analogWrite(LED_GREEN_PIN, 255);
    analogWrite(LED_RED_PIN, 0);
  }
  tone(BUZZER_PIN, 50);
  delay(50);
}
noTone(BUZZER_PIN);
} void lock_unlock() {
servo.write(90 - servoPos);
servoPos = 90 - servoPos;
state = !state;
actLED();
actBuzzer();
} void loop() {
// LED CODE
actLED();
// RFID READER CODE
if (!wrongTag) {
  // Look for new cards
  if (rc522.PICC_IsNewCardPresent()) {  // Select one of the cards
    unsigned long time = millis();
    if (time - lastReadTime >= WAIT) {
      lastReadTime = time;
      if (rc522.PICC_ReadCardSerial()) {
        //Show UID on serial monitor
        byte letter;
        for (byte i = 0; i < correctCodeSize; i++) {
          if (rc522.uid.uidByte[i] != correctCode[i]) {
            Serial.println("ERROR! Invalid tag! Enter keys!");
            // TODO: intermittent buzz
            warningStateStart = millis();
            enteredPasswd = "";
            wrongTag = true;
          } else {
            Serial.println("OK");
            proceed = true;
          }
        }
      }
    }
  }
} else {
  warningBuzz();
  unsigned long currTime = millis();
  if (currTime - warningStateStart >= WARNING_TIMEOUT) {
    angryBuzz();
    warningStateStart = millis();  // reset
  }
  // Wrong tag => have to read keypad
  char key = keypad.getKey();
  if (key) {
    if (key == '#') {
      bool validPasswd = checkPasswd(enteredPasswd);
      if (validPasswd) {
        Serial.println("OK!");
        proceed = true;
        wrongTag = false;
      }
      else {
        wrongPasswordBuzz();
      }
      enteredPasswd = "";
    } else {
      enteredPasswd += key;
    }
  }
}
if (proceed) {
  lock_unlock();
}
proceed = false;
}
Rezultate Obţinute
Concluzii
Download
Fişierele se încarcă pe wiki folosind facilitatea Add Images or other files. Namespace-ul în care se încarcă fişierele este de tipul :pm:prj20??:c? sau :pm:prj20??:c?:nume_student (dacă este cazul). Exemplu: Dumitru Alin, 331CC → :pm:prj2009:cc:dumitru_alin.


