This is an old revision of the document!
Smart Locker
Introducere
Descriere generală
| Keypad | –[input pins]—> | Arduino Uno |
+———+ | |
                              |  +-----------+  |
                              |  | LCD       |  |
                              |  +-----------+  |
                              |  |           |  |
                              |  |    LED    |  |
                              |  |           |  |
                              |  +-----------+  |
                              |  |           |  |
                              |  | Servo     |  |
                              |  | Motor     |  |
                              |  |           |  |
                              |  +-----------+  |
                              |  |           |  |
                              |  |   Buzzer  |  |
                              |  |           |  |
                              |  +-----------+  |
                              +-----------------+
At the core of the system is the Arduino Uno R3, which serves as the control center. It receives input from a keypad, allowing users to enter a unique code for authentication. The keypad acts as the primary interface for interaction with the locker system, enabling users to input commands and access their belongings securely.
To provide visual feedback and information, an LCD display is integrated into the system. The LCD display is connected to the Arduino board, presenting prompts, status messages, and instructions to guide users throughout the authentication and access process. It enhances the user experience by providing clear and concise information.
Once the user enters the correct code on the keypad, the Arduino board triggers a servo motor. The servo motor is mechanically connected to the locker mechanism and operates to unlock or lock the door, granting or restricting access to the storage compartment. The servo motor ensures precise control and reliable operation of the locker system.
To offer audio feedback and notifications, a buzzer is integrated into the system. The buzzer produces distinct sounds or tones to indicate successful authentication, access denied events, or other relevant events. This audio feedback enhances user feedback and serves as an additional layer of confirmation during the interaction with the locker system.
By leveraging the capabilities of the Arduino Uno R3 and the various components, this locker system provides a reliable, user-friendly, and secure storage solution. The Arduino board acts as the brain of the system, processing user input, managing the authentication process, controlling the servo motor, LCD display, and buzzer to ensure seamless and controlled access to the locker.
Hardware Design
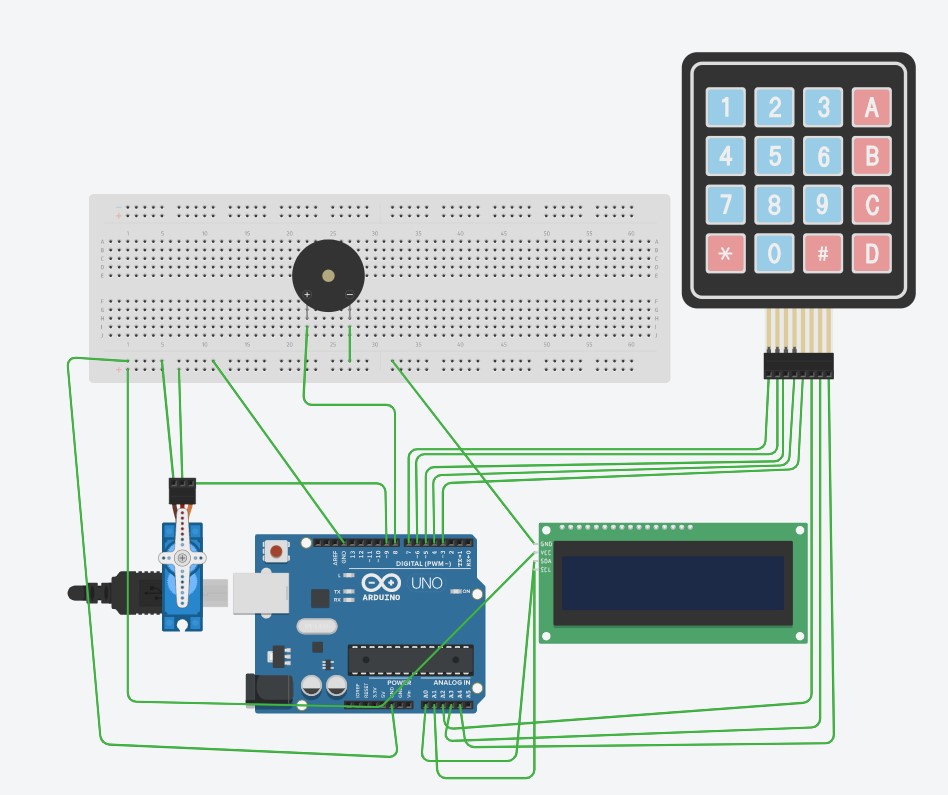
The electrical diagram:


Components: * Placa de Dezvoltare Compatibila cu Arduino UNO R3 (ATmega328p + ATmega16u2) + Cablu 50 cm * Servomotor S3003 * Tastatura matriceala 4×4 cu conector pin de tip mama * LCD 1602 cu Interfata I2C si Backlight Albastru
In this design, the components are connected to the Arduino Uno in the following way:
The keypad is connected to the digital pins of the Arduino Uno for input. The servo motor is connected to one of the PWM pins of the Arduino Uno, as well as to power and ground. The 16×2 LCD is connected to the digital pins of the Arduino Uno for output. The LED is connected to a digital pin of the Arduino Uno, as well as to a resistor and to ground.
Software Design
Throughout the development process, I utilized the Arduino IDE as my primary software environment. It provided a convenient platform for me to write and upload code to the Arduino board.
The key libraries I used in this project were as follows:
Wire.h: I used this library for I2C communication, which is a common protocol for interacting with various devices, such as the OLED display used in this project. It enabled straightforward communication between the Arduino and the display module.
Keypad.h: The Keypad library is utilized for interfacing with the keypad component. It provides functions and methods to easily read the input from the keypad, allowing users to enter their access code. The library handles the scanning of the keypad matrix and provides a convenient interface to retrieve the pressed key.
Servo.h: The Servo library enables control of the servomotor component. It provides functions to set the angle or position of the servo motor, allowing precise control over its movement. By utilizing this library, the Arduino can accurately position the servomotor to lock or unlock the locker door based on the authentication result.
LiquidCrystal_I2C.h: The LiquidCrystal_I2C library is used to interface with the LCD display module through the I2C protocol. It simplifies the process of displaying information on the LCD by providing functions for writing text, setting the cursor position, and controlling the backlight. This library significantly reduces the complexity of communicating with the LCD module over I2C, making it easier to display relevant prompts, messages, and status updates to the users.
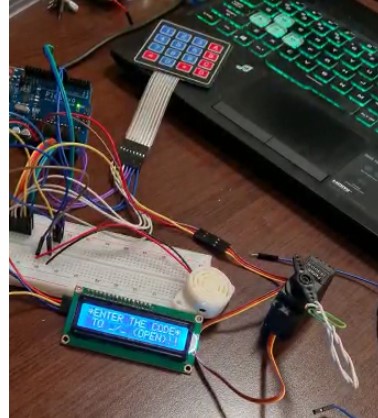
Rezultate Obţinute
Concluzii
In conclusion, by utilizing the Arduino Uno R3 along with the Keypad, LCD, Servo motor, and Buzzer components, we have successfully created a functional locker system.
The Arduino board acts as the central control unit, processing user input from the keypad and providing feedback through the LCD display and Buzzer. The Keypad allows users to enter their unique code for authentication, while the LCD display provides visual prompts, instructions, and status updates to guide users throughout the interaction with the locker system.
The Servo motor is responsible for physically locking and unlocking the locker door based on the authentication result, ensuring secure access to the stored items.
Additionally, the Buzzer provides audio feedback to indicate successful authentication or access denied events. Together, these components create a reliable, user-friendly, and secure locker system that offers controlled access to the storage compartment. The modular design allows for easy customization and expansion, making it adaptable for various applications and environments.
We can develop more this application by using a wifi module to control the password remote, or using nfc to unlock this like interfons. This application in this state we can use itlike a normal safe lock from gym for example or camera hotels.
Download
Fişierele se încarcă pe wiki folosind facilitatea Add Images or other files. Namespace-ul în care se încarcă fişierele este de tipul :pm:prj20??:c? sau :pm:prj20??:c?:nume_student (dacă este cazul). Exemplu: Dumitru Alin, 331CC → :pm:prj2009:cc:dumitru_alin.
Jurnal
Bibliografie/Resurse

