

Web Application Security (part 1)
Resources
Supporting files
For this lab, install the Burp suite. Download the free version, copy it in the home directory and run it later using:
$ java -jar ~/burpsuite_free_v1.6.jar
assuming that burpsuite_free_v1.6.jar is the name of the downloaded file.
We will use a vulnerable virtual machine as a target for our attacks. Download it (the file has about 250MB) and import it into VirtualBox by selecting File → Import Appliance and selecting cnsweb.ova.
Add a new network adapter (Adapter 2) of the type Host-only Adapter). This will be adapter you will use for connecting uring Burp. After booting up the virtual machine, you can find its IP by logging in directly from VirtualBox as student (password student); you will be shown a window with the IP address to use; you can not do anything more than that; you are just going to use the IP address to connect to the virtual machine using Burp.
Ctrl key.
You can then test that the web server is working by issuing
$ sudo apt-get update && sudo apt-get install curl
$ curl $SERVER_IP
where $SERVER_IP is the Virtual Machine's IP address.
.ova file doesn't respect the OVF specification. Everything should be ok if you press Retry and then check that the networking adapter is set to “bridged”.
Introduction
As the World Wide Web's high-level topology consists mainly of personal computing devices (e.g. desktops, laptops, mobile devices) making HTTP requests to web servers, the general field of web security consists of three main sub-fields: client-side security (i.e. browser security), communications security and server-side security, or web application security. This lab and the following will focus on the latter sub-field, although they might provide some general information on the former two.
The design of web applications, and their security in particular is influenced by the following characteristics:
- Statelessness: by default HTTP is a simple request-response protocol maintaing no state between successive communications. This shortcoming led to the design of cookies, which are small pieces of information exchanged between the client and the web application. The type of information exchanged using cookies needs to be carefully chosen, as a malicious client could possibly attempt to send back a malformed or forged cookie; additionally, cookies most often (but not always) represent confidential data, which means that they should only be transferred over a secure channel (i.e. HTTPS).
- Message format: HTTP requests have a specific format, namely they comprise plain-text header and data (although newer improvements also implement a binary protocol). The header contains various information about the client or the server (e.g. a user-agent, page caching information, text encoding information), while the payload is very often (but not always) a HTML page.
- Addressing: resources on the web are located using the URI/URL addressing scheme. Possible vulnerabilities here include a misconfigured web server that allows viewing application-specific files, or worse, that allow accessing other files on the host machine. While this information leakage is not very dangerous by itself, it may be used as an intermediary stage for other attacks.
- Request methods: HTTP communication is most often done using the GET and POST methods. Both methods allow clients to define variables and transfer them as arguments to the server. The fundamental difference between the two is that GET encodes variables in the URL, while POST encodes them in the message body. w3schools gives a brief explanation of how each of them is used.
Note that even though web applications themselves might be hardened, security vulnerabilities can come from anywhere in the server's software stack! A now infamous example is the Shellshock bug caused by a vulnerability in Bash, which comes as the default shell in most Linux distribution, but that can be very easily exploited by passing environment variables through CGI.
[1p] 0. Feedback
Before getting into the lab itself, the CNS team would be very happy to receive your feedback. You can do this by accessing the CNS Moodle course page, where on the right side you will find a block entitled "Feedback" (make sure you are enrolled to the course). Despite the fact that you need to login with your cs.curs.pub.ro account, the feedback is 100% anonymous.
The course this year might have had some rough edges, so it's very important that you tell us what went wrong and what wasn't ok with the lectures, labs and homework; be polite, but succint; don't sugarcoat it, we can take the critique. We are particularly interested in:
- What didn't you like and what you consider didn't go well?
- Why didn't you like that and why you consider it didn't go well?
- What should we do to make things likable and going well?
This should take no more than ten minutes of your lab time. ![]()
[2p] 1. Warm-up task: searching for public data and GET/POST
First let's do some wrap-up exercises to help us get a basic understanding of how web application security works and why it's important.
[1p] a. Searching for public data
One rule of thumb is to never ever post public information on the Internet. Unfortunately most people do this, so let's study how to find it. Here's some interesting stuff you can do:
- Download the latest version of Wordpress and study
wp-config-sample.php. This file is normally used as a template for basic Wordpress configuration data (stored inwp-config.php), which includes private data such as the database password. Identify the PHP variable storing the database password. Use this variable name as a search on GitHub and see if you can find any private data. - Look through the Google search options and think if you can use the fields there to find anything from private documents to password lists, etc. A common “Google search” attack involves searching for public, unsecured security cameras on Google; most security camera web applications consist of common web pages, see this Wikihow page to find some examples.
- Search for all the URLs containing files of type
inc, from therodomain, includingpasswordas an additional search keyword. Identify configuration directives that show passwords, database names and other information that should be private.
[1p] b. Talking to web sites
Let's go through the basics of how HTTP requests are made, using telnet to form requests. First, let's connect to the vulnerable web server described in Supporting files, e.g.:
$ telnet $SERVER_IP 80
Now let's issue a simple GET. The request is composed of:
GET <path> <http-version>,- followed by other header contents,
- followed by an additional newline, indicating the end of the request.
For example:
GET / HTTP/1.0
will return
HTTP/1.1 200 OK
Date: Sat, 10 Jan 2015 16:55:47 GMT
Server: Apache/2.4.7 (Ubuntu)
Last-Modified: Sat, 10 Jan 2015 11:20:21 GMT
ETag: "2f-50c4a757fc29a"
Accept-Ranges: bytes
Content-Length: 47
Connection: close
Content-Type: text/html

<html>
<body>
<b>It works!</b>
</body>
</html>
The server's response contains:
- A status code (
200 OKin our case) - Date information and information about the server
- Encoding and other info about the data, i.e. it's MIME-type
- The length of the data
- The actual data
[1p] Use the recipe above, aided by the w3schools tutorial and some examples (Google for more), to do the steps below.
Repeat the above for www.facebook.com. Note that you are getting a HTTP/1.1 301 Moved Permanently message. Try using
GET / HTTP/1.1
Host: www.facebook.com
and check the new response. Note the redirection to HTTPS (https://www.facebook.com). And note that the connection uses keep-alive and you need to use Ctrl+c to close the connection.
Access www.facebook.com in the browser and look through the page source (right click → view page source). Search for the HTML tag for the login form. Identify the page being queried when you press the Log in button.
submit string and identify the page name.
Login forms are delimited by the <form> HTML tag, so search for <form. The queried page is specified by the action attribute; also note that there is a method attribute. Input fields are specified using the <input> HTML tag, so look for that.
Identify the name, class and id for the e-mail and password fields inside the login form. This data is sent by a POST request. You could use it with the command line provided you did an HTTPS connection.
Access http://$SERVER_IP/~student/post.php using telnet and the HTTP GET. Access it again, but this time construct a POST request, comprising the variables name, age and email, containing your first name, age and some bogus e-mail address. You can try exploiting the PHP script (ask for bonus points if you find any vulnerabilities), but it really doesn't do too much.
POST request you have to fill:
- the
Content-LengthHTTP header variable with the length of the message you are trying to send - the
Content-TypeHTTP header variable with the valueapplication/x-www-form-urlencoded
[3p] 2. Burp tutorial
Since web applications present such a wide attack surface a need arises for systematization in attack attempts. A tool that can help in this respect is Burp Suite, a collection of tools that can be regarded as the equivalent to a debugger for web applications.
[1p] a. Proxy
In its most basic use, Burp acts as a proxy and logs all requests and responses. To install it as a proxy you need to check your browser settings:
- Firefox: Edit / Preferences / Advanced / Network / Settings / Manual Proxy Configuration. You should add 127.0.0.1:8080 for all protocols as you will need it both for HTTP and HTTPS.
In Firefox you can do this by accessing Settings, the Advanced tab, the Certificates tab.
Test that proxy-ing works by visiting http://slashdot.org in the browser. It will work and the browser will render the page. Burp can intercept the requests, but you have to turn on interception.
Initially Burp Proxy will try to intercept the requests from the browser and give you the opportunity to modify them. Go to the Proxy tab and the Intercept sub-tab and enable interception.
After activating the interception, refresh you connection to http://slashdot.org in the browser. Check out Proxy / HTTP History. It should look similar to this:
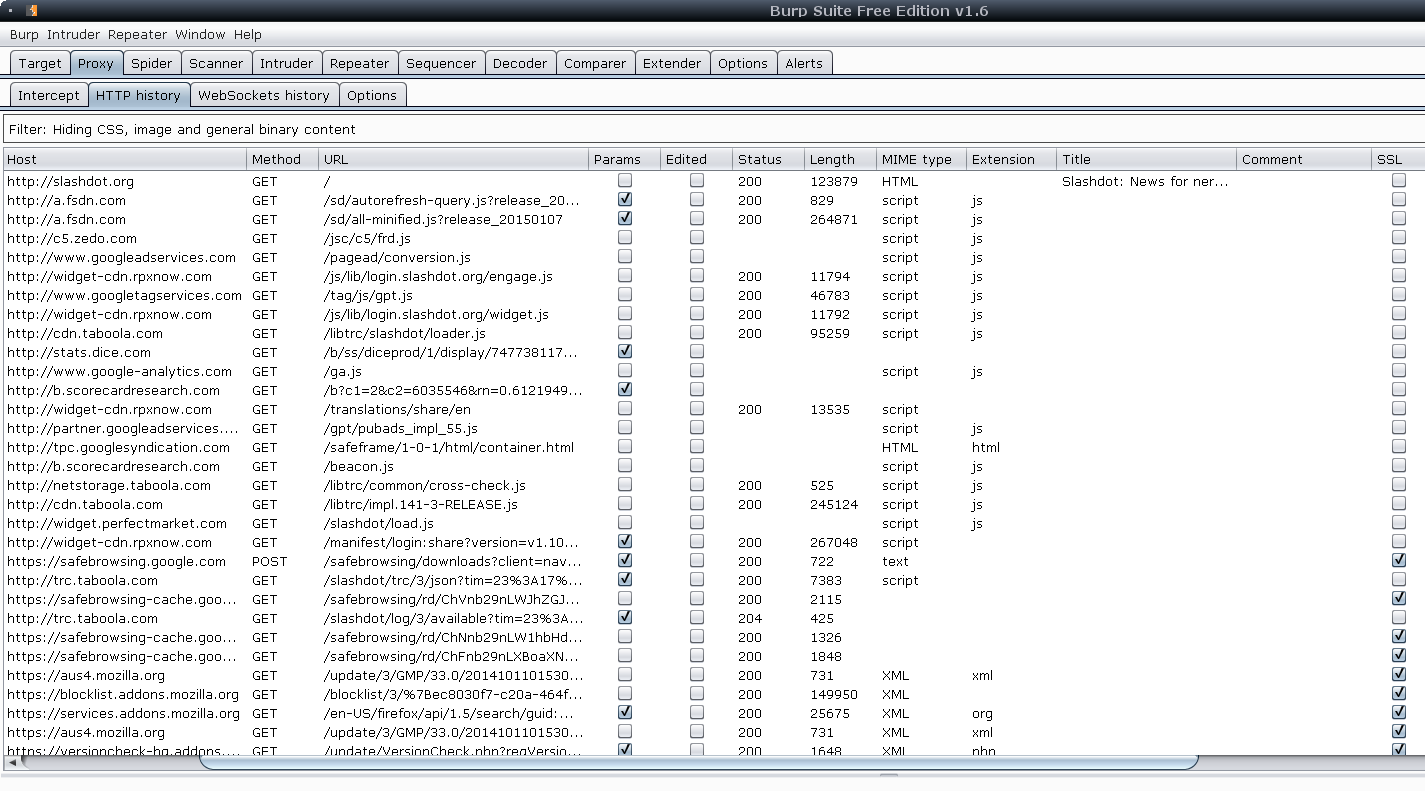
The proxy allows you to modify both ways: the request and the response.
[1p] Activate response intercept and modify the first news story title into “Riemann Hypothesis solved. The answer was 42”.
Options sub-tab in the Proxy Tab and enable the Intercept responses based on the following rules checkbox. You should also check the rules using the Or operator.
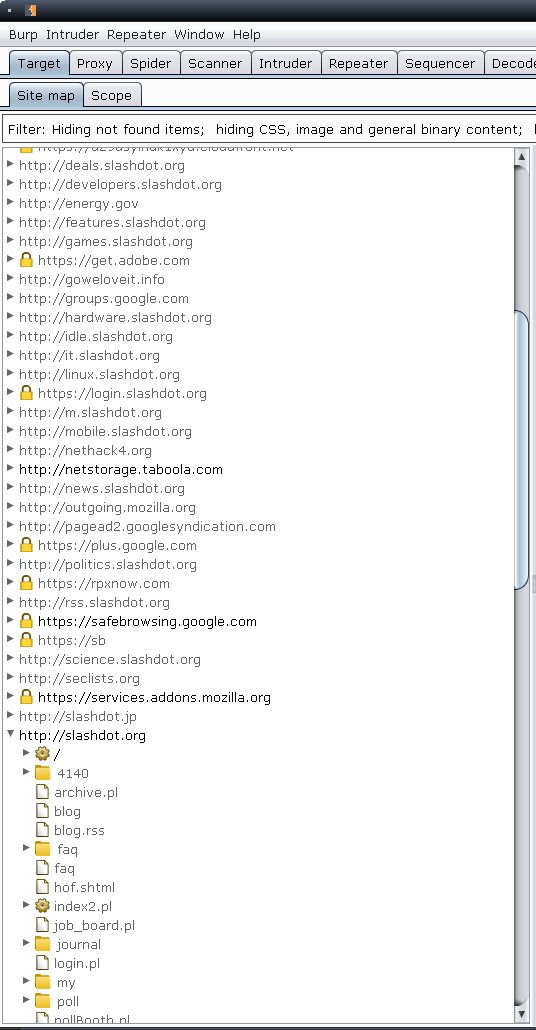
[2p] b. Surface Mapping
Path discovery and spidering is another useful approach needed in assessing web app security. Using the previous task, check out what files were mapped inside the slashdot domain and which URLs it points to. You will use Burp Target for this and obtain this list:
[1p] Discover some user home pages by investigating the paths within slashdot.org
~.
[1p] Our goal is to spider the Damn Vulnerable Web App (DVWA) start page at $SERVER_IP/~dvwa. For that, first you will need to go to Target and add it to the scope beforehand. The start the spidering process by clicking on the "Spider is paused" button.
Now, access the the Damn Vulnerable Web App (DVWA) start page at $SERVER_IP/~dvwa and log in to DVWA using the following credentials:
- User:
admin - Password:
password
Make sure to also provide Burp with those credentials when it asks for them. We will cover most of the DVWA-related tasks in the following lab.
By only looking at the mapped files identify the page that might contain a file inclusion vulnerability.
?page=... in the Sitemap view on the top-right higher window. It's in the vulnerabilities/ subfolder in the site map.
[5p] 3. CMS Mini security analysis
In this set of tasks you will deal with 2 important vulnerabilities:
- Information disclosure
- Local file inclusion
We will use a very insecure CMS (without having access to the source code). Check out the CMS mini start page at $SERVER_IP/~cmsmini.
What information can you gather from it strictly from the browser? Can you see any internal pages in Target?
[1p] a. Forceful path discovery
There is a directory that privileged users can access but the path to it is initially unknown to you as it doesn't appear in Target.
[1p] You need to do a brute force attack using Intruder to find out what it is.
- Select a request from HTTP History and right click to Send it to Intruder.
- In the Intruder tab add a payload position in the path. It should look similar to:
GET /~cmsmini/§ § HTTP/1.1
- In payloads select Runtime file and use cns_dirbust.txt
- When you're ready click Intruder (from the window menu not the tab) and Start Attack.
- Use the status code to distinguish between responses.
§ sign is the payload marker sign in the Intruder menu in the Positions submenu. You click on the button dubbed Add § to the right of the page screen.
[1p] b. Information disclosure
Now go to the previously discovered subdirectory in the site and have a guess at the password. :) After a failed attempt what new information does the browser supply you with about the site? What about the info that Burp gathered in Target? Page information has been disclosed!
[1p] Find out how the page information was gathered. What did Burp see differently from the browser? Check out the requests in HTTP History one by one and look at the response in Raw form and then in the Render form.
Check out the juicy pages mapped under the admin subdirectory. What did you think about the security of this application under the browser and what do you think now that you're investigating it in a systematic approach?
[3p] c. Local File Inclusion
There are two potential file inclusion vectors:
/view/?path=&p=…/admin/edit.php?path=&name=…
Find out which of these (if any) can be used. You will be using Repeater for this task. In Target right click on one of the above pages , click Send to Repeater and go to the Repeater tab. In the left window you can see the request that would be sent and you can modify it at will.
For starters, read /etc/passwd. You should use a path such as ../../../../etc and a name for passwd,
[2p] Find out what the password for the admin page is. You will need to browse the source code of CMS mini and see where config.php is placed.
