

This is an old revision of the document!
Lab 3 - Securing Network Devices (not final version)
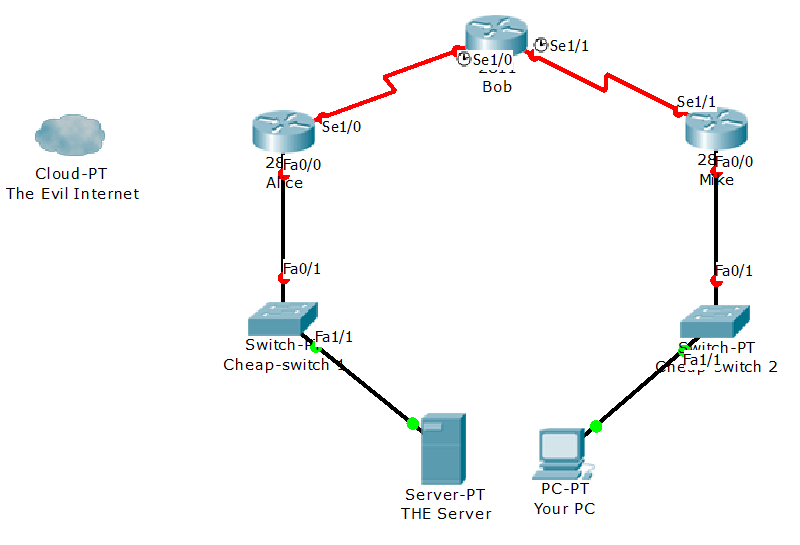
Topology
Interfaces
Open the Lab3_CNS_Topology.pkt file. To solve the following tasks, DO NOT configure anything on the switches.
| Device | Interface | IP Address | Subnet Mask | Default Gateway | Switch Port |
|---|---|---|---|---|---|
| Alice | Fa0/0 | 192.168.1.1 | 255.255.255.0 | N/A | S1 Fa0/1 |
| Alice | S1/0 | 10.1.1.1 | 255.255.255.252 | N/A | N/A |
| Bob | S1/0 | 10.1.1.2 | 255.255.255.252 | N/A | N/A |
| Bob | S1/1 | 10.2.2.2 | 255.255.255.252 | N/A | N/A |
| Mike | Fa0/0 | 192.168.3.1 | 255.255.255.0 | N/A | S3 Fa0/1 |
| Mike | S0/1 | 10.2.2.1 | 255.255.255.252 | N/A | N/A |
| The Server | - | 192.168.1.3 | 255.255.255.0 | 192.168.1.1 | S1 Fa0/1 |
| Your PC | - | 192.168.3.3 | 255.255.255.0 | 192.168.3.1 | S3 Fa0/1 |
Tasks
Important! „?” and „tab”:
- Remember to type „?” in all configuration modes to list the commands available to you. The „?” can be used to list all the forms of a certain command, too. Simply type „?” after the first word in the command and you will get a list of parameters that you can use to continue the command. For example, typing configure ? will return a list in which you will find terminal as an option.
- The „tab” key autocompletes the words that make up commands, as long as there is no confusion. For example, pressing „tab” after typing c will not give you configure, but pressing „tab” after conf will.
Important! Writing answers:
- Whenever you are asked to answer a question that doesn’t require configuration, type the answer in a notepad window and keep it until the lab assistant checks that task.
Important! Telnet.
- You can telnet from any device to any router in this scenario as long as you have properly configured the IP addressing scheme. Don’t forget that a router will not allow you to telnet to it if you don’t configure a password on its vty lines first.
- Hint: To erase the existing key pairs on a router (for ssh access, for example), use the „crypto key zeroize rsa” command.
- [1p] Configure the hostnames and the IP addressing scheme as shown in the topology. Make sure that all devices have full connectivity with their neighbors. Hint: Don’t forget about the clock rate on the serial interfaces.
- [+1 = 2p] Create the required static routes on the routers and the default routes on the server and the PC, in order to be able to ping the server from the PC.
- [+0.5 = 2.5p] On all routers: Configure a timeout value of 5 minutes on all router consoles.
- [+0.5 = 3p] On Alice and Mike: Configure a global minimum password length of 10 characters for all router passwords.
- [+0.5 = 3.5p] On Alice and Mike: Configure the enable secret password and set paswords for the vty lines (0 through 4) and the console. Choose any passwords you like but make sure you remember them!
- [+0.5 = 4p] On Alice and Mike: Look at the running configuration file. The passwords you entered are shown in clear text. Encrypt them. Look at the running configuration file again. At what level is the enable secret password encrypted? At what level are the other passwords encrypted?
- [+0.5 = 4.5p] On Alice and Mike: Create the user student with a clear text password and the user superstudent with an encrypted password. Configure the consoles so that only these two user accounts will be able to log in on the consoles of both routers.
- [+0.5 = 5p] Telnet from Bob to Alice. Are you being asked for a username? Configure Alice so that only the previous two user accounts will be able to telnet into the router. Do the same for Mike, too.
- [+1 = 6p] On Alice and Mike: Configure the routers to block any login for 5 seconds in case they detect 3 failed attempts in a 60-second interval. „Fail” one or more logins and use „show login” to check your settings.
- [+0.5 = 6.5p] On Alice: Make Alike log every successful login to the router. Test this with a telnet from Bob and save the generated log message in notepad.
- [+1.5 = 8p] On Bob: Configure Bob to allow SSH connections from both Alice and Mike. Test by SSH-ing from one of the other two routers.
- [+0.5 = 8.5p] On Bob: Set the default SSH timeout to 90 seconds and the maximum authentication retries to 5.
- [+1 = 9.5p] a) On Mike: Create a view named junior_admin. This view can only run all „show” and all „debug” commands on the router. Test the view and list the available commands. On Mike: Create a view named student_admin. This view can only run the „show ip interface brief” and the „show version” commands. Test the view and list the available commands.
- Views must be password-protected
- The router must have an enable password in order to enter the root view
- Enable AAA
- [+0.5 = 10p] On Bob: Show the Flash memory contents. Secure the boot-image and the configuration file. Show the Flash contents again. What’s missing? Display the name and location of the secured image and configuration file.
- [+1 = 11p] On Alice: Connect a FastEthernet straight-through cable between the „Internet” and Alice’s FastEthernet 0/1 interface. Run „auto secure” on Alice. Answer all questions accordingly. Consider the Fast0/1 interface to be connected to the Internet. Configure CBAC, too. View the running configuration file after auto secure completes.
