
2D Animations and Interactions
2D animations in Unity
In Unity (current version) we have two possibilities to make 2D animations: sprite-sheet si bone-based.

In the first image, the character is presented in several positions, with a sequence of positions for different actions. This image represents a sprite-sheet, being very popular in 2D games. This allows you to clearly imagine how the game will move.

In the second image, the dragon is divided into several parts of the body (head, body, arms and so on), requiring a newer 2D animation technique, commonly called bone-based animation. As the name suggests, the animation will be bone-based, in which each bone in the body can have a specific action or animation. With all the main body parts separate, it allows developers to create animations directly in the editor. This new animation technique is very similar to the one used in 3D animation.
Resources
Animator Controller
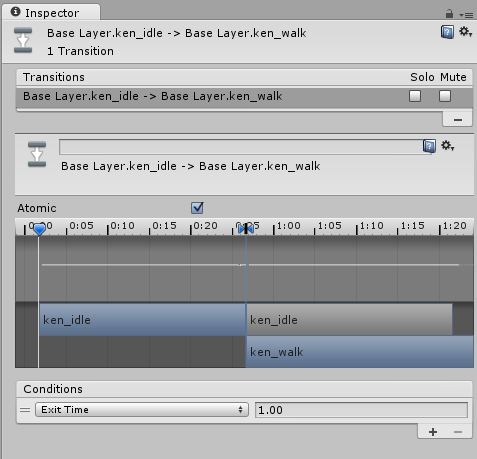
After making animations (check the tutorials above) the next step is to configure these animations so that we can use them, and be able to transition between them. For this, we will use an Animator Controller. This controller works as a state machine, each state being an animation.
To use the animations you can add drag-and-drop in the Animator.

For fluent and controlled animations, we must define the transitions between them. Transitions have many properties, including activation times, conditions, etc.


Conditions are used to control when a transition occurs. For example, we can use a state parameter to move from one animation to another, or other conditions (for example if it is on the ground, in the air, receives damage, etc.)
For example, we can use the following convention for a status parameter:
- ken_idle = 0
- ken_walk = 1
- ken_crouch = 2
- ken_jump = 3
- ken_hadooken = 4
and we set the transition condition from Idle to Walk state=1. This will tell the character, if in Idle, to transition to the Walk animation if the status parameter changes to 1.
Controlling the states of an Animator
To change the status of an animator, you must first add the Animator component to the object. Then we can control the parameters defined by the functions available in the Animator class.
const int STATE_IDLE = 0;
const int STATE_WALK = 1;
const int STATE_CROUCH = 2;
const int STATE_JUMP = 3;
const int STATE_HADOOKEN = 4;

string _currentDirection = "left";
void Start()
{
        //define the animator attached to the player
        animator = this.GetComponent<Animator>();
}

void Update()
{
        if (Input.GetKey ("right")) {
          changeDirection ("right"); //schimba directia personajului
          transform.Translate(Vector3.left * walkSpeed * Time.deltaTime); //muta personajul
          animator.SetInteger ("state", STATE_WALK); //activeaza animatia

        }
}

void changeDirection(string direction)
     {

         if (_currentDirection != direction)
         {
             if (direction == "right")
             {
             transform.Rotate (0, 180, 0);
             _currentDirection = "right";
             }
             else if (direction == "left")
             {
             transform.Rotate (0, -180, 0);
             _currentDirection = "left";
             }
         }

     }
Background animation
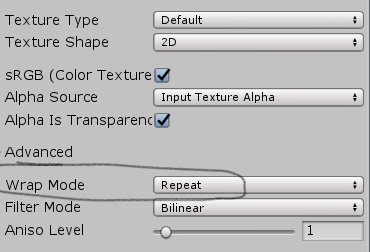
To animate the background of a 2D game, we can alter the position of the texture. Thus, we must define a material with a texture, and apply it on an object (usually a quad). After that we have at our disposal the Render component in which we can access the material and implicitly the textures, to which we can add an offset, depending on the position of the character, or a movement in time, etc.
   renderer = GetComponent<Renderer>();

   renderer.material.SetTextureOffset("_MainTex", offset);

   // "_MainTex" is the main diffuse texture. This can also be accessed via mainTextureOffset property.
   // "_BumpMap" is the normal map.
   // "_Cube" is the reflection cubemap.
To work properly, the texture you use must be set to Repeat
Animation projectiles / shooting
For shooting animation, a status is generally used to update the player's animation, and the projectile is generated as follows (recommended):
- A script is added to the weapon (which is on the scene) that manages the projectile generation and direction
- Starting from the location of the weapon, a projectile (using the Instantiate function, already studied) is instantiated (prefab as a rule, it must not already exist on the scene, using the position of the weapon). The projectile has attached a script containing details of speed, damage, etc.
- The projectile has a continuous translational motion in one direction, until it reaches a limit or collider when it triggers
Animations and scene instancing
Instantiate (gameobject, position) is used for instancing objects.
To generate content only in visual space on the screen, you can define objects that fix this frame, and then randomly generated in this interval.
The generated objects can be scripted so that they have continuous animations and movements.
Character movement
The character's movement can be done using a RigidBody2D component and applying forces or movements.
rb = GetComponent<Rigidbody2D>();
float moveHorizontal = Input.GetAxis ("Horizontal");
float moveVertical = Input.GetAxis ("Vertical");

Vector3 movement = new Vector3 (moveHorizontal, 0.0f, moveVertical);

rb.AddForce (movement * speed);

rb.MovePosition (transform.position + offset * Time.deltaTime);
Collision
For collision detection a collider2D can be used. For easy interaction, a Trigger can be generated at the collision event by ticking the Trigger box in the component. After that you can retrieve the event and the object with which the collision is made.
void OnTriggerEnter(Collider otherObject) {

		score += 10;
		scoreText.text = score.ToString();
		Destroy(otherObject.gameObject);

	}
Tasks
Making a 2D scroller game
- Configure scenes for 2D
- Add to the scene an image that represents the game background (animated)
- Add an animated character to the scene:
- it can be controlled from the keyboard
- shoots projectiles at enemies
- animated in several states (minimum 3)
- has a score that increases when killing enemies
- Add at least two types of enemies animated by different techniques
- destroyed on collision with the player's projectile
- destroyed collision with the player
- generated dynamically, at random positions and they move continuously
