
This is an old revision of the document!
Programarea obiectelor
Cerinte
Realizati o scena care sa contina:
- Personaj (player)
- Controlabil
- Are cel putin 2 atribute (de ex strength si dexterity)
- Are viata (health) si viteza (speed) variabile in functie de atribute (de ex strength si dexterity)
- Are un XP care creste la diverse evenimente (de ex elimina un inamic, elimina un turn etc.)
- Poate interactiona cu obiecte (e un corp solid)
- Poate ataca inimicii
- Minim 3 obiecte de tip pick-up care pot creste atributele personajului - cate unul pentru fiecare atribut si viata.
- Inamici care se misca pe harta
- In momentul in care detecteaza player-ul (intr-o anumita raza de exemplu) se intorc cu fata catre player si il urmaresc
- Au viata (health)
- Pot muri - cand mor ofera experienta personajului
- Un minimap cu buline rosii pentru inamici si bulina albastra pentru player
Documentatie video
Documentatie extinsa text
Sumar documentatie
todo: raycast pentru selectia obiectelor - point and click mers la ele
Interactiunea cu obiectele
Interactiunea cu obiectele in spatiul 3D poate fi extrem de complexa, intrucat exista foarte multe forme de interactiuni: inamici, obiecte de pickup, deschidere de usi, activare de manivele etc. Fiecare dintre aceste interactiuni are specificul ei, dar abstractizand, putem deduce ca fiecare interactiune se intampla intr-o anumita raza si cu un anumit punct de interactiune. Pentru a defini usor aceste lucruri, putem crea o clasa generica denumita InteractionObject cu o metoda abstracta (virtuala) ce defineste interactiunea in detaliu.
public class InteractionObject : MonoBehaviour {

  public float radius = 1f;
  public Transform interactionPoint;
  Transform interactionObject;
  bool done = false;

  //metoda abstracta, speficica fiecarui tip de interactiuni
  public virtual void Interaction ()
  {

  }

  void Update ()
  {
      float distance = Vector3.Distance(interactionObject.position, interactionPoint.position);

      if (distance <= radius && !done) // avem interactiune cu obiectul, pot sa afisez informatii: de ex "Press E to use"
      {
        done = true;
        Interaction();
      }
    }
  }

}
La fel de bine aceste interactiuni pot fi detectate folosind sistemul de colizuni din Unity
Physics Events
/* Both objects have to have a Collider and one object has to have a Rigidbody for these Events to work */
private void OnCollisionEnter(Collision hit) { Debug.Log(gameObject.name + " just hit " + hit.gameObject.name); }
private void OnCollisionStay(Collision hit) { Debug.Log(gameObject.name + " is hitting " + hit.gameObject.name); }
private void OnCollisionExit(Collision hit) { Debug.Log(gameObject.name + " stopped hitting " + hit.gameObject.name); }

/* Trigger must be checked on one of the Colliders */
private void OnTriggerEnter(Collider hit) { Debug.Log(gameObject.name + " just hit " + hit.name); }
private void OnTriggerStay(Collider hit) { Debug.Log(gameObject.name + " is hitting " + hit.name); }
private void OnTriggerExit(Collider hit) { Debug.Log(gameObject.name + " stopped hitting " + hit.name); }

/* For 2D Colliders just add 2D to the Method name and the Parameter Type */
private void OnCollisionEnter2D(Collision2D hit) { }
private void OnCollisionStay2D(Collision2D hit) { }
private void OnCollisionExit2D(Collision2D hit) { }
private void OnTriggerEnter2D(Collider2D hit) { }
private void OnTriggerStay2D(Collider2D hit) { }
private void OnTriggerExit2D(Collider2D hit) { }
Astfel, toate obiectele ce vor avea interactiuni, vor mosteni aceasta clasa. Spre exemplu pentru un obiect de pickup putem avea urmatoarea secventa:
public class PickupObject : InteractionObject {

  public override void Interaction()
  {
    base.Interaction(); // se apeleaza metoda parinte, in caz ca avem ceva generic

    //mecanica
    ...

    //distrugem obiectul
    Destroy(gameObject);

  }
}
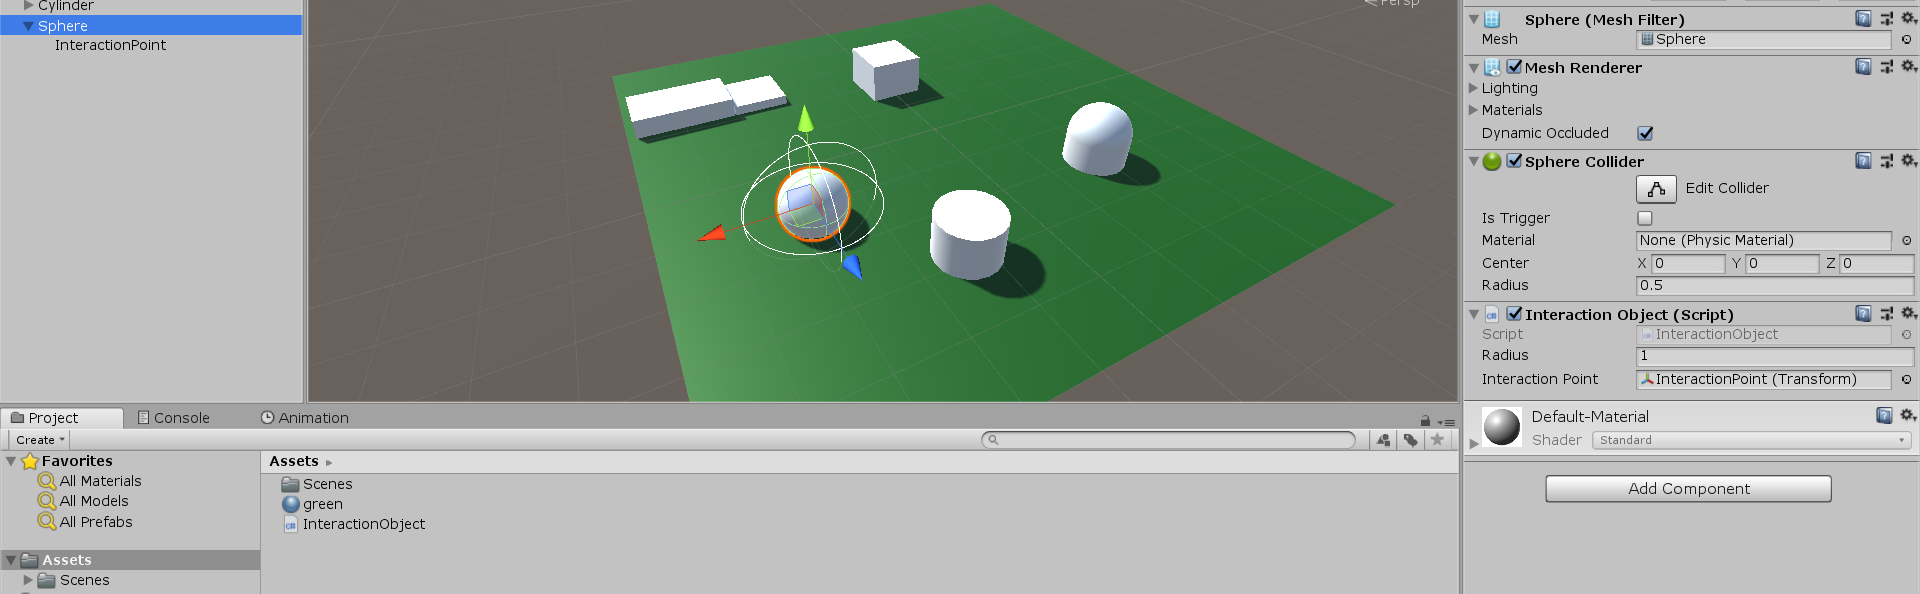
Pentru a controla mai bine zona de actiune (radius) si punctul de interes pentru un obiect de interactiune (InteractionObject), se poate defini o functie de editor, atunci cand obiectul este selectat. In exemplul de mai jos, la selectarea obiectului se va afisa o sfera wireframe de culoare alba.
void OnDrawGizmosSelected ()
{
  Gizmos.color = Color.white;
  Gizmos.DrawWireSphere(interactionPoint.position, radius);
}
Referinta globala la player
O problema in programarea interactiunilor este detectarea player-ului, in sensul de referinta. Astfel, avem mai multe variante:
- putem cauta un obiect dupa tag/nume etc.
- intr-o variabila target putem referentia direct player-ul (dar asta inseamna ca la fiecare agent trebuie mapat)
- putem folosi un singleton in care se tine referentiaza playerul si poate fi accesat de oriunde
public class PlayerManager : MonoBehaviour {

  public static PlayerManager instance;
  public GameObject player;

  void Awake()
  {
    instance = this;
  }

}
Folosind varianta simpla cu singleton, putem lua pozitia player-ului de interes:
target = PlayerManager.instance.player.transform;
Astfel, putem efectua usor operatii care tin de player - de exemplu putem orienta inamicii sau un npc cu fata catre player, in momentul unei interactiuni.
        //Roteste cu 90 grade
        void RotateN() {
         Vector3 currentRotation = transform.rotation;
         Vector3 wantedRotation = currentRotation * Quaternion.AngleAxis(-90, Vector3.up);
         transform.rotation = Quaternion.Slerp(currentRotation, wantedRotation, Time.deltaTime * rotationSpeed);
        }
        //Roteste inamicul cu fata catre player
	void FaceTarget ()
	{
		Vector3 direction = (target.position - transform.position).normalized;
		Quaternion lookRotation = Quaternion.LookRotation(new Vector3(direction.x, 0, direction.z));
		transform.rotation = Quaternion.Slerp(transform.rotation, lookRotation, Time.deltaTime * 5f);
	}
Inamici
Astfel, pentru inamici putem defini un controller cu un radius de actiune, si un gizmos pentru vizualizare usoara a acestuia in editor.
public class EnemyController : MonoBehaviour {

  public float radius = 2;

  void OnDrawGizmosSelected() {
    Gizmos.color = Color.red;
    Gizmos.DrawWireSphere(transform.position, radius);
  }


}
 Diferenta este ca acesti agenti vor raspunde automat la anumite evenimente:
- inamicii de obicei incep sa interactioneze atunci cand player-ul intra intr-o anumita raza de actiune
- NPC-urile interactoneaza la fel, bazate pe o raza de actiune sau efectiv interactiune directa (click)
Quest System
In ceea ce priveste quest-urile, sunt foarte multe posibilitati de abordare, dar in general implica urmatoarele elemente:
- obiectivele quest-ului
- recompensele
- cine gestioneaza quest-ul
Astfel, o abordare sugerata este sa se abstractizeze o clasa de tip Quest, una de tip Goal (obiectiv) si una de tip Recompensa, intrucat exista multe tipuri in care se pot instantia aceste lucruri.
Exemple de tipuri de Obiective:
- Kill - kill a bunch of stuff
- Gather - gather stuff for me
- Deliver - deliver my live letter
- etc.
Exemple de tipuri de Recompense:
- items
- experience
- gold
- skill
- etc.
Exemplu de clasa generica de tip Quest
public class Quest : MonoBehaviour {

  public List<Goal> Goals = new List<Goal>();
  public List<Reward> Rewards = new List<Reward>();
  public bool completed;

  public void CheckGoals() {
    completed = Goals.All(g => g.completed); //questul este gata cand toate obiectivele sunt complete
  }

  public void GiveReward() {
    //in functie de tipul recompensei se adauga obiecte in inventar, sau se adauga experienta, skill points etc.
  }


}
Apoi, un exemplu de un quest concret.
public class RandomSlayThingsQuest : Quest {

  void Start()
  {
    QuestName = "Random Slayer";
    Description = "Kill some time";

    Goals.Add(new KillGoal( ...));
    Goals.Add(new KillGoal( ...));

    Rewards.Add(new ItemReward( ...));
    Rewards.Add(new ExperienceReward( ...));

  }

}
Si un exemplu de Obiectiv
public class KillGoal : Goal {

  bool completed;
  int currentAmmount;

  public KillGoal(int enemyId, int ammount) {
    ...
  }

  public override void Init() {
    //listen to enemy death event
    EnemyManager.onDie += EnemyDied;
  }

  void EnemyDied(enemy) {
    this.currentAmmount++;
    if(this.currentAmmount >= ammount) {
      this.completed = true;
    }
  }


}
In ceea ce priveste cine gestioneaza questul, acesta este de obicei un NPC, deci putem extinde clasa NPC cu cateva lucuri specifice:
public class QuestNPC : NPC {


  public bool assigned;
  public Quest quest;

  public override void Interaction()
  {
    base.Interaction(); // se apeleaza metoda parinte

    if(!assigned) {
      //dialog
      //assign
    }

    void CheckQuest() {
      if(quest.completed) {
        quest.GiveReward();
      }
    }
  }
}
