
Lab 06 - Docker Compose
Objectives
- Understand the YAML file syntax
- Learn how to deploy multi-container applications using Docker Compose
- Get familiar with Postman
- Learn how to interact with a database
Contents
Tasks
Introduction
Normally, in order to run containers we need to execute the corresponding run command (docker run) and set all the necessary parameters. This process can be difficult and repetitive when we need to start multiple containers. One way to “save” the running configuration is to create scripts. The problem with running multiple scripts is the loss of uniformity in configuration (which container connects to which network, who communicates with whom, etc.).
Docker Compose is a utility created by Docker that is used to centralise the configuration process of a container-based application in a declarative manner, using Yet Another Markup Language (YAML) configuration files.
Moreover, the format for Compose files is also used in Docker Swarm, the orchestrator created by Docker for managing Docker services.
Installation
For Windows and MacOS, Docker Compose is part of the Docker Desktop installation. For Linux, the installation is done according to the official guide.
Key items
YAML file format
YAML files are generally used to write declarative configurations. The format is very easy to understand and employ, as follows:
- key:value elements are used
- indented paragraphs are children properties of the previous paragraphs
- lists are delimited by -.
Docker Compose file example
# docker-compose.yml
#version: "3.8"

services:
    api:
        build: . # builds the image from a Dockerfile
        image: register-image-name:version # uses an image from a registry
        environment:
            ENVIRONMENT_VARIABLE: value
        ports:
            - "5000:80"
        networks:
            - lab5-network

    postgres:
        image: postgres:12
        volumes:
            - lab5-volume:/var/lib/postgresql/data
            - ./scripts/init-db.sql:/docker-entrypoint-initdb.d/init-db.sql
        networks:
            - lab5-network

volumes:
    lab5-volume:

networks:
    lab5-network:
Version
The version attribute describes what functionalities will be loaded when running the Docker Compose utility.
version field has been deprecated on modern docker compose versions.
Services
The services attribute describes the services/containers that will run after the configuration is started by Compose. Each service represents a container that will have the name and configuration of the service. In the example above, the containers will be named api and postgres. The most important properties of services are the following:
- build - specifies the path where the Dockerfile the container will be built from is located
- image - specifies the name of the image used to run the container
- ports - a list of entries with the format “host_port:service_port”, which specifies which ports are exposed and/or mapped
- volumes - a list of entries with the format “host_volume:service_path” where the volume mappings are specified; the same rules that apply to CLI commands are maintained here as well; “host_volume” can be a standard volume or a bind mount
- networks - the list of networks which the service/container belongs to
- environment - object with entries of type “service_variable_name: value” which injects the environment variables specified when running the service/container.
Volumes
The volumes attribute describes the volumes used in the configuration. Volumes are passed as objects. If we do not want to change the default configuration, the value is an empty field.
Networks
The networks attribute describes the networks used in the configuration. Networks are passed in the form of objects. If we do not want to change the default configuration, the value is an empty field. An example of a network configuration is the following (where we use a network that already exists because it was created independently of the Docker Compose file):
networks:
    my-network-that-actually-exists:
        external: true
        name: the-original-network-that-already-exists
In the example above, my-network-that-actually-exists is just a “renaming” of an existing network.
Docker Compose Commands
The commands for interacting with Docker Compose are syntactically similar to the classic Docker commands for both version 1 and version 2. Below, you can see the most used commands. For version 1, the utility is docker-compose, while for version 2 the utility is docker with the compose parameter. For more information, you can read the official documentation for version 1 and the official version 2 documentation. The main difference between versions 1 and 2 is that there are several additional commands in version 2.
$ docker-compose start                        # starts containers (V1)
$ docker-compose stop                         # stops containers (V1)
$ docker-compose pause                        # pauses containers using a SIGPAUSE signal (V1)
$ docker-compose unpause                      # removes containers from the pause state (V1)
$ docker-compose ps                           # lists active containers (V1)
$ docker-compose up                           # builds, recreates, starts and attaches containers to a service (V1)
$ docker-compose up -d                        # starts services in the background, detached from the terminal that initialised them (V1)
$ docker-compose up --build                   # creates images before starting containers (V1)
$ docker-compose -f my-compose.yml up         # uses the specified Compose file instead of the default one (V1)
$ docker-compose down                         # stops containers and deletes them, along with the networks, volumes, and images created (V1)
$ docker-compose rm                           # deletes all stopped containers (V1)
$ docker-compose rm -s -v                     # with -s all containers are stopped and with -v the anonymous volumes attached are also deleted (V1)

$ docker compose start                        # starts containers (V2)
$ docker compose stop                         # stops containers (V2)
$ docker compound pause                       # pauses containers using a SIGPAUSE signal (V2)
$ docker compose unpause                      # removes containers from the pause state (V2)
$ docker compose ps                           # lists active containers (V2)
$ docker compose ls                           # lists all container stacks (V2)
$ docker compose -p my-proj -f my-comp.yml up # uses the specified Compose file instead of the default one and sets a project name (V2)
$ docker compose down                         # stops containers and deletes them, along with the networks, volumes, and images created (V2)
$ docker compose rm                           # deletes all stopped containers (V2)
$ docker compose rm -s -v                     # with -s all containers are stopped and with -v the anonymous volumes attached are also deleted (V2)
Combining multiple Docker Compose files
Docker Compose is recommended for use only at the local development stage. Docker Swarm (or other orchestrators, such as Kubernetes) should be used for testing or production environments.
Precisely because it is used in the development stage, Docker Compose has a mechanism to combine several Compose files to create different running configurations without replicating the common parts.
To run a Compose configuration based on multiple YAML files, you can use the command below:
$ docker-compose -f file-compose-1.yml -f file-compose-2.yml up --build # V1
$ docker compose -f file-compose-1.yml -f file-compose-2.yml up --build # V2
In the command above, the information in file-compose-2.yml will overwrite or complete the information in file-compose-1.yml. This is useful for quickly testing various configurations (or combinations of configurations).
Tasks
00. [00p] Getting started
In order to solve the tasks, you need to have Docker installed, or you need to use Play with Docker, as described in lab 4.
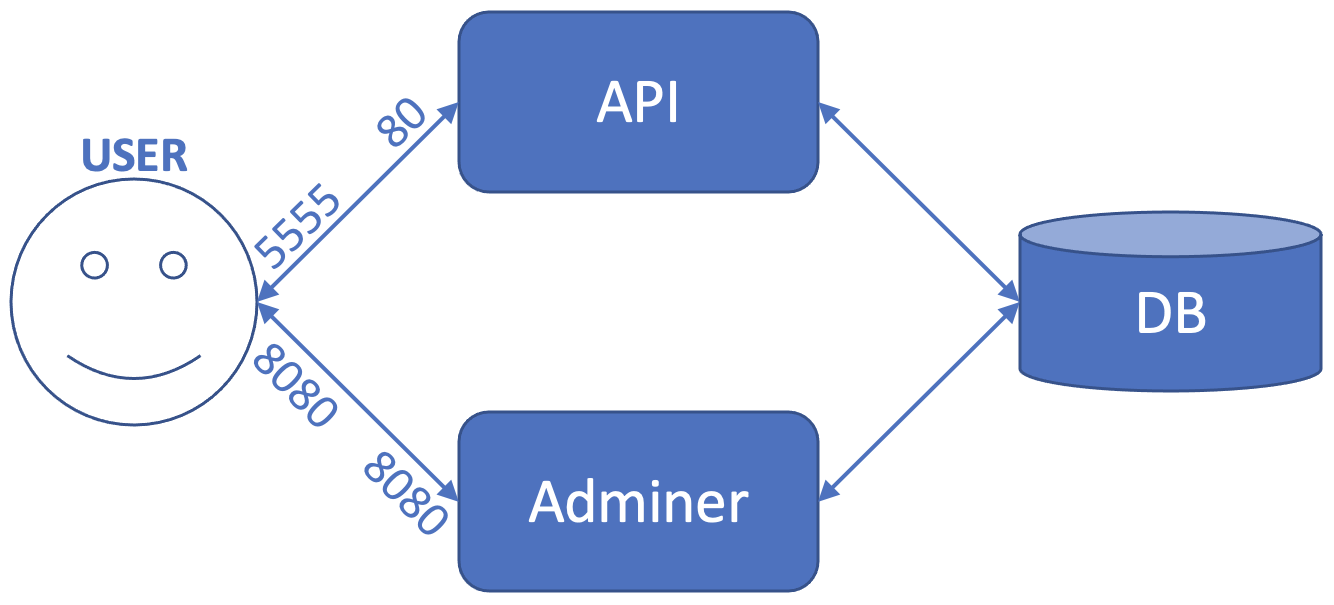
01. [30p] Running a multi-container application
Subtasks
- based on the sources and the Dockerfile in the backend folder from the lab archive, build an image with the name lab5-api-image
- create a bridge network called lab5-db-network
- create another bridge network called lab5-adminer-network
- create a volume named lab5-db-volume
- from the parent folder of backend, launch a container in the background for a database with the following features:
- a bind mount will be attached that will map between the "$(pwd)"/database/init-db.sql file on the local machine (this will be the source to the bind mount flag and can be found in the lab archive) and the /docker-entrypoint-initdb.d/init-db.sql file in the container to be run (this will be the destination)
- attach the previously-created lab5-db-volume volume (as source) to the /var/lib/postgresql/data path in the running container (as destination)
- the container will be part the previously-created lab5-db-network network
- the following environment variables will be specified (in a docker run command, this is done as follows: docker run -e NAME=value):
- variable POSTGRES_USER with value admin
- variable POSTGRES_PASSWORD with value admin
- variable POSTGRES_DB with value books
- the container will be called lab5-db
- the container will run the postgres image from the official register
- add the lab5-db container to the lab5-adminer-network network
- launch a container in the background for a database admin with the following features:
- the container will expose port 80 and map it to 8080 on the local machine
- the container will be called lab5-adminer
- the container will be part the previously-created lab5-adminer-network network
- the container will run the adminer image from the official register
- start a container in the background based on the previously-created lab5-api-image image, with the following features:
- the container will be part of the previously-created lab5-db-network network
- the following environment variables will be specified:
- variable PGUSER with value admin
- variable PGPASSWORD with value admin
- variable PGDATABASE with the value books
- variable PGHOST with value lab5-db
- variable PGPORT with value 5432
- the container will be called lab5-api
- the container will expose port 80 and map it to port 5555 on the local machine
02. [10p] Testing a web application using Postman
The application started earlier is a web application that does not have a graphical interface (i.e., a frontend). For this reason, it can only be tested by sending HTTP requests using a tool such as Postman. We will now show how to use Postman to connect to a web application backend.
In the Postman application, we can create the two types of requests that we want to test:
- GET - requests information from the backend (in our case, the list of books in the library)
- POST - sends information to the backend (in our case, adds a book to the library).
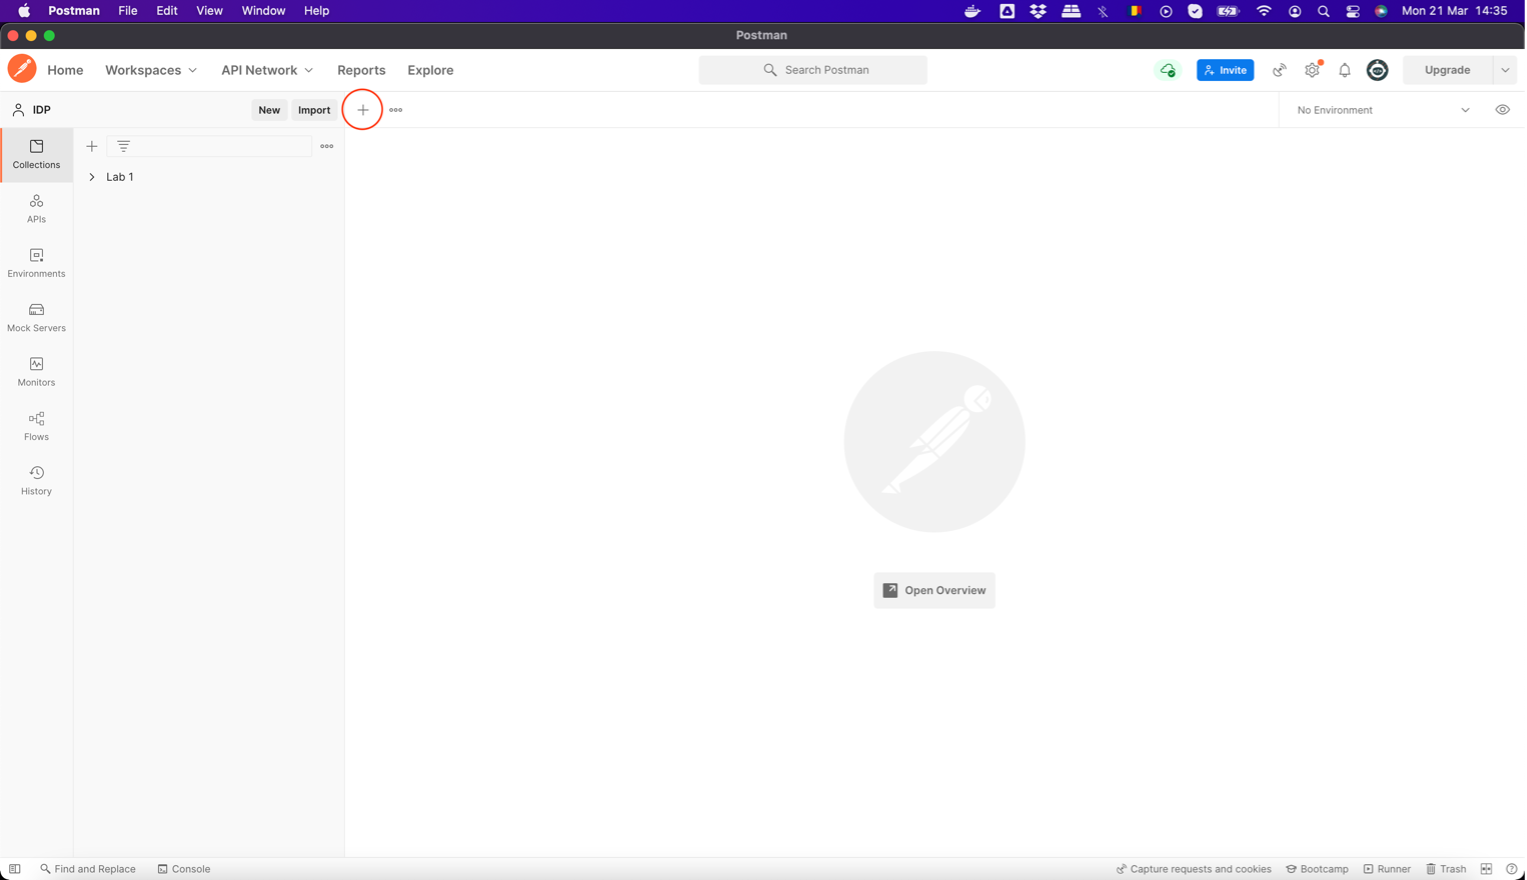
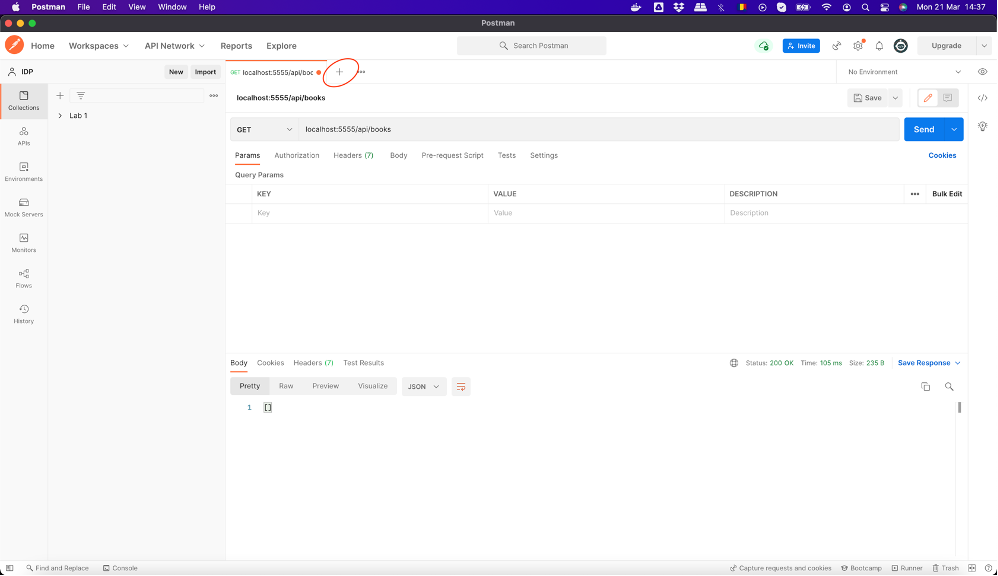
The steps to accomplish this are outlined below. Firstly, once we have opened the Postman application, we press the + button, as can be seen in the image below (the button is circled in red).
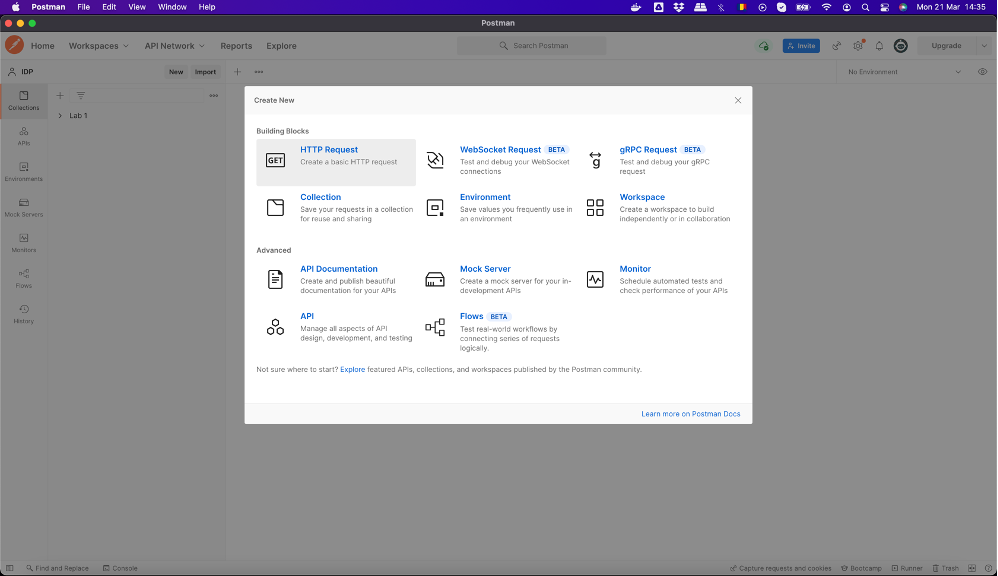
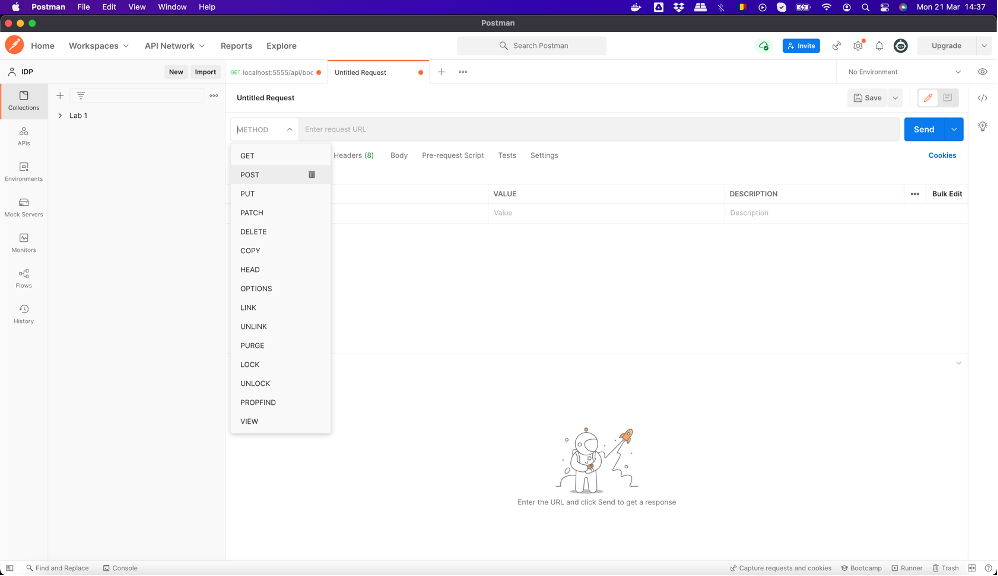
Next, we select the HTTP Request option, as shown below.
We add the first request, whose type should be GET. In the address bar, we write localhost:5555/api/books/ and then we press the Send button (shown in red in the image below).
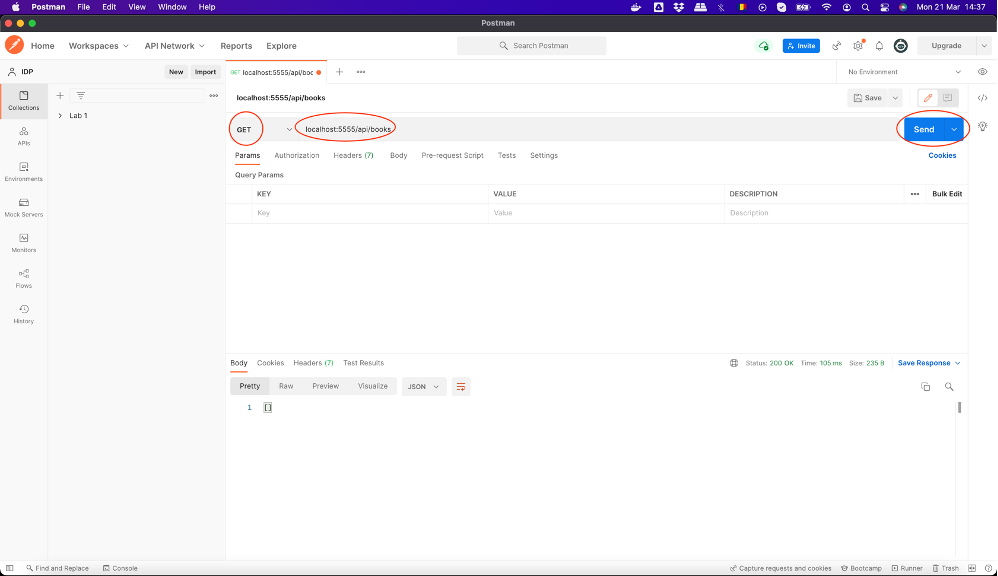
Once the request is sent and everything is in order, we should receive a reply with the status 200 OK (circled in the image below), which contains an empty string (because there are currently no books in the library), as shown below.

Next, we can create a POST request. We start by pressing the circled + button in the image below.
Next, we set the request type to POST and then put the same address as before.
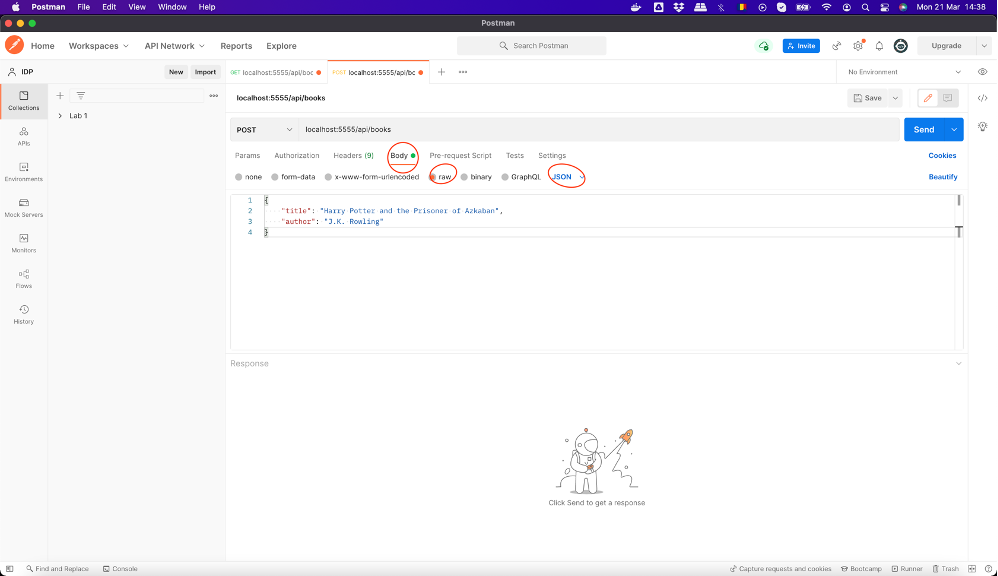
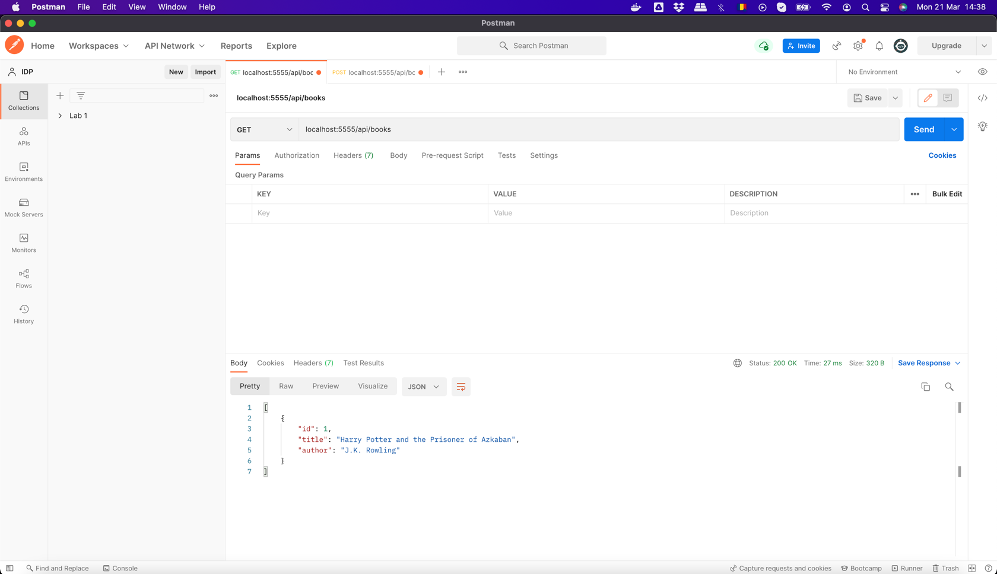
Because we are now adding a book, we need to place the book information in the POST request we are making. This is done by selecting the Body component of the request (circled in red in the image below), marking the data as Raw and JSON (also in red in the image) and adding the book information in JSON format (see below an example for “Harry Potter and the Prisoner of Azkaban”):
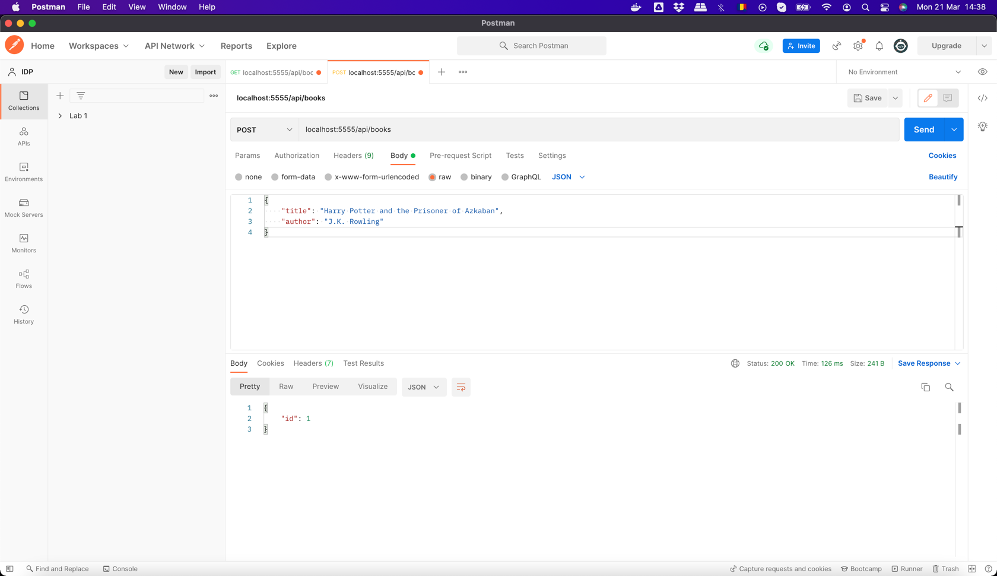
When we press the Send button, if everything is fine, we will receive a reply with the status 200 OK and the ID of the newly-added book, as can be seen in the image.
Finally, if we run the GET request again, we can check the existence of the book we added in the library.
Subtasks
- install Postman
- send a GET request to your application based on the steps above and check that it returns 200 OK and an empty list of books
- add a book of your choosing in the library using a POST request based on the steps above and check that it returns 200 OK
- send a GET request again and check that you can see the book you just added
03. [10p] Testing for data persistence
Subtasks
- stop and delete the three containers started at exercise 1
- start them again using the same commands given at exercise 1
- send a POST request using Postman and verify that the book you added at exercise 2 is still in the library
04. [10p] Administrating a database
Subtasks
- go to the Adminer interface on http://localhost:8080 (or see lab 4 if you are working on Play with Docker)
- log into the database using the following details:
- System: PostgreSQL
- Server: lab5-db
- Username: admin
- Password: admin
- Database: books
- check that you can observe a table called books and click on it
- click the Select data button to see the books already in the database (you should see the book you previously added)
- click the New item button and add a new book (you should only fill in the title and author text boxes and then press Save)
- using Postman, send a GET request and check that the backend also returns the book you added in Adminer
05. [10p] Cleaning up
Subtasks
- stop and remove the three containers created previously
- remove the two networks created previously
- remove the volume created previously
06. [20p] Working with Docker Compose
Subtasks
- write the entire configuration from exercise 1 in a Docker Compose file called docker-compose.yml
- deploy the configuration from the docker-compose.yml file using docker-compose -f docker-compose.yml up
- use Postman and Adminer to verify that everything works just as before
- stop all the containers using docker-compose -f docker-compose.yml down
- remove the remaining volume
07. [10p] Splitting the Docker Compose file
Subtasks
- split the docker-compose.yml file from exercise 6 into two separate YAML files:
- one of them will contain the API and database services
- the other one will contain the Adminer service
- deploy the configuration from the two files using Docker Compose
- use Postman and Adminer to verify that everything works just as before
- stop all the containers
- remove the remaining volume
