Milestone 2
Starting with week 3, we are going to work with pfSense, an open source firewall with documentation that can be consulted here.
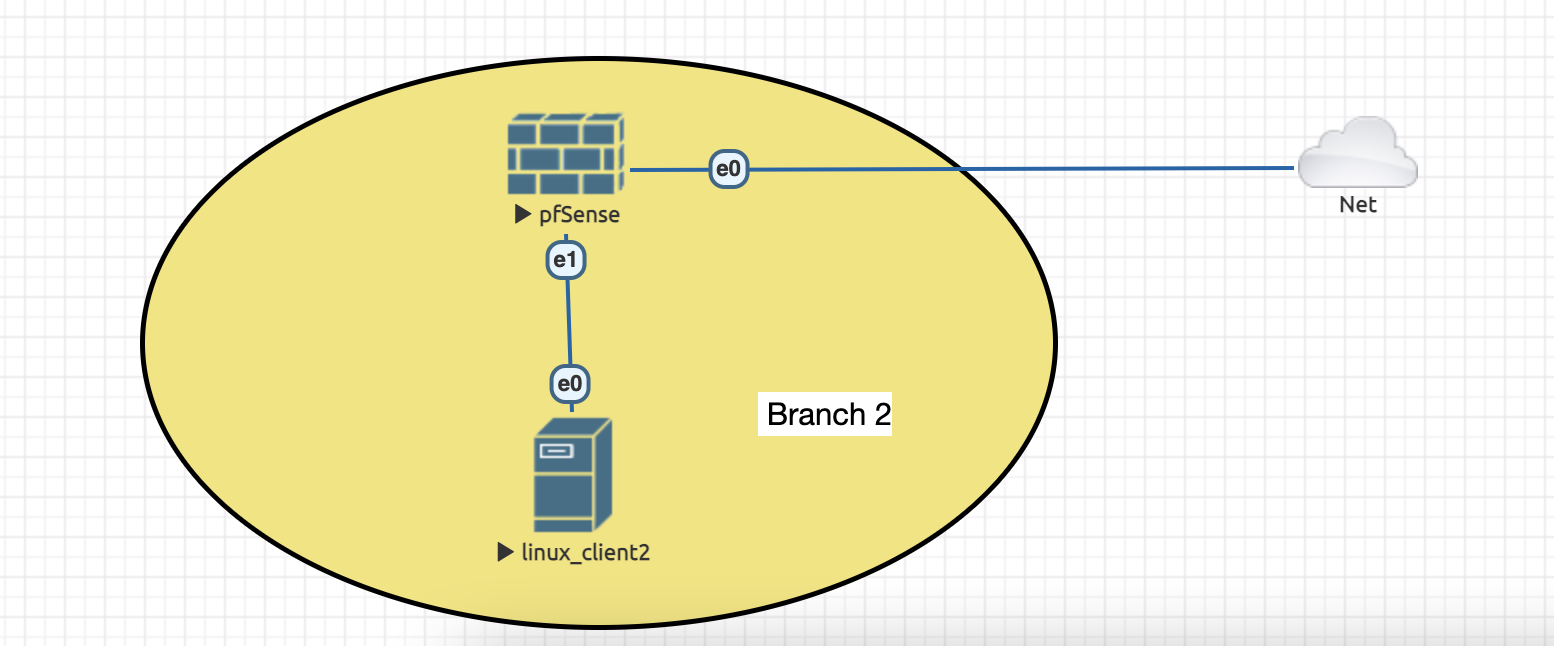
Topology we are going to use this week:
1. Download the iso.gz file: https://www.pfsense.org/download/ (latest version tested 2.6)
2. Copy downloaded archive to eve-ng instance using scp
3. Go through the steps from eve-ng website: https://www.eve-ng.net/index.php/3380-2/ (use as folder name pfsense-2.7.0). Make sure to power off the node instance (after installation is completed) and save the snapshot as a new base image in path /opt/unetlab/addons/qemu
4. Power on the instance again, set the ip addresses for vtnet0 (WAN, using DHCP) and vtnet1 (LAN, choose default subnet 192.168.1.0/24).
5. Create a new Linux node (like done previously here: https://ocw.cs.pub.ro/courses/sred/setup_lab_remote#virtual_machine_access) and connect it to e1 from pfsense.
6. Look over the commands from console menu: https://docs.netgate.com/pfsense/en/latest/config/console-menu.html. Go to shell and find the ip address for interface vtnet0 (it should be in subnet configured for Cloud1 - remember step 6 from here: https://ocw.cs.pub.ro/courses/sred/setup_lab_openstack).
7. Change the mac address to a custom one, from cli:
# select shell (8 key)
# change mac address based on your eve_ng instance ip
ifconfig vtnet0 link 50:00:00:$SECOND_BYTE:$THIRD_BYTE:$FORTH_BYTE
# example: for 10.6.0.10, use mac address 50:00:00:06:00:10
Then, run again dhclient vtnet0 and get the new ip address assigned.
8. Try to access the webGUI interface using browser. Does it? Why not? (hint: https://advanxer.com/2019/12/pfsense-enabling-administration-via-the-wan-interface/).
9. At last, login using default credentials (https://docs.netgate.com/pfsense/en/latest/usermanager/defaults.html) and go through the setup part (do not forget to save the new password!).
10. Go to Interfaces > WAN > MAC Address, add also there the mac address from above, then Save and apply changes. This way your mac will be permanently saved.
11. Add a new rule to permit traffic to WAN interface from your ip address (check eve-ng pnet0). Revert steps done previously, on step 6 (hint: use again shell and same binary).
12. Start Linux machine and make sure it receives a private ip from range 192.168.1.0/24.
13. At last, add a new NAT rule to have Internet access for that internal computer.
Week 4
1. Anti-lockout rule : enable ssh on LAN gateway ip and test connection from client inside LAN.
2. Change settings to permit access using public key (hint: authorized key for admin user).
3. Do not permit ping to firewall machine (ip 192.168.1.1) from the internal network (drop icmp echo requests).
4. Block access to facebook.com. The rest of urls should be permitted (check sites like digi24.ro or x.com). Hint: dns resolver
5. Create a custom DNS entry in firewall for apache2 service from server (created on milestone 1). Use as subdomain: web and as domain: sred.com.
6. Check from the client in LAN that it can access the webserver using: web.sred.com
7. Do the same steps from above for ftp service and test in cli the access: ftp ftp.sred.com 21
8. Start an additional apache2 service on server (port 81) and block access from network 192.168.1.1 to it. Test using url: http://web.sred.com:81


