Lab 3. Dedicated firewall security (part 1) - FTD
Setup
Story
After a period of time, our company managed to have some income and decided to invest it in security equipment, a license for a Cisco Firepower Threat Defense (known as FTD). In the first day, as expected, there is need to setup the virtual machine and create a simple topology with the server connected in Outside zone and client area in Inside one.
Local host prerequisites
If you have a Windows/MacOS machine, you need to install on it vnc viewer to access the Linux/Firewall machines and putty for Cisco routers/switches. You can also check this client side pack from Eve-ng for Windows and MacOS.
For Linux OS, you can use Remmina or Remote Desktop Viewer (both should be already installed). Check this link also: Remmina install.
Lab infra - deploy full topology
This new security equipment called ftd is a Cisco Firepower Thread Defense version 6.6.1-91. You can find it on your local machine in $HOME/images/ftd directory. Your task is to add to qemu directory , use a specific naming format for Firepower and image, solve the permission problems (this is based of this tutorial), deploy and configure the machine:
t0. ssh to the eve-ng machine (use user root and -X flag) - for win use putty or mobaxterm:
user: root
password: student
user@host:~# ssh -l root -X 10.3.0.A (where A is your 4th byte in ipv4 address)
t1. create the directory for FTD image:
root@SRED:~# cdq
# note: cdq is an alias for 'cd /opt/unetlab/addons/qemu'
root@SRED:/opt/unetlab/addons/qemu# mkdir firepower6-FTD-6.6.1-91
Format: firepowerMAX_VERSION-FTD-MAX_VERSION.MIN_VERSION.BUILD-REVISION (in our case MAX_VERSION=6, MIN_VERSION=6, BUILD=1, REVISION=91)
t2. move the qcow2 image (found in $HOME/images/ftd) to this path
root@SRED:~# mv ~/images/ftd/hda.qcow2 /opt/unetlab/addons/qemu/firepower6-FTD-6.6.1-91
root@SRED:~# /opt/qemu/bin/qemu-img convert -f vmdk -O qcow2 Cisco_Firepower_Threat_Defense_Virtual-6.6.1-91.vmdk /opt/unetlab/addons/qemu/firepower6-FTD-6.6.1-91/hda.qcow2
t3. solve the permissions:
root@SRED:~# /opt/unetlab/wrappers/unl_wrapper -a fixpermissions
t4 (optional!). boot the image in ad-hoc mode from cli (just to test it):
root@SRED:/opt/unetlab/addons/qemu/firepower6-FTD-6.6.1-91# /opt/qemu/bin/qemu-system-x86_64 -hda hda.qcow2 -m 8192 -smp 8
qemu options:
'-hda ' = specify the virtual hard drive with an image to boot
' -m ' = ram
' -smp ' = number of cores for cpu
Select the first option, then wait for the kernel to boot. Close the machine after booting completed (you can send a simple SIGINT signal to the process).
t5. go to eve-ng webui from your browser (http://10.3.0.A) and create a new lab by closing the old one (left > expand > close lab) - make sure all nodes are turned off, create a new one (add new lab > give a suggestive name) and open it.
Create a new node for the FTD:
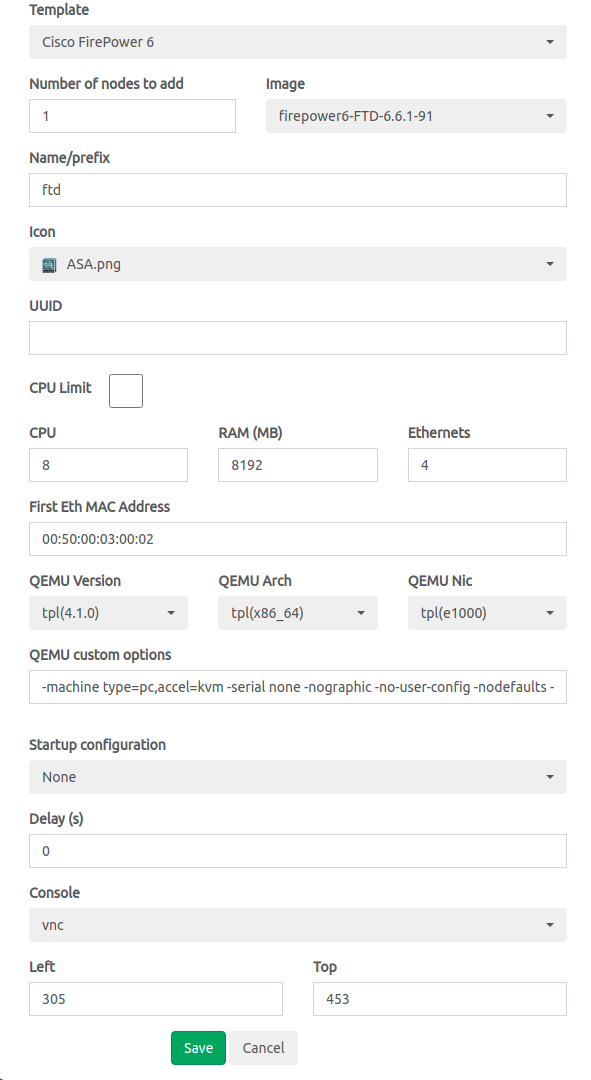
Right click > Add new object Node > Search for Firepower version 6 (if you cannot find it, go back to steps 1,2, and 3) > select the required image name (it is based on the folder name):
See the configuration:
- add a new mac address (for dhcp request with a new mac address) for first eth interface. you can use the format: 00:50:00:byte_2_eveng_ip:byte3_eveng_ip:byte4_eveng_ip (example: for 10.3.0.76, use 00:50:00:03:00:76).In the image from above, the configured mac address is 00:50:00:03:00:02, which corresponds to eve-ng machine with ip 10.3.0.2.
- ram 8GB (at least 8 are required for FTD)
- cpu 8
- Ethernet interfaces 4.
Q: Why do we need 4 netw interfaces on FTD?
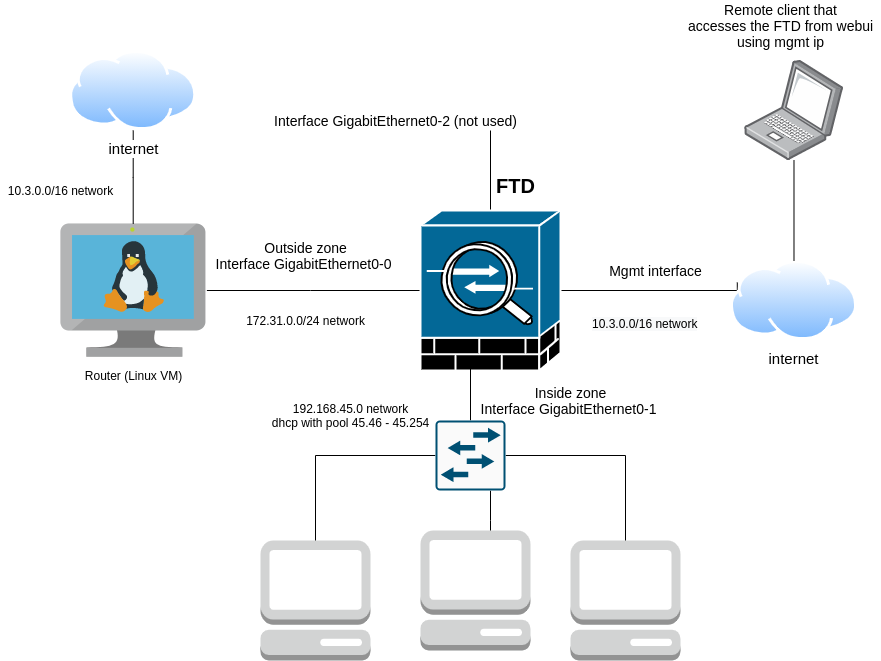
See the following image:
The first interface is used for managing the FTD remotely or locally (if we are in lab network from UPB). Is it strictly used for accessing the WebUI of the equipment (most of the times) and no other traffic like forwarding packets from clients to other networks, creating ipsec tunnels with cloud instances or clients connected via vpn client (I will give you here some examples on the next lab). These scenarios can be performed on the next interfaces, which are known as traffic ones.
The next one is a console one which is not available in eve-ng (device can be managed anyway like a console attached to it using vnc or rdp).
The following 3 ones are Gigabit interfaces which represent:
- outside area: used by default by firewall for Internet access (you will see this at easy setup for ntp and license activation). This needs to remain only for outside area. The next ones can be changed how do we want internally.
- inside area: used by internal clients to connect to firewall. There exists by default a NAT rule to translate internal ips dynamically to external one and an access policy rule for allowing any traffic from inside to outside.
- the third one can be used for other networks (like DMZ or visitors - see lab 2). Currently, we are keeping it disabled for the third lab.
As a conclusion here, FTD forwards and filters traffic generated from inside to outside area based on security policies. An important note here is that returning traffic is also allowed, as the request comes from internal zone (see there is no need for an access policy in mirror - remember the example with the RACLs). This means also that we do not have access from Router Linux VM to the client machine when incoming packets are coming from outside zone.
t6. we will need to access the machine remotely. The first solution that comes to mind is to add in the same subnet as the eve-ng machine (with Internet access). To do this, simply create a new network (Right click > Network) and select type management/Cloud0. Then attach a wire from this Cloud to FTD (select the first interface - mgmt for FTD). Using this, it will take an ip address from the ESX vswitch (via dhcp).
root@SRED:~# brctl show
vnet0_4		8000.1eb89307059b	no		vunl0_1_2
							vunl0_3_0
We also have 10 bridge interfaces for internet access, that need to contain firstly eth0 (for internet access) and vunl ones used by cloud nodes that provide to other equipments internet access - example:
root@SRED:~# brctl show
bridge name	bridge id		STP enabled	interfaces
pnet0		8000.005056b8f1f9	no		eth0
							vunl0_1_0
							vunl0_2_0
Above see that there is a bridge between eth0 and 2 cloud interfaces (used by 2 nodes/devices for internet access). Any device connected to that cloud node will get its ip using dhcp (more information about this will be added on setup lab page).
t7. save node config and create another 2 nodes and new 1 network:
- 1 node with Linux image linux-ubuntu-18.04-server_machine (add 2 eth interfaces and keep the rest of default config). Add also a mac address for first eth interface with format 00:50:00:byte_2_eveng_ip:byte3_eveng_ip+1:byte4_eveng_ip (example: for 10.3.0.76 use 00:50:00:03:01:76).
- 1 node with Linux image linux-ubuntu-18.04-client1_machine (keep also the rest of default config - 1 eth interface also)
- 1 networks, with type Management/Cloud0 (attached to eth0). Linux machine connected to it will get its own ip from range 10.3.0.0/16 using dhcp.
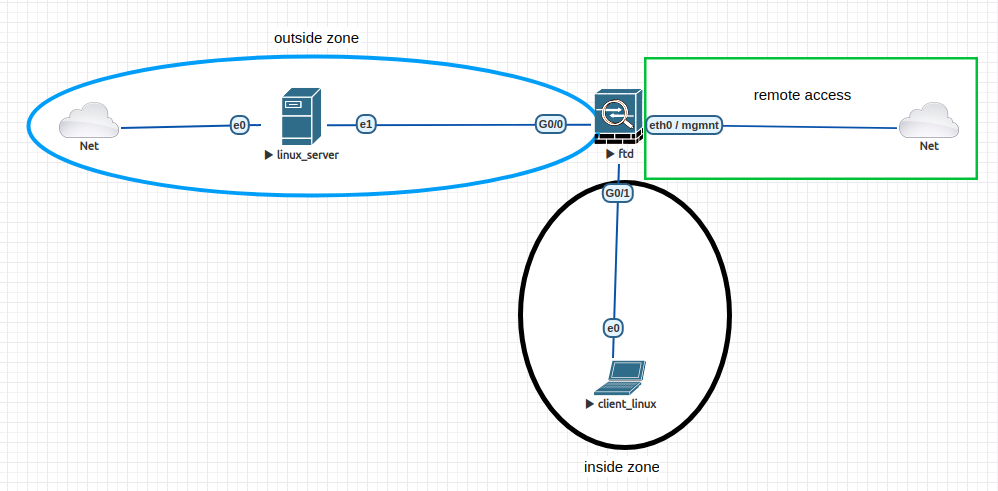
To create links node - node and node-network, simply hover over the node until you see the plug logo and drag it to the correspondent node/network. Create the topology as seen below (client - FTD using G0/1 and linux_router - FTD using G0/0):
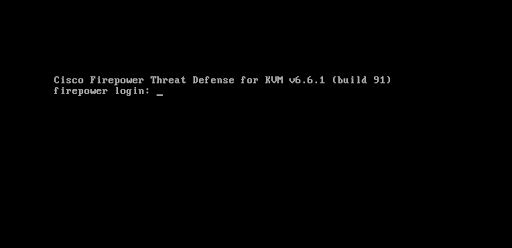
t8. start all nodes (go to left > expand > More Actions > Start all nodes). Access firstly the FTD machine from vnc/rdp and wait for it to boot (the kernel boot might take up to 10-15 minutes).
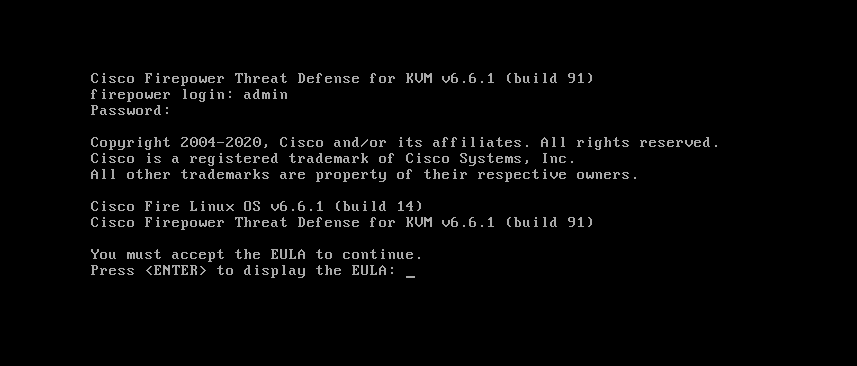
t9. after boot, you will need to enter the default credentials:
user: admin; password: Admin123
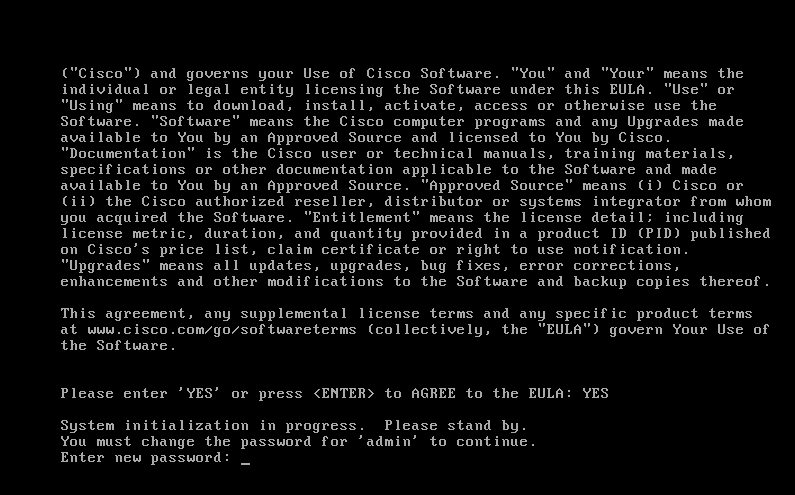
t10. press enter to display EULA and accept it (YES):
t11. enter a new password for cli access - use student or any passwd you want:
t12. configure the mgmt network interface with ipv4 only, using dhcp protocol and check in the end the ip address assigned (this will be your management ip):
> show network
# see here the IPv4 configuration
After this, we can access webui of FTD (named FDM - firepower device manager) by going to browser and typing: https://MGMT_IP (see it from above command output) (note that you need to specify protocol https as it does not do redirect and port 80 is closed). You may see at the beginning (this happens mostly when accessing it after a restart) the code 503 service unavailable - due to the fact the service is not yet ready - wait for 2,3 minutes and refresh the page.
user: admin password: student (or the passwd you set on step 11)
t13. Go through the easy setup part, choose dhcp for outside area (the ip will be configured later) and activate 90-days trial. You may see some errors on step 1 as we did not completed Linux Router VM configuration.
t14. Leave the FDM and go to Linux Router VM. See that on interface eth0, there is assigned an ip address from range 10.3.0.0/16. If not execute the command:
eve@ubuntu:~# sudo dhclient eth0
The interface between Router - FTD uses subnet 172.31.0.0/24, with .1 address used by firewall and .2 by Linux machine:
eve@ubuntu:~# sudo ip a a 172.31.0.2/24 dev eth1
We will need to enable routing and create a nat policy using iptables for forwarding traffic that originates from firewall (is like linking a firewall to your local router):
eve@ubuntu:~# echo 1 > /proc/sys/net/ipv4/ip_forward # enable routing (disabled by def)
eve@ubuntu:~# sudo iptables -t nat -A POSTROUTING -d 0.0.0.0/0 -o eth0 -j MASQUERADE
eve@ubuntu:~# sudo iptables -t nat -L
[...]
MASQUERADE all -- anywhere anywhere
t15. Come back to FDM and go to Device: firepower (4th tab) > Interfaces > View All interfaces > Edit GigabitEthernet0/0 and add the ip address 172.31.0.1 with subnet 255.255.255.0 (optional a description).
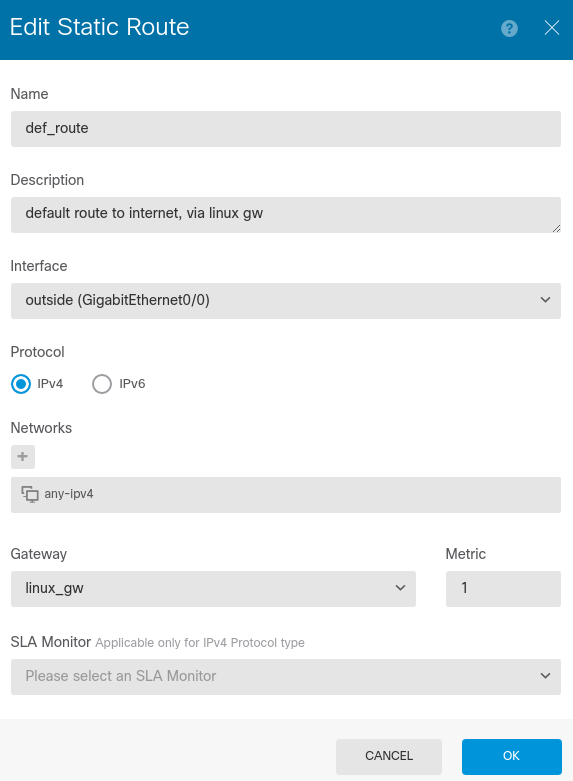
The internal routing table is empty, so we need to a default static route one. Go to Device: firepower > Routing > View configuration > add (+ sign) and add:
See that networks is any-ipv4 (default network object with type network and 0.0.0.0/0 value) and gw linux_gw (another network object with type host and 172.31.0.2 value).
Deploy the config and wait for some minutes (second circle):
t16. After commit is finished, go to first circle in the image from above (cli console) and ping 8.8.8.8 or google.com. It should receive all responses.
t17. Go again to interfaces and check G0/1 - see that it has already assigned and the ip address 192.168.45.1/24 and has attached a dhcp server (pool 45.46 - 45.254). Go to client Linux machine and check the address of eth0:
eve@ubuntu:~# sudo ip a s dev eth0
[...]
inet 192.168.45.46/24

# if you do not have one
eve@ubuntu:~# sudo dhclient eth0
See that also a default route was injected, but no DNS server (by default dhcp server has configuration with dns servers empty):
eve@ubuntu:~# ip r s
default via 192.168.45.1 [...]
eve@ubuntu:~# cat /etc/resolv.conf
[...]
nameserver 127.0.0.53
options edns0
# add 8.8.8.8 dns ip
eve@ubuntu:~# echo "nameserver 8.8.8.8" >> /etc/resolv.conf
t18. In the end, try to ping from client google.com or access from Mozilla browser youtube.com.
Exercises
e1. [8p] Full setup
Go through all steps t1→ t18 from tutorial and make sure client has internet access.
e2. [1p] Don't ping
Block all icmp traffic from inside zone to outside zone (application ICMP - default one). This is also known as AVC (application) inspection. Deploy and test ping to google.com.
e3. [1p] No more social media
Block all URL traffic to facebook.com from inside zone (URL tab > + > create new URL > add name and URL facebook.com). Deploy and test facebook access from Mozilla. Check that twitter/other website works.
> shutdown
This command will shutdown the system. Continue?
Please enter 'YES' or 'NO': YES
This will ensure everything is handled right when shutting down the device (if you just stop it from webui, you will need to redo all the steps from above!).


