Lab 7: Web server
Request data from a web page
Remember using a web service. When you make a request to the server, you need to show it the method, meaning what you expect it to do, which, in the case where you want data to be drown from the web by the server, would be get. Next, you need to tell the server where to get this data from. Any query has the following structure: http://address:[port]URL?querystring. Through this query the server will find the data you want and send it back to your browser.
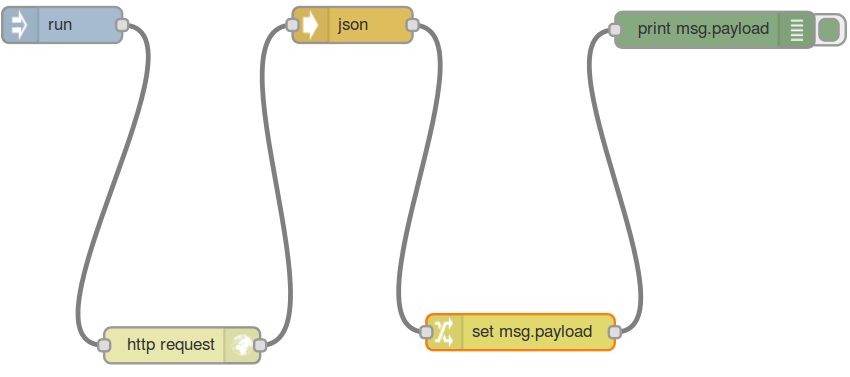
To get information from the Web you need as usual, only a few nodes.
Let's imagine you need to access the data from a web site. How could you implement this need in Streams?
To be able to see the data in under a structure that can be easily interpreted by the nodes, it will have to be in JSON format. What you'll actually use from the website is an API URL. Under functions you have the node http request.
Go on the web site you want to get data from. Now search for the API and copy the URL. It will give you access to the data you request written as a JSON. In the settings of the second node, paste the URL into the corresponding field.
The problem is that when the node puts this data in the payload, it will be a string. In order to be able to parse it, you need to converse it back to a JSON. Use the node which has this very name.
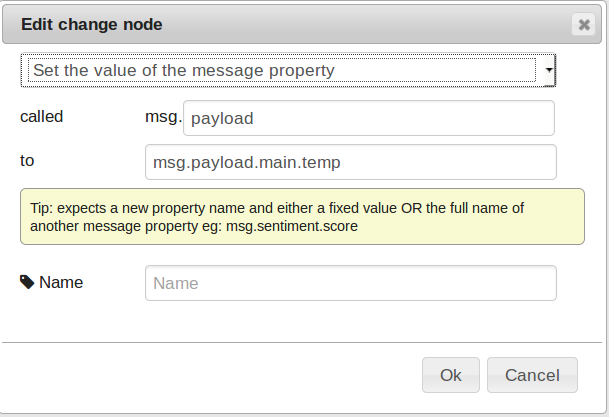
 There is a way of extracting only a part of this object. Search for the change node. This will make of the message in the payload, the one you wish to have.
There it is, now print it on the screen to see how it works.

Send a message to a web page
This time, you build a server yourself. What do you need? A port on which your server, once started will listen on and instructions on what it should do. Also you will need a web response, as any request comes with a response. While the former is made of instructions, messages to be sent and an address of the desination, the latter will return the status of the request: did the server find the page, could it access it?
Many important details about web servers can be found in the corresponding course. These will help you understand every step in building and using the web services. What you will do is to make a web server, using the Web node. In it's settings see that your server will listen on a port, and follow the method you choose to a route configured inside the node.
The message you send will be in payload, but you change it simply by using the same node as before.
Web response will set the status for the web response. For example, if you write 200 it will be ok, the connection works, but 404 is error not found.
Now you have your own web server. Let's access the page where the new payload will be shown. Add a new tab on your browser and write your board's IP.
You find this IP if you open your board's shell and write ifconfig . After you write in the URL fields of the new tab the IP add : and then your port, in this case 5000.
Before anything else, you need to run the project to start the server. Only after,if you enter the page, it should show the message from the payload.

Try dynamic view in a web page
You saw already how to create a web page using Streams programming language. What you added to the web page was the message in the payload.
There is another way by which you can create a web page using Streams.
Use HTML to create a web page
The concept is pretty much the same. You send the payload to the web server to write data on a webpage. This time, the payload can be an HTML file, where you build your document.
More to that. If in this HTML file you use a variable, say light, and you write it in between two sets of curly brackets {{}} and, if the same variable stores a value in your Streams main file, maybe the value from a light sensor, it will be added to the web page. In short, you store a value in a variable in Streams and use it in the HTML like so: { {variable} } (with no spaces) , and the value will appear on the web document. How? The template will be processed, meaning the variable in this html file will be given the value from the payload and loaded in the response.
Now you have a variable in your Streams main file to which you give the value from a light sensor. This same variable is used in the HTML file you created. Now, let's make the connection between the two.
Replace the web response node with web template. In the latter's settings, write the name of the html file. You can run the project and access the page with the same address: http://IP:5000.
Dynamic web pages
In these cases there won't be static files inluded in the page returned to the browser by the server. Using AngularJS, a library which can be used with javaScript and included in HTML files, you can now constantly check if the value has changed and instead of using the request, response, end of communication schematics, you can now keep the communication line open. This way you can see the changes on the web page in real time without the need to reload the page.
You have an already built example of how to use an AngularJS in the additional HTML file. You find it, when creating a new application as Web Server under Streams programming language. Let's use the same example with the light sensor.
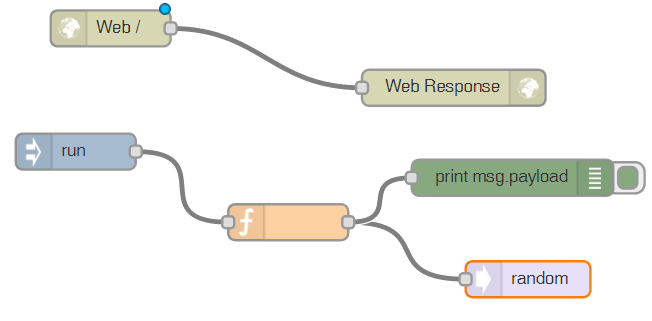
Compared with the previous part, nothing changes concerning the web route node and its connection to the web response. The latter, has a slight change thought that we will come back to a bit later.
In this example, the function will generate random numbers and put them in a variable called random. You can read an analog pin, as described in the Sensors lab, and send the value to a variable.
 Now, the only method by which you can constantly send this value to your web page is to use a HTML file, to which you add AngularJS features, thus making your page a dynamic one.
In the example application, on the left side of the page, there is the file manager. Inside you will see that in the folder with the name of your project, you have the main file and one other folder static. Here you will find the HTML file you need.
Let's look into this one. The head has the scripts which make possible the next part of the HTML, so it shouldn't be modified. The first one implements AngularJS, the second handles the communication, the third controls the variables.
Moving on to the body, ng-controller defines the controller. Within the body of the HTML you can write the tags that are necessary for the page you envision. Looking at the example, you will find the variable defined in streams, in the node value, meaning random. If you have used light, you would write { {light} } (no spaces).
Now that you have the HTML you wished for, go back to streams. You will have to tell the web server where to take the data from. In the node web response you left earlier the field redirect not filled. Here, you need to write the address to the HTML, from within the project. /static/project_name.html .
You told the web server what the port is, how the page should look like, what it should contain and on which route to locate it. Now run the project and thus you start your server.
The next step is to actually access the page and see if it was created correctly.
Take the board's IP search the page just as you did in the previous part: http://IP:port .
Exercises
- Write a web server and show to the user a static html page. If he requests anything else that that page, show him an error page.
- Write a web server that shows the user the temperature on each refresh.
- Add a select box to the page, so that the user can select what he wants to see: the temperature or the light.
- Modify the server you just wrote to display the data without refreshing the page.
- Use a websocket to display the all data.
- Build a web service that allow controlling the device pins.
- Write a web page to test the service.


