Intro to RP2040
Microcontroller
Microcontrollers are tiny integrated circuits (ICs) that you can program to perform various tasks. They have a processor, memory, and input/output pins (GPIO) to interact with the external world. From toys to cars, microcontrollers are everywhere in electronics.
The RP2040 is a powerful and versatile microcontroller built by the Raspberry Pi Foundation. This chip, based on the ARM architecture, is the heart of development boards like the popular Raspberry Pi Pico. We also utilize the RP2040 in Marble Pico board.
 |  |
To unleash the potential of the RP2040, the Raspberry Pi Foundation created the Pico-SDK. This free and open-source software development kit (SDK) equips you with the tools and libraries needed to program the RP2040 in C and C++.
RP2040
This chip name was provided by the Raspberry Pi foundation and is explained in the datasheet:
- RP: Stands for “Raspberry Pi,” similar to how other Raspberry Pi products use “Pi” in their names.
- 2: Indicates the number of cores in the CPU. The RP2040 has a dual-core processor.
- 0: Represent the CPU type (Arm Cortex-M0+) used in the RP2040.
- 4: Signifies the amount of RAM (in kilobytes) on the chip. The RP2040 typically comes with 256KB of RAM (2^4 * 16KB) - floor(log2(ram / 16k)).
- 0: Signifies the amount of nonvolatile storage on the chip. The RP2040 typically comes with 0MB of flash but can have ur up to 16MB of off-chip Flash memory via dedicated QSPI bus (2^4 * 16KB) - floor(log2(nonvolatile / 16k)).

RP2040 has a dual M0+ processor cores, DMA, internal memory and peripheral blocks connected via AHB/APB bus fabric. It offers a variety of features for flexible development:
- Memory:
- External memory support: Code can be executed directly from external flash memory using SPI, DSPI, or QSPI interfaces. A small internal cache improves performance for frequently accessed data.
- Internal SRAM: Internal memory (264 kB) can store code or data and is accessible by different parts of the chip simultaneously.
- Processing:
- DMA: Dedicated DMA (Direct Memory Access) channels offload repetitive data movement tasks from the processors, improving efficiency.
- Flexible I/O: GPIO pins can be controlled directly or through built-in logic functions.
- Communication:
- Hardware peripherals: Dedicated hardware handles standard communication protocols like SPI, I2C, and UART.
- Programmable I/O (PIO): Flexible PIO controllers can be configured for various custom I/O functions.
- USB:
- Integrated USB controller: Provides USB host or device functionality under software control (Full Speed/Low Speed).
- Analog-to-Digital Converter (ADC): Four ADC channels can be used to convert analog signals to digital data.
- Clocks:
- Dual Phase-Locked Loops (PLLs): Generate clocks for specific functions like USB (48MHz) and the system (up to 133MHz).
- Power Management:
- Internal voltage regulator: Simplifies power supply by requiring only an external voltage source for I/O.

In short, the RP2040 packs powerful processing, flexible memory options, diverse communication options, and built-in peripherals, making it suitable for various development projects.
Environment interaction
General-purpose input/output pins let you connect external components like LEDs, sensors, or buttons to your RP2040. You can configure them to be inputs (reading data) or outputs (sending data). The RP2040 provides 30 multi-function GPIOs controllable via software (C/C++ or MicroPython) for diverse functionalities beyond basic input/output.
In order to interface with the external environment, various electronic components are used, serving either as actuators (modifying the state of the external environment) or as transducers/sensors (influenced by the external environment and providing information to the microcontroller about various parameters).
Examples of actuators:
- Fans
- Audible indicators (buzzers)
- Light indicators
- Heating resistors
Examples of sensors:
- Buttons
- Photo resistors - their electrical resistance is influenced by the amount of light
- Thermistors - their electrical resistance is influenced by temperature
LED-s
LEDs - Light Emitting Diode - also called electroluminescent diodes - emit light when they are directly polarized. Not to be confused with light bulbs as they have radically different methods of operation.
LEDs can be used as indicator lights (often used in various appliances to signal that the appliance is on and doing something), or for illumination, in which case power LEDs are used. In the lab, LEDs are used to indicate the status of a pin.
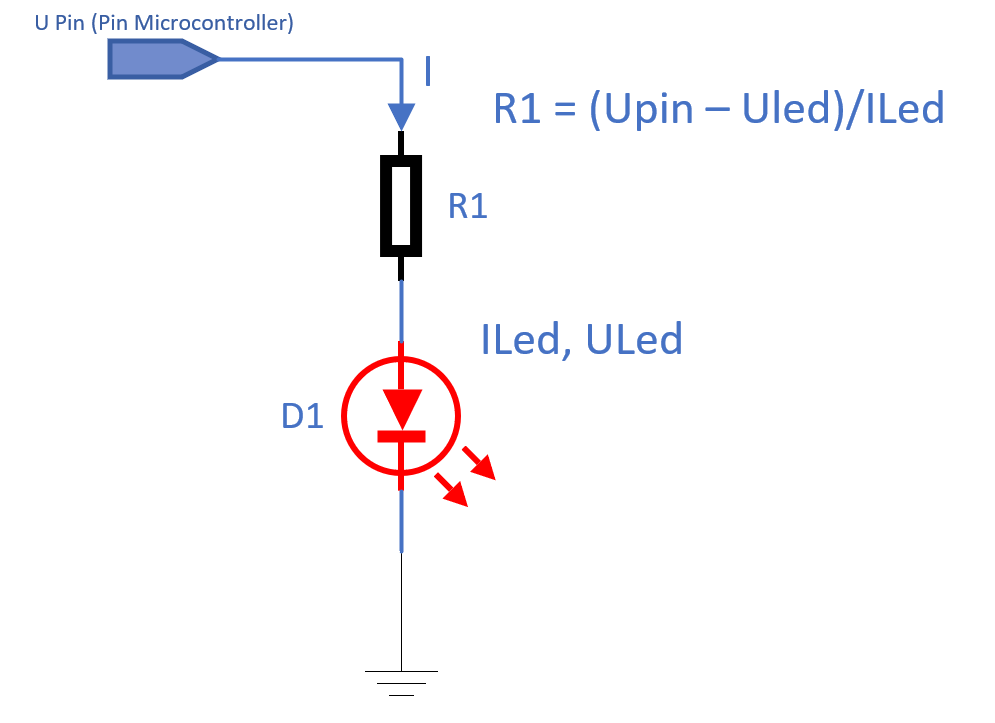
Calculation of current limiting resistor To use an LED for the purpose of indicating the status of a pin (rather said to indicate the presence of voltage), the current through the LED must be limited. This can be done most simply by stringing a resistor with the LED.
An LED is designed to operate at a nominal current (ex: 10mA). The voltage drop at this current across low power indicator LEDs is given by the chemistry of the LED (this also gives the color of the LED). In the lab, since we are using such a low current LED, we can power it directly from the logic pins of the MCU.

If the MCU has a pin voltage of 3.3V, also noted as 3V3, to light up an LED with a nominal current of 10mA and a voltage drop of 2V we need a resistance of 130 Ω.
Buttons
The simplest way for the user to interact with a MCU is through the use of buttons.
There are various ways to connect a button to the MCU, but these are the most used versions:

Breadboard and jumper wires
A breadboard is a rectangular board with a grid of holes that allows you to create temporary electronic circuits without soldering. The board typically has metal strips underneath the surface, connecting the holes in certain patterns. These patterns follow a standard layout, facilitating circuit building. Breadboards are reusable and provide a convenient way to prototype circuits quickly and make changes easily by rearranging components.
 |  |
Jumper wires are flexible wires with connectors at each end, typically male connectors (pins) or female connectors (sockets). They are used to create electrical connections on a breadboard by plugging one end into a hole on the breadboard and the other end into another hole, forming a connection between the two points.

Datasheets
The RP2040, like most electronic components, has a datasheet (sometimes called a data sheet or spec sheet). This document is like an instruction manual for the chip, explaining its features and how to use it in your projects.
What's in an RP2040 Datasheet?
- Overview: A basic description of the RP2040, its functionalities, and what kind of projects it's suitable for.
- Pinout: A diagram showing all the pins on the chip, their functions (like GPIOs for connecting to other components), and electrical specifications (like voltage limits).
- Technical Specifications: Detailed information on the RP2040's performance, memory, power consumption, and other technical aspects.
Keep in mind:
- Complexity: Datasheets can be technical. Don't worry if you don't understand everything at first! Focus on the sections relevant to your project (e.g., GPIO pins).
- Limited Examples: Datasheets might not provide step-by-step project guides. However, they offer the foundation for understanding how to use the RP2040 with your code.
- Complementary Resources: If the datasheet is overwhelming, online resources like tutorials and forums can help explain concepts in a more user-friendly way.
GPIO configuration
GPIO pins can be used as outputs (LEDs, motors, buzzers) or as inputs (buttons, sensors).
The R02040 has three peripherals that control the GPIO pins:
- Pads - control the actual physical pin or pad that the processor has outside. This control the electrical parameters, like maximum current or pull up and pull down resistors
- IO Bank0 - connects and multiplexes the peripheral's pins to the output pads. Several peripherals use the same output pad to communicate with the exterior. For example, in the image below, GPIO0 can be used either for:
- SIO - the GPIO function
- SPI_RX - the receive pin for the SPI peripheral
- I2C0_SDA - the data pin for the I2C0 peripheral
- UART0_TX - the transmit pin for the UART0 (serial port 0) peripheral
- SIO - that controls the interior MCU's pins. This is the peripheral that developers use to read and write the value of the pins.
Wowki simulator
Wokwi is a web-based platform that allows you to simulate and prototype electronic circuits with microcontrollers. It provides a visual interface where you can drag and drop components, connect them with virtual wires, and write code to control their behavior. Wokwi currently supports popular microcontroller boards like:
- Arduino Uno, Mega, Nano, etc.
- Raspberry Pi Pico
- ESP32 boards (generic)
- STM32 multiple boards
Exercises
- Create a program in Wowki to blink an LED connected to a Raspberry Pi Pico (RP2040) microcontroller.
- Design and implement a program for a Raspberry Pi Pico (RP2040) microcontroller that increments a counter from 0 to 9 and displays the current count on an 7-segment display. The program should also include a reset button that, when pressed, resets the counter back to 0.


