Lab06. Man-in-the-middle attack
Use OpenStack CDCI template to start a new VM. To access the VM, login to cloud.grid.pub.ro using your UPB credentials, and from there ssh into the private IP from OpenStack using “ubuntu” as a username and your ssh key.
root@cdci:/$ ssh mihai.chiroiu@fep.grid.pub.ro
[mihai.chiroiu@fep8 ~]$ ssh -vv ubuntu@<IP>
Objectives
- MITM using ettercap tool
- Wireshark usage for protocol dissection - DNS
- Understanding attacks on ARP
- Learning different types of MITM
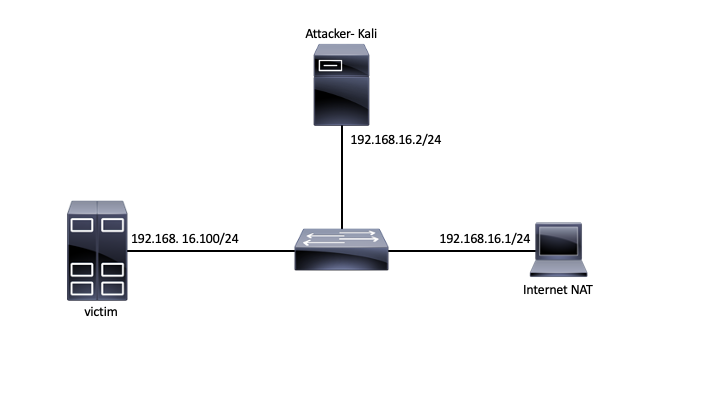
Topology
Tasks
01. [5p] Virtual machine setup
First, make sure that your virtual machine is updated (run the provided update.sh script, or create one).
root@cdci:/# vim ~/containernet/mininet/node.py (line 828, privileged = True)
Next, in one terminal start the provided Mininet topology.
root@cdci:~# source ~/.venvs/ctn/bin/activate
(ctn) root@cdci:/# cd cdci/lab04
(ctn) root@cdci:/home/ubuntu/cdci/labs/lab04# python3 topology.py
If there are any problems with starting the topology (if all is good you should see the Mininet prompt ”>”) use the given cleanup script and try to restart the topology.
02. [5p] Internet connectivity
Before you begin, make sure that you have Internet connectivity on all two nodes (attacker and victim). R1 should be the gateway for the Attacker and Victim. Write down the MAC and IP addresses of all 3 nodes (including the gateway). Use the provided scripts to access the nodes.
root@ip-172-30-0-165:/# ./attacker_bash.sh
root@attacker:/#

root@ip-172-30-0-165:/# ./victim_bash.sh
root@victim:/#
03. [30p] ARP poisoning MITM attack
The goal of this exercise is to pass all the victim's traffic through the attacker's machine. From the Attacker node start an ARP poisoning mitm attack against the Victim machine using ettercap tool. Use “ping” tool from Victim and make sure that all traffic (including to outside) goes through the Attacker’s node (use extra verbose option for ettercap).
Use tcpdump to save all the traffic from the victim and analyze it using Wireshark. Try to answer the following questions:
- Can you spot the Gratuitous ARP packet sent when infecting the victim?
- Look into the layer 2 of the packets and see how the destination MAC address has changed under the attack.
- Can you spot the Gratuitous ARP packet when the infection is stopped?
04. [10p] Traffic dissection
Investigate the following traffic as it is generated by the Victim node:
- HTTP and DNS while under MITM attack. Can you use Wireshark and rebuild/export the HTML pages that the victim opened (use wget or curl)?.
05. [20p] Raw packets altering
Ettercap filters can also be used to modify packets as they pass through the attacker’s node. Use the provided filter to change icmp type from echo to reply (Hint: https://www.iana.org/assignments/icmp-parameters/icmp-parameters.xhtml).
- You should observe the changes on the victim (no more replies).
- Use tcpdump on the attacker to inspect the changes.
cat icmp.filter
if (ip.proto == ICMP) {
   msg("Changing ICMP type!\n");
  replace("8.8.8.8", "8.8.4.4");
 }
etterfilter icmp.filter -o icmp.ef
06. [10p] DNS traffic altering
Another interesting plugin of Ettercap is DNS spoofing. Config it such that any queries for the “facebook.com” domain name are translated into “127.0.0.1”.
07. [20p] HTTPS traffic inspection
Unfortunately, HTTPS traffic cannot be inspected, or can it :). We will try to use ettercap and observe changes in the certificate chain when MITM attack is active.
- First, use the “openssl s_client” tool (or other) to see the certificates path for the “www.google.com” website.
 root@victim:~# openssl s_client -showcerts www.google.com:443
CONNECTED(00000005)
depth=2 OU = GlobalSign Root CA - R2, O = GlobalSign, CN = GlobalSign
verify return:1
depth=1 C = US, O = Google Trust Services, CN = GTS CA 1O1
verify return:1
depth=0 C = US, ST = California, L = Mountain View, O = Google LLC, CN = www.google.com
verify return:1
- Next, run ettercap without TLS MITM (-S).
- Now, run ettercap including TLS MITM.
root@attacker:~# openssl genrsa -out hacker.pem 2048
root@attacker:~# openssl req -x509 -new -key hacker.pem -sha256 -days 365 -out hacker.crt
ec_uid = 0
ec_gid = 0
# if you use iptables:
redir_command_on = "iptables -t nat -A PREROUTING -i %iface -p tcp --dport %port -j REDIRECT --to-port %rport"
redir_command_off = "iptables -t nat -D PREROUTING -i %iface -p tcp --dport %port -j REDIRECT --to-port %rport"
redir6_command_on = "ip6tables -t nat -A PREROUTING -i %iface -p tcp -s %source -d %destination --dport %port -j REDIRECT --to-port %rport"
redir6_command_off = "ip6tables -t nat -D PREROUTING -i %iface -p tcp -s %source -d %destination --dport %port -j REDIRECT --to-port %rport"


