

This is an old revision of the document!
Lab05. Practical cryptography
Use OpenStack CDCI template to start a new VM. To access the VM, login to cloud.grid.pub.ro using your UPB credentials, and from there ssh into the private IP from OpenStack using “ubuntu” as a username and your ssh key.
root@cdci:/$ ssh mihai.chiroiu@fep.grid.pub.ro
[mihai.chiroiu@fep8 ~]$ ssh -vv ubuntu@<IP>
# start the recording after you ssh into the machine
ubuntu@cdci-v2:~/cdci/labs/lab03$ asciinema rec lab03_mihai.cast
[...]
# !!!IMPORTANT before you start working echo your name in the terminal!!!
ubuntu@cdci-v2:~/cdci/labs/lab03$ echo "Mihai Chiroiu's terminal!"
# ============ IMPORTANT ============
# do the tasks: enter docker
ubuntu@cdci-v2:~/cdci/labs/lab03$ ./attacker_bash.sh
root@attacker:/# pwd
/
root@attacker:/#
root@attacker:/# exit
# exited docker
# stop recording
ubuntu@cdci-v2:~/cdci/labs/lab03$ exit
asciinema: recording finished

# upload the recording
ASCIINEMA_API_URL=https://asciinema.cs.pub.ro asciinema upload lab03_mihai.cast
When you finish your work, submit the details on the form . Double check to see if all is good (https://ctipub-my.sharepoint.com/:x:/g/personal/mihai_chiroiu_upb_ro/EcKTIE5LyNtDsOzKJx5xfOYBWce6CeIBmm4yO43Lt1SdhQ?e=kPJcRL)
Objectives
- Hashing data to provide integrity
- Use openssl for symmetric and asymmetric encryption
- Convert to base64 an encrypted message
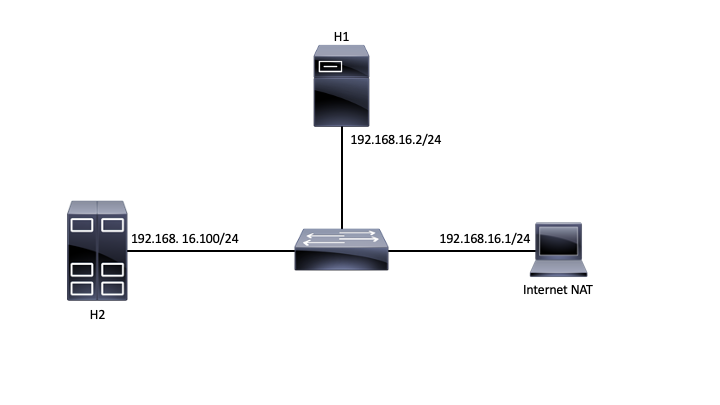
Topology
Tasks
01. [5p] Virtual machine setup
First, make sure that your virtual machine is updated (run the provided update.sh script, or create one).
root@cdci:/# cat update.sh
#!/bin/bash
# (c) Mihai Chiroiu - CDCI

git clone https://github.com/mihai-chiroiu/cdci.git
Next, in one terminal start the provided Mininet topology.
root@cdci:/# cd cdci/lab05
root@cdci:/# /usr/bin/python3 topology.py
If there are any problems with starting the topology (if all is good you should see the Mininet prompt ”>”) use the given cleanup script and try to restart the topology.
02. [10p] Internet connectivity
Before you begin, make sure that you have Internet connectivity on all two nodes. R1 should be the gateway for the all of them. Write down the IP addresses of all the nodes (including the gateway). Use the provided scripts to access the nodes.
Download the following archive and extract it both nodes (Hint: wget is installed). https://ocw.cs.pub.ro/courses/_media/cdci/labs/upb-vs-harvard.zip . Download the archive also on your local computer and inspect the images.
root@ip-172-30-0-165:/# ./h1.sh
root@attacker:/#

root@ip-172-30-0-165:/# ./h2.sh
root@victim:/#
root@h2:~# wget https://ocw.cs.pub.ro/courses/_media/cdci/labs/upb-vs-harvard.zip
root@h2:~# unzip upb-vs-harvard.zip
root@h2:~# pwd
03. [10p] Hashing
- Use the MD5 hashing function and compare the files from the archive extracted previously. How do the hashes differ? What about the files, are they the same? Now, use other hashing functions and compare the result.
- Download the latest version of the Firefox browser for Windows and compare the hash value to the official one.
root@h1:~/upb-vs-harvard# md5sum upb.bmp
2cbfabbbfb2adf0fea6ff8fbbaeaabae  upb.bmp
root@h1:~/upb-vs-harvard# md5sum harvard.bmp
2cbfabbbfb2adf0fea6ff8fbbaeaabae  harvard.bmp

root@h1:~/#  wget http://releases.mozilla.org/pub/firefox/releases/65.0b9/win64/en-US/Firefox%20Setup%2065.0b9.exe
root@h1:~/#  sha256sum Firefox\ Setup\ 65.0b9.exe
04. [10p] Symmetric encryption
The openssl tool provides different mechanisms to encrypt data using symmetric cyphers. List all the available cyphers and modes of operation. Encrypt the ‘This is a cool lab’ text using aes-256-cbc mode and the password ‘thisisasupersecretpassword’. The output of the previous command is a not human-readable and cannot be easily used, add the ‘-base64’ parameter and verify the output.
- Copy and decrypt the message on the other node.
root@h1:~# openssl list -cipher-commands
aes-128-cbc       aes-128-ecb       aes-192-cbc       aes-192-ecb
[...]
root@h1:~# echo "This is a cool lab" | openssl aes-256-cbc -k thisisasupersecretpassword
root@h1:~# echo "This is a cool lab" | openssl aes-256-cbc -k thisisasupersecretpassword -md sha512 -p -base64 -pbkdf2
salt=1F678051A7D00C6F
key=C46100F8145E3C58BECD235C6F55C8CBD2CDCC15ACD9EB35C7815E70CF97330A
iv =9B51ACC36B704923244B65190C3A1A0B
U2FsdGVkX18fZ4BRp9AMb3QeOQYXFoR0lFCO7tXYAXiQ/tJmwAsbOM8yYjmWD6ku

root@h2:~# echo "U2FsdGVkX18fZ4BRp9AMb3QeOQYXFoR0lFCO7tXYAXiQ/tJmwAsbOM8yYjmWD6ku" | openssl aes-256-cbc -k thisisasupersecretpassword -md sha512 -base64 -d -pbkdf2
This is a cool lab
05. [15p] ECB-mode encryption
In this exercise we will show how using a wrong encryption mode can break the encryption scheme. Let us try to encrypt the upb.bmp image using the AES-256-ECB mode.
- Encrypt the image file using AES-256-ECB.
- Recover the image-related metadata / header . This is required if we want the picture to be displayed properly. Note that the header is 54 bytes (http://www.onicos.com/staff/iz/formats/bmp.html). You can use the “dd” tool for this purpose.
- Last, transfer the encrypted image to your file (from the node to the virtual machine, and from the virtual machine to your computer).
root@h1:~/# openssl aes-256-ecb -k thisisasupersecretpassword -in upb.bmp -out upb_logo_enc.bmp -nosalt -pbkdf2
root@h1:~/# dd if=upb.bmp of=upb_logo_enc.bmp bs=6 count=9 conv=notrunc
9+0 records in
9+0 records out
54 bytes copied, 5.6056e-05 s, 963 kB/s
root@h1:~/# scp upb_logo_enc.bmp ubuntu@192.168.16.1:~/.
ubuntu@192.168.16.1's password:
upb_logo_enc.bmp                                                     100%  733KB 381.8KB/s   00:01
06. [10p] Digital signing
Symmetric encryption is typically used for encrypting data, hashing is used for data integrity and asymmetric encryption is used for authentication. We can use ‘openssl dgst’ tool for signing files using DSA.
- Create a DSA key pair and use it to sign the image file encrypted before. Use SHA256 for hashing the file.
- Send the signed data to the other node and verify the signature. How could you distribute the public part of the DSA key?
root@h1:~/# openssl genpkey -genparam -algorithm DSA -pkeyopt dsa_paramgen_bits:2048 -pkeyopt dsa_paramgen_q_bits:256 -pkeyopt dsa_paramgen_md:sha256 -out dsaparams.pem
root@h1:~/# openssl genpkey -paramfile dsaparams.pem -out dsaprivkey.pem
root@h1:~/# openssl dsa -in dsaprivkey.pem -pubout > dsapubkey.pem
root@h1:~/# openssl dgst -sha256 -sign dsaprivkey.pem upb_logo_enc.bmp > upb.sig
root@h1:~/# scp upb_logo_enc.bmp upb.sig dsapubkey.pem ubuntu@192.168.16.1:~/.

root@h2:~# scp ubuntu@192.168.16.1:~/upb.sig ubuntu@192.168.16.1:~/upb_logo_enc.bmp ubuntu@192.168.16.1:~/dsapubkey.pem .
root@h2:~# ls
dsapubkey.pem  upb.sig  upb_logo_enc.bmp
root@h2:~# openssl dgst -sha256 -verify dsapubkey.pem -signature upb.sig upb_logo_enc.bmp
Verified OK
07. [10p] Certificate Signing Request
Asymmetric encryption schemes are used in certificates to authenticate and encrypt data in transit. In this exercise we are going to create a CSR (Certificate Signing Request), which includes the public key of your server. Note that this CSR must be signed by a Certificate Authority before being used.
- Generate a 2048 bits private-public RSA key. Note, that while in practice the private key should be protected using a symmetric key, in this lab we assume that you don’t. Display the public key part of the generated pair. How about the private one?
- Use the previously generated key and create a new CSR that should be saved to the ‘ServerCertificateRequest.csr’ file.
- Print the public key stored in the CSR certificate and compare it with the one generated in the first step.
root@h1:~# openssl genrsa -out RSAKEYPAIR.pem 2048
root@h1:~# openssl rsa -in RSAKEYPAIR.pem -pubout
root@h1:~# openssl rsa -in RSAKEYPAIR.pem -text
root@h1:~# openssl req -out ServerCertificateRequest.csr -new -key RSAKEYPAIR.pem
root@h1:~# openssl req -in ServerCertificateRequest.csr -pubkey
08. [10p] Digital signing
In this exercise you will be required to analyze an already signed certificate from the www.google.com website.
- Use the s_client suite from openssl and download the top chain certificate locally (Hint: signed by GlobalSign Root CA). Note that there might be a chain of certificates, save each one in a different file.
- What is the public key of the certificate? Compare it to the one viewed in browser (use Firefox for a simplified view).
- Use ‘openssl verify’ to test the correctness of the certificate. Does the verification of the certificate work?
root@h1:/# openssl s_client -host www.google.com -port 443 -prexit -showcerts
root@h1:/# cat www.google.pem
-----BEGIN CERTIFICATE-----
MIIESjCCAzKgAwIBAgINAeO0mqGNiqmBJWlQuDANBgkqhkiG9w0BAQsFADBMMSAw
HgYDVQQLExdHbG9iYWxTaWduIFJvb3QgQ0EgLSBSMjETMBEGA1UEChMKR2xvYmFs
U2lnbjETMBEGA1UEAxMKR2xvYmFsU2lnbjAeFw0xNzA2MTUwMDAwNDJaFw0yMTEy
MTUwMDAwNDJaMEIxCzAJBgNVBAYTAlVTMR4wHAYDVQQKExVHb29nbGUgVHJ1c3Qg
U2VydmljZXMxEzARBgNVBAMTCkdUUyBDQSAxTzEwggEiMA0GCSqGSIb3DQEBAQUA
A4IBDwAwggEKAoIBAQDQGM9F1IvN05zkQO9+tN1pIRvJzzyOTHW5DzEZhD2ePCnv
UA0Qk28FgICfKqC9EksC4T2fWBYk/jCfC3R3VZMdS/dN4ZKCEPZRrAzDsiKUDzRr
mBBJ5wudgzndIMYcLe/RGGFl5yODIKgjEv/SJH/UL+dEaltN11BmsK+eQmMF++Ac
xGNhr59qM/9il71I2dN8FGfcddwuaej4bXhp0LcQBbjxMcI7JP0aM3T4I+DsaxmK
FsbjzaTNC9uzpFlgOIg7rR25xoynUxv8vNmkq7zdPGHXkxWY7oG9j+JkRyBABk7X
rJfoucBZEqFJJSPk7XA0LKW0Y3z5oz2D0c1tJKwHAgMBAAGjggEzMIIBLzAOBgNV
HQ8BAf8EBAMCAYYwHQYDVR0lBBYwFAYIKwYBBQUHAwEGCCsGAQUFBwMCMBIGA1Ud
EwEB/wQIMAYBAf8CAQAwHQYDVR0OBBYEFJjR+G4Q68+b7GCfGJAboOt9Cf0rMB8G
A1UdIwQYMBaAFJviB1dnHB7AagbeWbSaLd/cGYYuMDUGCCsGAQUFBwEBBCkwJzAl
BggrBgEFBQcwAYYZaHR0cDovL29jc3AucGtpLmdvb2cvZ3NyMjAyBgNVHR8EKzAp
MCegJaAjhiFodHRwOi8vY3JsLnBraS5nb29nL2dzcjIvZ3NyMi5jcmwwPwYDVR0g
BDgwNjA0BgZngQwBAgIwKjAoBggrBgEFBQcCARYcaHR0cHM6Ly9wa2kuZ29vZy9y
ZXBvc2l0b3J5LzANBgkqhkiG9w0BAQsFAAOCAQEAGoA+Nnn78y6pRjd9XlQWNa7H
TgiZ/r3RNGkmUmYHPQq6Scti9PEajvwRT2iWTHQr02fesqOqBY2ETUwgZQ+lltoN
FvhsO9tvBCOIazpswWC9aJ9xju4tWDQH8NVU6YZZ/XteDSGU9YzJqPjY8q3MDxrz
mqepBCf5o8mw/wJ4a2G6xzUr6Fb6T8McDO22PLRL6u3M4Tzs3A2M1j6bykJYi8wW
IRdAvKLWZu/axBVbzYmqmwkm5zLSDW5nIAJbELCQCZwMH56t2Dvqofxs6BBcCFIZ
USpxu6x6td0V7SvJCCosirSmIatj/9dSSVDQibet8q/7UK4v4ZUN80atnZz1yg==
-----END CERTIFICATE-----

root@h1:/# openssl x509 -in www.google.pem -pubkey
-----BEGIN PUBLIC KEY-----
MIIBIjANBgkqhkiG9w0BAQEFAAOCAQ8AMIIBCgKCAQEA0BjPRdSLzdOc5EDvfrTd
aSEbyc88jkx1uQ8xGYQ9njwp71ANEJNvBYCAnyqgvRJLAuE9n1gWJP4wnwt0d1WT
HUv3TeGSghD2UawMw7IilA80a5gQSecLnYM53SDGHC3v0RhhZecjgyCoIxL/0iR/
1C/nRGpbTddQZrCvnkJjBfvgHMRjYa+fajP/Ype9SNnTfBRn3HXcLmno+G14adC3
EAW48THCOyT9GjN0+CPg7GsZihbG482kzQvbs6RZYDiIO60ducaMp1Mb/LzZpKu8
3Txh15MVmO6BvY/iZEcgQAZO16yX6LnAWRKhSSUj5O1wNCyltGN8+aM9g9HNbSSs
BwIDAQAB
-----END PUBLIC KEY-----

root@h1:/# openssl verify -verbose www.google.pem
www.google.pem: OK

# if we use the first certificate
root@h1:/# openssl verify -verbose www.google.pem
C = US, ST = California, L = Mountain View, O = Google LLC, CN = www.google.com
error 20 at 0 depth lookup: unable to get local issuer certificate
error www.google.pem: verification failed
