

This is an old revision of the document!
Lab05. Practical cryptography
Objectives
- Hashing data to provide integrity
- Use openssl for symmetric and asymmetric encryption
- Convert to base64 an encrypted message
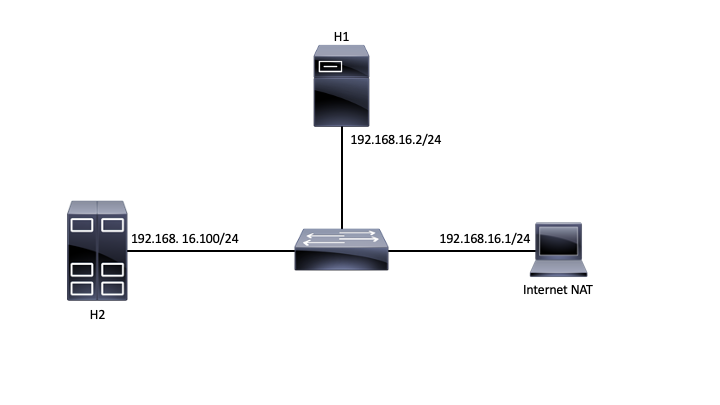
Topology
Tasks
01. [5p] Virtual machine setup
First, make sure that your virtual machine is updated (run the provided update.sh script, or create one).
root@cdci:/# cat update.sh
#!/bin/bash
# (c) Mihai Chiroiu - CDCI

git clone -b labs --single-branch https://github.com/mihai-chiroiu/cdci.git
git config user.email "student@upb.ro"
Next, in one terminal start the provided Mininet topology.
root@cdci:/# cd cdci/lab05
root@cdci:/# /usr/bin/python3 topology.py
If there are any problems with starting the topology (if all is good you should see the Mininet prompt ”>”) use the given cleanup script and try to restart the topology.
02. [10p] Internet connectivity
Before you begin, make sure that you have Internet connectivity on all two nodes. R1 should be the gateway for the all of them. Write down the IP addresses of all the nodes (including the gateway). Use the provided scripts to access the nodes.
Download the following archive and extract it both nodes (Hint: wget is installed). https://ocw.cs.pub.ro/courses/_media/cdci/labs/upb-vs-harvard.zip . Download the archive also on your local computer and inspect the images.
root@ip-172-30-0-165:/# ./h1.sh
root@attacker:/#

root@ip-172-30-0-165:/# ./h2.sh
root@victim:/#
03. [10p] Hashing
- Use the MD5 hashing function and compare the files from the archive extracted previously. How do the hashes differ? What about the files, are they the same? Now, use other hashing functions and compare the result.
- Download the latest version of the Firefox browser for Windows and compare the hash value to the official one.
04. [10p] Symmetric encryption
The openssl tool provides different mechanisms to encrypt data using symmetric cyphers. List all the available cyphers and modes of operation. Encrypt the ‘This is a cool lab’ text using aes-256-cbc mode and the password ‘thisisasupersecretpassword’. The output of the previous command is a not human-readable and cannot be easily used, add the ‘-base64’ parameter and verify the output.
- Copy and decrypt the message on the other node.
05. [15p] ECB-mode encryption
In this exercise we will show how using a wrong encryption mode can break the encryption scheme. Let us try to encrypt the upb.bmp image using the AES-256-ECB mode.
- Encrypt the image file using AES-256-ECB.
- Recover the image-related metadata / header . This is required if we want the picture to be displayed properly. Note that the header is 54 bytes (http://www.onicos.com/staff/iz/formats/bmp.html). You can use the “dd” tool for this purpose.
- Last, transfer the encrypted image to your file (from the node to the virtual machine, and from the virtual machine to your computer).
06. [10p] Digital signing
Symmetric encryption is typically used for encrypting data, hashing is used for data integrity and asymmetric encryption is used for authentication. We can use ‘openssl dgst’ tool for signing files using DSA.
- Create a DSA key pair and use it to sign the image file encrypted before. Use SHA256 for hashing the file.
- Send the signed data to the other node and verify the signature. How could you distribute the public part of the DSA key?
07. [10p] Digital signing
7. Asymmetric encryption schemes are used in certificates to authenticate and encrypt data in transit. In this exercise we are going to create a CSR (Certificate Signing Request), which includes the public key of your server. Note that this CSR must be signed by a Certificate Authority before being used. a. Generate a 2048 bits private-public RSA key. Note, that while in practice the private key should be protected using a symmetric key, in this lab we assume that you don’t. Display the public key part of the generated pair. How about the private one? b. Use the previously generated key and create a new CSR that should be saved to the ‘ServerCertificateRequest.csr’ file. c. Print the public key stored in the CSR certificate and compare it with the one generated in the first step.
08. [10p] Digital signing
8. In this exercise you will be required to analyze an already signed certificate from the cisco.com website. a. Use the s_client suite from openssl and download the certificate locally. Note that there might be a chain of certificates, save each one in a different file. b. What is the public key of the cisco.com server? Compare it to the one viewed in browser (use Firefox for a simplified view). c. The chain downloaded include three certificates, use ‘openssl verify’ to test the correctness of each certificate in the path. Test the first level against the second, the second against the third, and the third against the machine. Does the verification of cisco.com certificate work without the fullchain?
