This is an old revision of the document!
Exam - 22 May 2020
Use OpenStack CDCI template to start a new VM. To access the VM, login to fep.grid.pub.ro using your UPB credentials, and from there ssh into the private IP from OpenStack using “ubuntu” as a username and your ssh key.
First, you need to sync your CDCI directory from the git.
ubuntu@cdci-test:~$ cd cdci/
ubuntu@cdci-test:~/cdci$ sudo su
root@cdci-test:/home/ubuntu/cdci# git pull
root@cdci-test:/home/ubuntu/cdci# cd containers/
root@cdci-test:/home/ubuntu/cdci/containers# make
[...] THIS TAKES ABOUT 10 MINUTE [...]
Second, start the topology from one terminal, and use three others to connect to the virtual nodes.
Due to the fact that we have to work remote, please make sure that you record your screen while working. Here is how.
# start the recording after you ssh into the machine
ubuntu@cdci-v2:~/$ asciinema rec lab03_mihai.cast
[...]
# !!!IMPORTANT before you start working echo your name in the terminal!!!
ubuntu@cdci-v2:~/$ echo "Mihai Chiroiu's terminal!"
# ============ IMPORTANT ============
# do the tasks: enter docker
ubuntu@cdci-v2:~/$ ./attacker_bash.sh
root@attacker:/# pwd
/
root@attacker:/#
root@attacker:/# exit
# exited docker
# stop recording
ubuntu@cdci-v2:~/cdci/labs/lab03$ exit
asciinema: recording finished
asciinema: press <enter> to upload to asciicinema.cdci.ro, <ctrl-c> to save locally

View the recording at:

    http://asciinema.cs.pub.ro/a/QJdizlwTeMTSivCJd1M1VLx6l

# the IP of server has changed, sorry
ubuntu@cdci-v2:~/cdci/labs/lab03$ sudo echo "35.246.203.175 asciinema.cs.pub.ro" > /etc/hosts
# upload the recording
ubuntu@cdci-v2:~/cdci/labs/lab03$ asciinema upload lab03_mihai.cast
When you finish your work, submit the details on the form . Double check to see if all is good (https://docs.google.com/spreadsheets/d/1_2uiVTnEv5RRbnp7lrw3EPqfBiN7JH1s8EQ6ru3Hhb4/edit?usp=sharing)
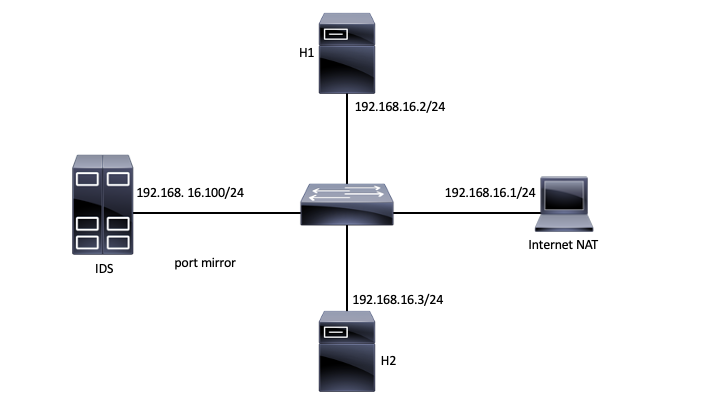
Topology
Tasks
01. [2p] IMCP Payload
Send the “CDCI-EXAM” payload from H1 to H2 using the ping command. Display the payload on H2 as it is received (using tcpdump).
02. [2p] MITM
From H1 do a MITM attack against H2. Test it and make sure traffic can be displayed.
03. [1p] Encryption
Use AES128 EBC mode and encrypt the “CDCI-EXAM-TODAY” string in. Save it as Base64 in a local file. Use any password for encryption.
04. [2p] ICMP Tunnel
Create an ICMP tunnel between H1 & H2 and send the following string over the tunnel “CDCI-EXAM-TODAY”. [1p] Save the traffic and open it using Wireshark (on your personal computer).
05. [1p] Snort1
Write down a snort rule that matches any type of ICMP traffic. Snort is installed on the IDS. Make sure an alert is generated with the following message: “ICMP for CDCI-EXAM”.
06. [1p] Snort2
Write down a snort rule that matches any ICMP traffic with the “CDCI-EXAM” payload. Make sure an alert is generated with the following message: “PAYLOAD CDCI-EXAM”.
07. [1p] Snort3
Write down a snort rule that matches any ICMP traffic with the “EXAMCDCI-[A-Z]{3}“ payload encoded as Base64. Make sure an alert is generated with the following message: “EASY CDCI-EXAM”.


