This is an old revision of the document!
Introduction to Embedded Linux kernel development
In this session we will walk-through the essential software components that make the Board Suppport Package (BSP) for a hardware platform. We will demonstrate our work by booting PICO-IMX8M evaluation Kit.
In order to boot a hardware platform and runs applications on Linux we need the following software components:
- uboot (uboot.bin)
- Linux kernel image (Image)
- Device tree blob (dtb)
- Kernel Modules
- rootfs image
The virtual machine provided by NXP should have all the software already downloaded including all the prerequisites. In this lab we will use a prebuild uboot and rootfs image.
Presentation
- follow slides at session 1
Practical lab
You can use virtual machine setup or native Linux setup.
To connect to the Linux running inside the virtual machine you can use:
ssh -p 3022 student@localhost
1. Explore the development environment
Your work directory should look like this.
$ tree -L 2 /home/student/work/
├── nss-linux                  # Linux kernel source code
├── images                     # prebuild binaries
│   ├── flash.bin
│   ├── Image
│   ├── imx8mq-pico-pi.dtb
│   └── rootfs.ext2
└── scripts                    # several scripts to help with compilation and booting
    ├── modules_install.sh
    ├── setenv.sh
    ├── uuu
    └── uuu_script
2. Compile the Linux kernel
$ source ~/work/scripts/setenv.sh
$ cd ~/work/nss-linux
$ make tn_imx8_defconfig
$ make -j8
Successful compilation will create the following binaries:
arch/arm64/boot/Image- this is the resulting Linux kernel imagearch/arm64/boot/dts/freescale/imx8mq-pico-pi.dtb- device tree blob files- a set of Linux kernel modules (
*.ko) scattered around the Linux kernel working tree.
We also have prebuild binaries for Image and imx8mq-pico-pi.dtb found under ~/work/images/ directory to be used as a backup.
3. Boot the board
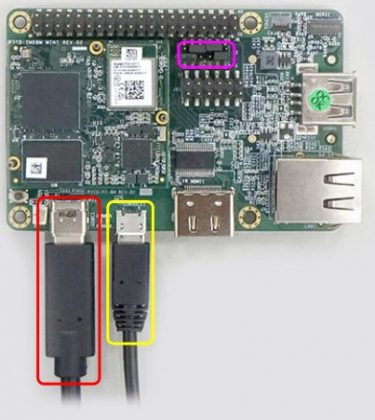
Connect the PICO-PI-IMX8M to your laptop using the two USB cables provided as described on Technexion webpage.
- Yellow box: debug console cable
- Red box: power cable (USB Type C)
- Magent box: boot configuration jumper location.
Make sure the board is in Serial Download Mode. Jumper location should be set as follows:
Now, we are ready to boot the board. Open two consoles:
Console #1
$ minicom -D /dev/ttyUSB0
Console #2
# sudo ~/work/scripts/uuu ~/work/scripts/uuu_script
And then hit ''Reset' button on the board.
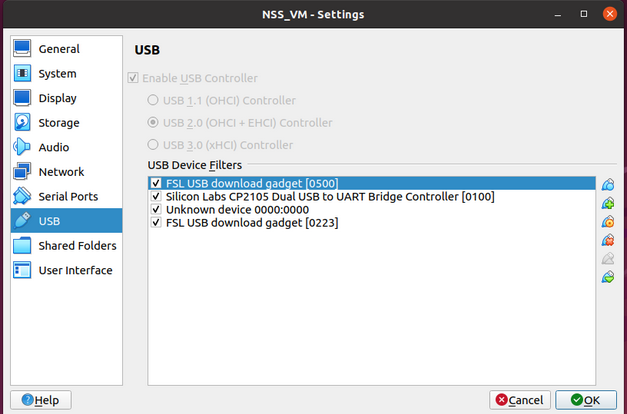
During the booting of the board you will need to tell Virtualbox which USB devices to passthrough the Guest Linux.
The final consoles should look like this. Notice Console #1 has Linux kernel booting log:
4. Make a change in the Linux kernel
Go to the Linux kernel source root tree and modify a file.
$ cd ~/work/nss-linux

$ vim ~/work/arch/arm64/kernel/setup.c
Add a simple print like in the following patch
--- a/arch/arm64/kernel/setup.c
+++ b/arch/arm64/kernel/setup.c
@@ -90,6 +90,8 @@ void __init smp_setup_processor_id(void)

        pr_info("Booting Linux on physical CPU 0x%010lx [0x%08x]\n",
                (unsigned long)mpidr, read_cpuid_id());
+
+       pr_info("Hello from Embedded Linux Summer School\n");
 }
Now recompile the kernel. You can go back and read `2. Compile the Linux kernel`


