This is an old revision of the document!
Introduction to Embedded Linux kernel development
In this session we will walk-through the essential software components that make the Board Suppport Package (BSP) for a hardware platform. We will demonstrate our work by booting PICO-IMX8M evaluation Kit.
In order to boot a hardware platform and runs applications on Linux we need the following software components:
- uboot (uboot.bin)
- Linux kernel image (Image)
- Device tree blob (dtb)
- Kernel Modules
- rootfs image
The virtual machine provided by NXP should have all the software already downloaded including all the prerequisites. In this lab we will use a prebuild uboot and rootfs image.
Presentation
- follow slides at session 1
Practical lab
You can use virtual machine setup or native Linux setup.
To connect to the Linux running inside the virtual machine you can use:
ssh -p 3022 student@localhost
1. Explore the development environment
Your work directory should look like this.
$ tree -L 2 /home/student/work/
├── nss-linux                  # Linux kernel source code
├── images                     # prebuild binaries
│   ├── flash.bin
│   ├── Image
│   ├── imx8mq-pico-pi.dtb
│   └── rootfs.ext2
└── scripts                    # several scripts to help with compilation and booting
    ├── modules_install.sh
    ├── setenv.sh
    ├── uuu
    └── uuu_script
2. Compile the Linux kernel
$ source ~/work/scripts/setenv.sh
$ cd ~/work/nss-linux
$ make tn_imx8_defconfig
$ make -j8
Successful compilation will create the following binaries:
arch/arm64/boot/Image- this is the resulting Linux kernel imagearch/arm64/boot/dts/freescale/imx8mq-pico-pi.dtb- device tree blob files- a set of Linux kernel modules (
*.ko) scattered around the Linux kernel working tree.
We also have prebuild binaries for Image and imx8mq-pico-pi.dtb found under ~/work/images/ directory to be used as a backup.
3. Boot the board
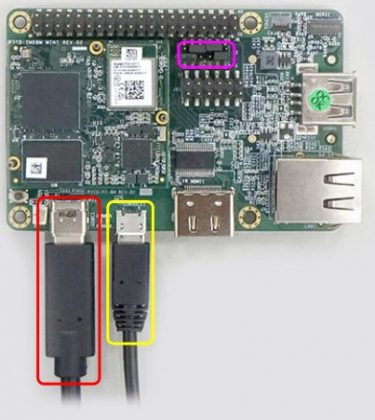
Connect the PICO-PI-IMX8M to your laptop using the two USB cables provided as described on Technexion webpage.
- Yellow box: debug console cable
- Red box: power cable (USB Type C)
- Magent box: boot configuration jumper location.
Make sure the board is in Serial Download Mode. Jumper location should be set as follows:
Now, we are ready to boot the board. Open two consoles:
Console #1
$ minicom -D /dev/ttyUSB0
Console #2
# sudo ~/work/scripts/uuu ~/work/scripts/uuu_script
And then hit ''Reset' button on the board.


