
02. [40p] tmux
tmux is a terminal multiplexer. It allows you to split a terminal into multiple views on the same screen, create multiple sessions, etc.

One particularly interesting feature is that you can detach yourself from a session only to reattach later. Take the following scenario: you need to start a process on a remote machine once you ssh into it. The process needs to keep running even after you exit. How do you launch that process?
$ nohup ./my_program <INPUT_FILE &>OUTPUT_FILE &
Let's break this down:
nohup: works in the same way as sudo but doesn't give you administrative privileges. In stead, what it does is that it makes the process that you launch immune to hangup signals. When your controlling process dies (in this case your very terminal), its children get a hangup signal that is automatically handled by causing them to immediately die. nohup allows those children to ignore the signal and keep on living.<INPUT_FILE: when the terminal dies, your stdin, stdout and stderr are gone as well. Even if the children survive their parent's death, reading or writing to any of these three “files” will cause an error. In other words they still die, just less gracefully. If you know that your process never reads from stdin, you can skip this. Otherwise, it's a good idea to redirect the input from a file that you know will persist, such as a storage-backed file.&>OUTPUT_FILE: the explanation above applies here as well.&is just a shorthand for both stdout and stderr. So you redirect both to the same file. Note that this file (or that which replaces stdin, for that matter) can be /dev/null or /dev/zero.&: this final component of our command tells our shell to start the process in background, not needing to pester the parent (i.e.: zsh or bash), putting it on-hold until it finishes.
Pretty complicated, right? And even if you do this, when you start a new SSH session it will be very difficult to change these parameters (e.g.: redirecting stdout to your terminal) while the process is running. I bet tmux looks pretty good right about now :)
[10p] Task A - Installation
This is a lot less painful than it was for zsh, so don't worry. Let's install tmux and run it:
$ sudo apt install tmux
$ tmux
Et voila. Now, try to split your window and switch between shells (yes, each new window spawns a fresh shell).
- <Ctrl + B> % : split terminal horizontally
- <Ctrl + B> ” : split terminal vertically
- <Ctrl + B> ←↑↓→ : cycle through active terminals
- <Ctrl + B + ←↑↓→> : resize active terminals
Note that you can rebind all these shortcuts in a config file. For now, let's add a rather useful option: allowing to switch active shell by clicking on it. Also, the color of the zsh auto-completion plugin might have defaulted to white; let's fix this as well.
$ echo 'set -g mouse on' >> ~/.tmux.conf
$ echo 'set -g default-terminal screen-256color' >> ~/.tmux.conf
$ tmux source-file ~/.tmux.conf
- right click on the terminal (while running tmux) and drag the mouse. A menu should appear with some basic commands. Drag the cursor over the command and release the mouse button
- run
tmux split-window. This command shows all configured binds. We notice thesplit-window [-h]command being used, so try runningtmux split-windowwith a tmux instance already running. This will send it a split screen request, just like <Ctrl + B> ”.
[10p] Task B - powerline
When you look back at the gif in the intro, something feels off… What's up with that ugly, green bar at the bottom of the screen? You're most likely missing powerline, so let's remedy this:
$ sudo apt install powerline
$ echo 'source /usr/share/powerline/bindings/tmux/powerline.conf' >> ~/.tmux.conf
$ tmux source-file ~/.tmux.conf
Much, much better…
[10p] Task C - Start tmux by default
If you open a new terminal with <Ctrl + Alt + T> you will notice that tmux is not running. When zsh starts up, it automatically sources .zshrc, so let's make it execute tmux by adding the following at the end:
# start tmux session (only once!)
if [ -z "$TMUX" ] && [[ "$USER" == "YOUR_USERNAME_GOES_HERE" ]]; then
    exec tmux
fi
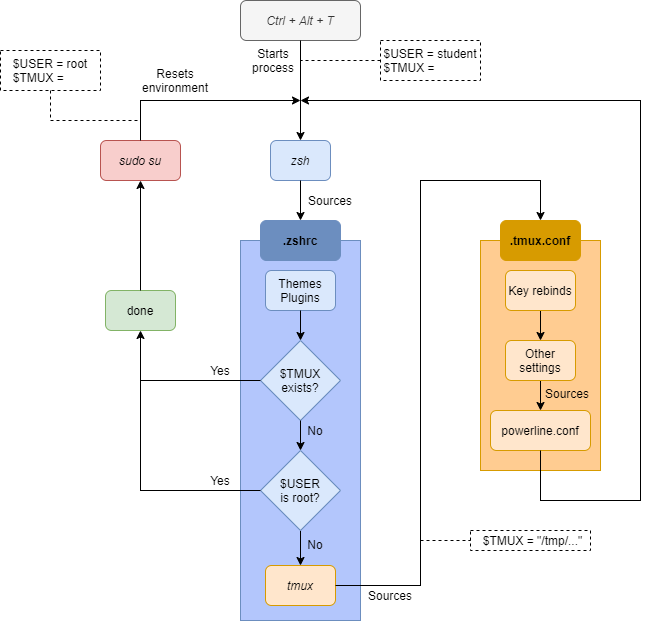
This may require some explanations. If at any point you're feeling lost, check out the diagram in the spoiler below (or ask).
[ -z “$TMUX” ]: Your shell defines some environment variables which can be seen by running theenvcommand. Unless you have an active tmux session, there is no TMUX variable. So if that variable is empty (which in bash / zsh means it doesn't exist), we need to start tmux. But remember! tmux then starts your default shell (i.e.: zsh), which sources .zshrc again, and executes tmux… again… See where I'm going with this? You run into an infinite loop of starting tmux and zsh and your terminal will simply crash. So we need to start tmux exactly once.[[ “$USER” == ”…” ]]: This is a solution for a rather dumb problem. Up until now, you've set up zsh only for your user but not for root. If you create /root/.zshrc and in it you just source the main .zshrc in your home, you will end up executing tmux again, but only once more. The reason is that the TMUX environment variable is not passed to the new user's shell. Why this is annoying is that the second tmux instance will add another status bar to the bottom of your screen. Normally, when you start a terminal with <Ctrl + Alt + T> you don't run a shell as root, so this workaround is somewhat valid.exec tmux: By runningtmuxyou will be able toexitor <Ctrl + D> and you'll return to the original zsh shell. By runningexec tmuxyou will effectively replace your current shell, so when you exit, you will close the entire terminal window.
[10p] Task D - Have some fun with it
Try to keep this cheatsheet close by while you're getting used to tmux.
So far, we've covered screen splitting so now try to create a few new sessions and cycle through them.
