This is an old revision of the document!
Session 2: Android Server Communication & Security
Objectives
- Learn to make secure network calls
- Learn how to use a RecyclerView List and a Dialog
- Learn how to use an API using the Retrofit network library
Prerequisites
- Setup your development environment: Setup page
- Download and run in Android Studio the attached zip
Employee Management App
In this session we will create an app that:
- Gets a list of employees from a Public API and displays it in a RecyclerView List
- Can delete an entry by long pressing on an element from the list. The user needs to confirm the operation by displaying a Yes/No Dialog
- Can add a new entry to the list using a Floating Action Button
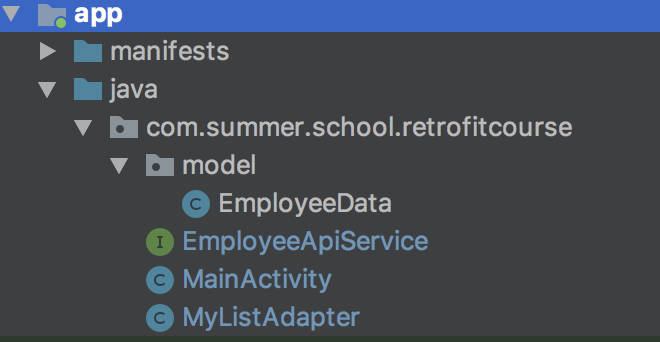
Project Structure
EmployeeData is a data object that holds information about an Employee (id, name, age, salary). In order to be serializable as a Json we need to add the @SerializedName(“employee_name”) annotation and a provided name. The provided name should correspond to the ones in the API we use.
EmployeeApiService holds the interface with the requests we will make to the server
MainActivity is the main screen of the app and also creates the Retrofit Service. The main content of the screen is a RecyclerView with the list of all employees. By long pressing on an item the user can delete an entry and if the user presses the Floating Button he will open a form to add a new entry.
MyListAdapter is a RecyclerView.Adapter See more Here
Using Retrofit
This section is adapted from Here
Retrofit is a type-safe HTTP Client for Android and Java. The basic functionality it is to turn the HTTP API into a Java interface.
When working with retrofit you need to consider the following:
- How is the data transmitted. For example, one popular way is to use JSON objects. Retrofit can handle their conversion to Java objects
- A model for the data you need transmitted
- this is usually a class with fields that reflect the JSON schema you use in your requests. In our app it will be called EmployeeData.java
- Define the endpoints and the requests you need to make in an interface, we refer to it as service (not to be confused with Android services) In our case it will be the EmployeeApiService.java interface
Basic steps for using this library:
- Add dependencies in the build.gradle file of your project (see example below)
- Add the INTERNET permission in the manifest file
- Create the classes for your model
- Define the requests and endpoints you need
- create “service interfaces” and use annotations such as @GET, @POST to define the operations you need.
- Create a retrofit instance and provide it the service interface
- Make calls to the api by calling the service's methods.
- provide callbacks to the calls in order to react to the results or failures
In this section's code examples we're going to create basic HTTP GET / POST / DELETE request for the employee API service.
As stated above in Retrofit we only need to declare our service interface. Below we declared our EmployeeApiService which has a GET request for the employee list, a POST to create a new entry and a DELETE request to remove an employee from the list using his id. Retrofit uses Annotations to show how a request will be handled. In our case we simply defined in the GET request the path to the employee API endpoint. For the DELETE we will also need to add the {userId} parameter using {}. In order to complete this we added the @Path(“userId”) annotation before the userId parameter. This way we link the method parameter to the URL parameter.
public interface EmployeeApiService {
    @GET("employees")
    Call<List<EmployeeData>> getUserDetails();

    @POST("create")
    Call<EmployeeData> createUser(@Body EmployeeData employeeData);

    @DELETE("delete/{userId}")
    Call<ResponseBody> deleteEmployeeById(@Path("userId") int userId);
}
From here the Retrofit class generates an implementation of the EmployeeApiService interface. When creating the Retrofit instance we need to pass our baseUrl. Using this and appending the requests path will create the complete URL.
apiService = (new Retrofit.Builder())
                .baseUrl("http://dummy.restapiexample.com/api/v1/")
                .build()
                .create(EmployeeApiService.class);
Using the service we can make the Call that will make synchronous or asynchronous HTTP request to the remote WebServer.
Call<List<EmployeeData>> employeeCall = apiService.getUserDetails();
In order to make the call and get the result in our app will need to call enqueue(). This sends asynchronously the request and notifies the application through the onResponse() callback when a response is received or through onFailure() callback if something goes wrong. This call is handled on a background thread by Retrofit.
employeeCall.enqueue(new Callback<List<EmployeeData>>() {
            @Override
            public void onResponse(Call<List<EmployeeData>> call, Response<List<EmployeeData>> response) {
                // Do some cool stuff with the response
            }

            @Override
            public void onFailure(Call<List<EmployeeData>> call, Throwable t) {
                // Show error message
            }
        });
If the service responds with JSON objects, Retrofit can help deserialize them by using converters. A popular JSON library is GSON. This helps converting JSON responses into POJOs. In order to use this we need to add a GsonConvertorFactory when creating the service:
apiService = (new Retrofit.Builder())
                .addConverterFactory(GsonConverterFactory.create())
                .baseUrl("http://dummy.restapiexample.com/api/v1/")
                .build()
                .create(EmployeeApiService.class);
In order to add the two libraries to our application we need to add them as dependencies in the app/build.gradle configuration file.
dependencies {
    implementation 'com.squareup.retrofit2:retrofit:2.5.0'
    implementation "com.squareup.retrofit2:converter-gson:2.5.0"
}
Tasks
Resources
- Android Labs for SMD course - created in Spring 2019 by Fitbit developers
- Retrofit Main Page Link - A type-safe HTTP client for Android and Java
- Public API Public API used in this Session
- RecyclerView List RecyclerView Android Documentation


