
Lab 01 - Ricing
Objectives
- Familiarization with zsh and tmux
- Selection of themes and plugins
- Quality-of-life macros and aliases
Contents
Tasks
Proof of Work
This lab will teach you a few terminal customizations. Probably won't make a better programmer out of you but you'll certainly feel like one. Remember though, just because the terminal is an important part of Linux, it's not the only thing you can spend more hours than you probably should customizing. If you lack inspiration, check out r/unixporn (arguably, the best type of porn) and you'll find no end of fancy "rices" and overly obfuscated configs.
So in the spirit of r/unixporn, your proof of work will consist of a Google Doc, containing screenshots of, and comments on your new workspace. In order to receive the 10p bonus for completing the lab feedback, include a screenshot of the form submission confirmation screen (but not of any answers – the form is anonymized). Once you're done, export the doc as a pdf and upload it in the appropriate moodle assignment. The submission cut-off time is 11:55pm, on the same day as the lab.
Tasks
01. [40p] zsh
bash is a wonderful shell but there are better alternatives for day-to-day use. One of these alternatives is zsh (pronounced “Z-shell”). zsh provides a more robust tab completion, easier navigation through directories and a larger selection of plugins, among many other. At the same time, it retains compatibility with bash features such as Word Designators or Modifiers.

In this exercise, you will install zsh and configure it with predefined themes and plugins.
[10p] Task A - Dependency installation
Pretty much everything you will install in Ubuntu (at least while you're still new to this) will be done via apt. apt is a CommandLine Interface (CLI) for the package management system (think Windows Store, but better). First thing you must do after a fresh install is to update your information about the packages available for download. Once you do, you'll be able to do a term search and install whatever you please.
$ sudo apt update
$ apt search zsh
Note a few things:
- The first command is prefixed by sudo while the second isn't. sudo basically tells your shell to execute the remainder of the command (in this case
apt update) with “administrator privileges”. Updating your local package information is a sensitive operation that not every user should be able to do. But just searching for a packet (without installing it) is a harmless operation, so no need for sudo there. - The
apt search zshcommand returns a rather long list. This is because apt performs an approximate search in both the available package names and descriptions. If you want an exact match, try using a regular expression such as ^zsh$ which should be interpreted as: “beginning of the line, followed by the string 'zsh', followed by the end of the line”.
Anyway, moving forward we will want to use a popular collection of zsh configurations called oh-my-zsh. As such, we will need to install a few dependencies first:
$ sudo apt install curl wget git zsh fonts-powerline
These are pretty well known tools and you are very likely to use them again; here is a short description of each one:
- curl : tool for transferring data to/from servers (e.g.: sending an HTTP request and printing the page's HTML code).
- wget : non-interactive web downloader; fetches resources from URLs and saves them locally.
- git : a CLI for project versioning, enabling you to collaborate with other people; right now we'll use it only to download oh-my-zsh but we'll return to it in a future lab.
- zsh : basically, an improved bash and what we want to install / customize.
- fonts-powerline : this is not a tool, but a font set that is required to render the pointy bits of the agnoster theme. Will be useful for tmux in the next exercise as well.
[10p] Task B - oh-my-zsh
With this out of the way, let's download oh-my-zsh and copy their template configuration file in your HOME directory. Then change your user's default shell to zsh:
$ git clone https://github.com/ohmyzsh/ohmyzsh.git ~/.oh-my-zsh
$ cp ~/.oh-my-zsh/templates/zshrc.zsh-template ~/.zshrc
$ chsh -s $(which zsh)
Things to note here:
- Now you have a .oh-my-zsh directory in your home. The '.' before the name marks it as an invisible directory, so you will need to specify the
-aflag when you run ls. This directory contains all the sample themes, plugins and auto-complete scripts that zsh will use, so don't delete it. - .zshrc, like .bashrc, is the default configuration file that the shell will try to access on startup. If you want to change the theme or add plugins, this is the place to look.
- The default shell change that resulted because of chsh will not take effect until you relog to your current user. However, you can simply run zsh in your terminal and bash will be replaced by zsh.
- in case you are confused by
$(which zsh): this is called Command Substitution. Before the main command (i.e.: chsh) is executed, bash will interpretwhich zshseparately. It's output to stdout (in this case, /usr/bin/zsh, the location of zsh) will replace$(…). So the final form of the command you gave, after substitutions, will bechsh -s /usr/bin/zsh.
[10p] Task C - Theme customization
Notice how your zsh theme is different from the one in the GIF above? That's because your default is robbyrussell and that is agnoster (with a few tweaks). Take a look here and choose a theme that suits you. Then, edit .zshrc. When you're done editing the config file and you've saved the changes, source it for them to take effect:
$ source ~/.zshrc
[10p] Task D - Plugin customization
Finally, let's add a few plugins to our shell by editing the plugins variable in .zshrc. Note that plugins is a bash array and the elements are space-separated, not comma-separated.
- dirhistory : keeps track of your directory changes and lets you jump back and forth. Note that this is already available in ~/.oh-my-zsh/plugins/dirhistory/ .
- zsh-autosuggestions : gives you command completion suggestions based on your past commands. This plugin is not readily available in the plugins/ directory, so you will have to download it there first (HINT: scroll down in the repo's page and read the README).
- Alt + ← : go to previous directory
- Alt + → : undo previous directory back-jump
- Alt + ↑ : same as
cd ..
Some bash / zsh shortcuts that can work well with zsh-autosuggestions:
- Ctrl + ← : move cursor one word left
- Ctrl + → : move cursor one word right
- Ctrl + A : move cursor at start of line
- Ctrl + E : move cursor at end of line
- Ctrl + W : delete from start of word and until cursor
- Ctrl + R : reverse search for command in history
02. [40p] tmux
tmux is a terminal multiplexer. It allows you to split a terminal into multiple views on the same screen, create multiple sessions, etc.
One particularly interesting feature is that you can detach yourself from a session only to reattach later. Take the following scenario: you need to start a process on a remote machine once you ssh into it. The process needs to keep running even after you exit. How do you launch that process?
$ nohup ./my_program <INPUT_FILE &>OUTPUT_FILE &
Let's break this down:
nohup: works in the same way as sudo but doesn't give you administrative privileges. In stead, what it does is that it makes the process that you launch immune to hangup signals. When your controlling process dies (in this case your very terminal), its children get a hangup signal that is automatically handled by causing them to immediately die. nohup allows those children to ignore the signal and keep on living.<INPUT_FILE: when the terminal dies, your stdin, stdout and stderr are gone as well. Even if the children survive their parent's death, reading or writing to any of these three “files” will cause an error. In other words they still die, just less gracefully. If you know that your process never reads from stdin, you can skip this. Otherwise, it's a good idea to redirect the input from a file that you know will persist, such as a storage-backed file.&>OUTPUT_FILE: the explanation above applies here as well.&is just a shorthand for both stdout and stderr. So you redirect both to the same file. Note that this file (or that which replaces stdin, for that matter) can be /dev/null or /dev/zero.&: this final component of our command tells our shell to start the process in background, not needing to pester the parent (i.e.: zsh or bash), putting it on-hold until it finishes.
Pretty complicated, right? And even if you do this, when you start a new SSH session it will be very difficult to change these parameters (e.g.: redirecting stdout to your terminal) while the process is running. I bet tmux looks pretty good right about now :)
[10p] Task A - Installation
This is a lot less painful than it was for zsh, so don't worry. Let's install tmux and run it:
$ sudo apt install tmux
$ tmux
Et voila. Now, try to split your window and switch between shells (yes, each new window spawns a fresh shell).
- <Ctrl + B> % : split terminal horizontally
- <Ctrl + B> ” : split terminal vertically
- <Ctrl + B> ←↑↓→ : cycle through active terminals
- <Ctrl + B + ←↑↓→> : resize active terminals
Note that you can rebind all these shortcuts in a config file. For now, let's add a rather useful option: allowing to switch active shell by clicking on it. Also, the color of the zsh auto-completion plugin might have defaulted to white; let's fix this as well.
$ echo 'set -g mouse on' >> ~/.tmux.conf
$ echo 'set -g default-terminal screen-256color' >> ~/.tmux.conf
$ tmux source-file ~/.tmux.conf
- right click on the terminal (while running tmux) and drag the mouse. A menu should appear with some basic commands. Drag the cursor over the command and release the mouse button
- run
tmux split-window. This command shows all configured binds. We notice thesplit-window [-h]command being used, so try runningtmux split-windowwith a tmux instance already running. This will send it a split screen request, just like <Ctrl + B> ”.
[10p] Task B - powerline
When you look back at the gif in the intro, something feels off… What's up with that ugly, green bar at the bottom of the screen? You're most likely missing powerline, so let's remedy this:
$ sudo apt install powerline
$ echo 'source /usr/share/powerline/bindings/tmux/powerline.conf' >> ~/.tmux.conf
$ tmux source-file ~/.tmux.conf
Much, much better…
[10p] Task C - Start tmux by default
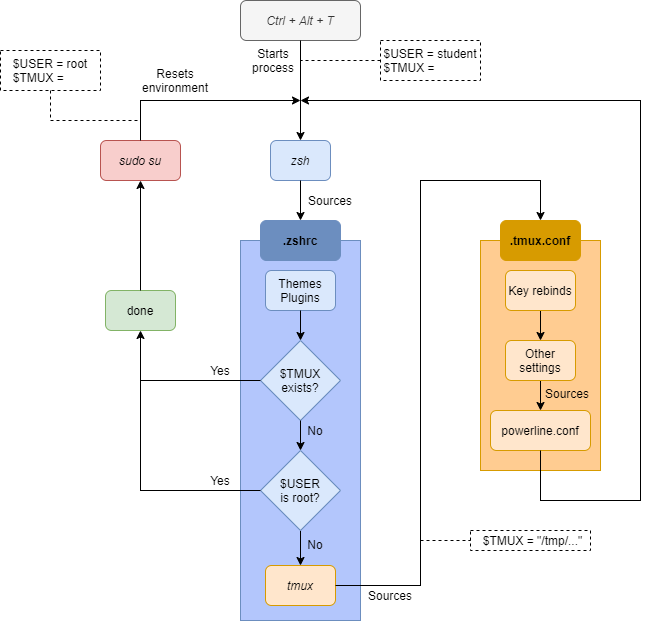
If you open a new terminal with <Ctrl + Alt + T> you will notice that tmux is not running. When zsh starts up, it automatically sources .zshrc, so lets make it execute tmux by adding the following at the end:
# start tmux session (only once!)
if [ -z "$TMUX" ] && [[ "$USER" == "YOUR_USERNAME_GOES_HERE" ]]; then
    exec tmux
fi
This may require some explanations. If at any point you're feeling lost, check out the diagram in the spoiler below (or ask).
[ -z “$TMUX” ]: Your shell defines some environment variables which can be seen by running theenvcommand. Unless you have an active tmux session, there is no TMUX variable. So if that variable is empty (which in bash / zsh means it doesn't exist), we need to start tmux. But remember! tmux then starts your default shell (i.e.: zsh), which sources .zshrc again, and executes tmux… again… See where I'm going with this? You run into an infinite loop of starting tmux and zsh and your terminal will simply crash. So we need to start tmux exactly once.[[ “$USER” == ”…” ]]: This is a solution for a rather dumb problem. Up until now, you've set up zsh only for your user but not for root. If you create /root/.zshrc and in it you just source the main .zshrc in your home, you will end up executing tmux again, but only once more. The reason is that the TMUX environment variable is not passed to the new user's shell. Why this is annoying is that the second tmux instance will add another status bar to the bottom of your screen. Normally, when you start a terminal with <Ctrl + Alt + T> you don't run a shell as root, so this workaround is somewhat valid.exec tmux: By runningtmuxyou will be able toexitor <Ctrl + D> and you'll return to the original zsh shell. By runningexec tmuxyou will effectively replace your current shell, so when you exit, you will close the entire terminal window.
[10p] Task D - Have some fun with it
Try to keep this cheatsheet close by while you're getting used to tmux.
So far, we've covered screen splitting so now try to create a few new sessions and cycle through them.
03. [20p] Quality-of-life improvements
[10p] Task A - Color man pages
On Linux, you will consult the man pages a lot. Normally, these are displayed in a bland monochrome manner, which makes them hard to parse. If you need to convince yourselves, check the manual page for the manual itself:
$ man man
Let's try to spice things up a little! Your terminal is able to display quite a few colors.
$ sudo apt install colortest
$ colortest-16b
In olden days, terminals were implemented by a driver that represented each cell by two bytes in a matrix.
One byte held the ASCII value of the displayed character. The other was used to specify character / background display color and other features such as blinking (if you're looking at that terminal cursor, you're spot on). In order for users (i.e.: not the driver) to specify what color to set, ANSI escape codes were invented. These consisted of sequences of a 0x1b byte (or 033 in octal representation), followed by [, then ; separated numerical values representing the codes, and terminated by the m character. Let's try to print a fancy “hello world” to the terminal (33 is yellow, 1 is bold, 0 is reset):
$ echo "\033[1;33m Hello World! \033[0m"
We can use this… Add this at the end of your .zshrc file, source it, and open the same man page again:
# color schemes for man pages
man() {
    LESS_TERMCAP_mb=$'\e[1;34m'   \
    LESS_TERMCAP_md=$'\e[1;32m'   \
    LESS_TERMCAP_so=$'\e[1;33m'   \
    LESS_TERMCAP_us=$'\e[1;4;31m' \
    LESS_TERMCAP_me=$'\e[0m'      \
    LESS_TERMCAP_se=$'\e[0m'      \
    LESS_TERMCAP_ue=$'\e[0m'      \
    command man "$@"
}
What's happening here:
man(): we're basically replacing the man command with a bash function.LESS_TERMCAP_*: these are variables used (indirectly) by man to format its output. The authors of these pages decide how and when to use them. We decide what they are. By defining these variables before running a bash command, we set them only in the environment of the started process and will disappear when said process terminates.command man “$@”: here, command tells bash / zsh to use the original man command, not the function we just defined. If you're wandering why this is necessary, think back to the wholetmuxandzshfiasco described earlier. The“$@”here is substituted with all the arguments that the man bash function received and passes them on to the man command.
[10p] Task B - Color iproute2 output
If you scroll back to the first gif in this lab, you might notice the execution of the ip addr show command, to list the network interfaces on my system, and their IP addresses. This is similar to the ipconfig command in Windows cmd. In fact, prior to ip, Linux had an even more similar command, called ifconfig (yeah…) But ifconfig is now deprecated and is not even installed by default in most modern distributions. People still (incorrectly) use it because they don't like the monochrome output of ip and it's output is more nicely formatted. But ip can use ANSI escape codes if you feed it the -c flag. To this end, let's specify an alias (basically a shortcut) in .zshrc.
# alias for iproute2 color output
alias ip='ip -c'
Source .zshrc and try ip addr show again. Now, every time you run ip, it automatically expands to ip -c.
04. [10p] Feedback
Please take a minute to fill in the feedback form for this lab.
