

This is an old revision of the document!
Lab 03 - Frontend
Vue
Vue (read as view) is a powerful fronted framework for creating web-app interfaces. Vue is split into multiple sub-libraries where the core is focusing on creating view elements while the plugins focus on extra functionality like Vuex, for state management, Vue Router, for managing routes (URLs) inside an app (Example) and much much more since Vue is primarily created on a component system that allows you to extend it with your own components or reuse components from the web.
Though we are trying to give you a crash course in Vue, it is recommended to check the official Vue page and read their articles from their own guide (Vue 2.0 Guide). Anyone who aims to be using Vue in any project should at least read all the chapters from this page (except migration from Vue 1.0). All links included in this wiki article are must reads.
Vue js can be used directly by including the following script in the <head>
<!-- development version, includes helpful console warnings -->
<script src="https://cdn.jsdelivr.net/npm/vue/dist/vue.js"></script>
or
<!-- production version, optimized for size and speed -->
<script src="https://cdn.jsdelivr.net/npm/vue"></script>
Here is a simple example of a Vue App.
<!-- this code goes in body -->
<div id="app">
  <!-- example of linking attribute to variable -->
  <p v-bind:title="message">
    Hover your mouse over me for a few seconds
    to see my dynamically bound title!
  </p>
  <!-- example of linking attribute to variable 2 ':' is an alias for v-bind-->
  <p :title="message">
    Hover your mouse over me for a few seconds
    to see my dynamically bound title!
  </p>
  <!-- example of content -->
  <p>{{counter}} clicks</p>
  <!-- example of event handling 1-->
  <button v-on:click="counter++">Click me 1</button>
  <!-- example of event handling 2 '@' is an alias for v-on-->
  <button @click="counter++">Click me 2</button>
  <!-- example of event handling 3-->
  <button @click="incremenentCounter">Click me 3</button>
</div>
//this goes inside a <script> tag at the end of the <body>
var app = new Vue({
  el: '#app',
  data: {
    message: 'You loaded this page on ' + new Date().toLocaleString(),
    counter: 0
  },
  methods: {
    incremenentCounter: function() {
      this.counter++
    }
  }
})
Though it is indeed possible to code a full app like this it is strongly recommended against. That is where vue components come in place, helping you structure your own project. And even thought they can be directly defined in html too it is recommended to use node.js to build your project from .vue component files.
Single file components is the core feature that will allow you to structure your code by defining new components with new HTML tags.
In order to get you started with Vue components you will need node installed and a vue project. The de facto tool for generating new vue projects is and will always be the latest version of vue-cli utility (another independent part of the vuejs infrastructure).
In order to install vue-cli all you need to do is
npm install -g @vue/cli
# OR
yarn global add @vue/cli
This will install the vue command in your OS.
Once installed all you need to do is run vue create my-project and follow the interactive menu. After generating the project, the 2 commands that you will mostly use withing the project folder will be
npm run serve
# OR
yarn serve
for running a local development server on localhost:8080 to interactively test you project. This page will automatically show the changes in your project.
npm run buid
# OR
yarn build
for building your project. The output will be placed in ./dist folder by default inside your project
Vue Components
As mentioned before, each component is a standalone file allowing you to work collaboratively on developing the app. Let's take a look at the structure of such file
<!-- this is the default HelloWordComponent.vue from teh default vue-cli project under ./src/components -->

<!-- the first part from a .vue file called <template> is defining the html code from your component -->
<template>
  <div class="hello">
    <h1>{{ msg }}</h1>
    <p>
      For guide and recipes on how to configure / customize this project,<br>
      check out the
      <a href="https://cli.vuejs.org" target="_blank" rel="noopener">vue-cli documentation</a>.
    </p>
    <h3>Installed CLI Plugins</h3>
    <ul>
      <li><a href="https://github.com/vuejs/vue-cli/tree/dev/packages/%40vue/cli-plugin-babel" target="_blank" rel="noopener">babel</a></li>
      <li><a href="https://github.com/vuejs/vue-cli/tree/dev/packages/%40vue/cli-plugin-eslint" target="_blank" rel="noopener">eslint</a></li>
      <li><a href="https://github.com/vuejs/vue-cli/tree/dev/packages/%40vue/cli-plugin-unit-jest" target="_blank" rel="noopener">unit-jest</a></li>
    </ul>
    <h3>Essential Links</h3>
    <ul>
      <li><a href="https://vuejs.org" target="_blank" rel="noopener">Core Docs</a></li>
      <li><a href="https://forum.vuejs.org" target="_blank" rel="noopener">Forum</a></li>
      <li><a href="https://chat.vuejs.org" target="_blank" rel="noopener">Community Chat</a></li>
      <li><a href="https://twitter.com/vuejs" target="_blank" rel="noopener">Twitter</a></li>
      <li><a href="https://news.vuejs.org" target="_blank" rel="noopener">News</a></li>
    </ul>
    <h3>Ecosystem</h3>
    <ul>
      <li><a href="https://router.vuejs.org" target="_blank" rel="noopener">vue-router</a></li>
      <li><a href="https://vuex.vuejs.org" target="_blank" rel="noopener">vuex</a></li>
      <li><a href="https://github.com/vuejs/vue-devtools#vue-devtools" target="_blank" rel="noopener">vue-devtools</a></li>
      <li><a href="https://vue-loader.vuejs.org" target="_blank" rel="noopener">vue-loader</a></li>
      <li><a href="https://github.com/vuejs/awesome-vue" target="_blank" rel="noopener">awesome-vue</a></li>
    </ul>
  </div>
</template>

<!-- the second part from the .vue file is defining the logic/code -->
<script>
export default {
  name: 'HelloWorld',
  props: {
    // here we define properties of our own components
    // we will see later how this comes into play
    msg: String
  }
}
</script>

<!-- the last/thrid part is the style -->
<!-- Add "scoped" attribute to limit CSS to this component only -->
<style scoped>
h3 {
  margin: 40px 0 0;
}
ul {
  list-style-type: none;
  padding: 0;
}
li {
  display: inline-block;
  margin: 0 10px;
}
a {
  color: #42b983;
}
</style>
An interesting feature of .vue is the ability to use other languages for each of the 3 parts than the standard. As an example here we use scss instead of css which allows nested tags, mixins, funcions and variables. The vue cli project comes by default with scss support.
<style scoped lang="scss">
$color: #42b983; // our variables that are supposed to be globals can be defined in another file and then just included
@import 'assets/scss/global'; //multiple global variables defined here

li {
  /* this selects every li */
  display: inline-block;
  margin: 0 10px;
  a {
    /* this selects every a inside of a li */
    color: $color;
  }
}
</style>
Now let's see how this component will be used as part as another component. Here is the default code of the Home.vue component that you will find in src/views folder:
<template>
  <div class="home">
    <img alt="Vue logo" src="../assets/logo.png">
    <!-- here we use our subcomponent and we send it a value via our custom defined property called msg -->
    <HelloWorld msg="Welcome to Your Vue.js App"/>
  </div>
</template>

<script>
// @ is an alias to /src
import HelloWorld from '@/components/HelloWorld.vue'
// here we import the hello world component

export default {
  name: 'home', // this is the name we define for the current component
  components: {
    HelloWorld
  }
  // here we expose the hello world component
}
</script>
While developing with you you should always have vuejs developer extension (for chrome/firefox) that will allow you to easily inspect your components and vuex states.

A simple counter component
We are going to try to make a counter component with initialization and that emits events to it's parent
<template>
  <div class="counter">
    {{counter}}
  </div>
  <button>Click me</button>
</template>

<script>
export default {
  name: 'Counter',
  props: {
    initial: {
      //allow via a property of type Number to set an initial value
      type: Number,
      default: 0
    }
  },
  data () {
    //in components data is a function and not a property unlike app level, this is further explained in vue guide
    // data needs to be a function that returns our local variables
    return {
      counter: this.initial //we intiailize coutner with our initial value default to 0
    }
  },
  methods: {
   //methods is property of type object that will contain multiple methods for our use
   increment () {
     this.counter++
     this.$emit('valueChanged', this.counter) //here we emit to the parent an event called value changed
     // now the parent will be able to use v-on:valueChanged or @valueChanged
     // the method mapped to valueChanged will recieve teh current value of the counter
   }
  }
}
</script>
There are many other features important in components that you should read on:
- an in-depth explanation of props with validation and other features
- slots (allowing you to access the text inside your component <mycomponent>some content</mycomponent>)
- computer properties that allows you to define dynamic ready only data that you can access inside your component
- Watchers that run code when a certain value is changed inside data or computed props
List rendering with v-for
Quite often you will need to generate a list dynamically with a for (a table, a menu, etc). For this we have v-for
<!-- here we will go over an array called items -->
<!-- items = [{uid:1, message:"some message"}, {uid:2, message:"some other message"}]
<!-- v-for expects you to bind a key via v-bind:key or just :key -->
<!-- this key needs to be unique yo each element and is used by v-for to know when an update is made or a new element appeared-->
<ul id="example-1">
  <li
    v-for="item in items"
    :key="item.uid"
  >
    {{ item.message }}
  </li>
</ul>
<!-- if your array does not contain it's own keys you can use the auto generated index of v-for -->
<!-- index starts from 0 for the first element and keeps increasing -->
<ul id="example-2">
  <li
    v-for="(item, index) in items"
    :key="index"
  >
    {{ item.message }}
  </li>
</ul>
<!-- modifying items in data will result in dynamic changes in the interface -->
<!-- v-for can also iterate over objects not just arrays -->
<ul id="example-3">
  <li
    v-for="(value, key) in object"
    :key="key"
  >
    {{ key }} -- {{ value }}
  </li>
</ul>
Input binding
In many apps you will have inputs and you will want this inputs to be linked directly to a variable in a 2-way connection. When the input cahnges the variable updates and when the variable changes the input updates. This is done via v-model
<template>
  <div>
    <input v-model="message" placeholder="edit me">
    <p>Message is: {{ message }}</p>
  </div>
</template>
<script>
export default {
  name: 'HelloWorld',
  data () {
    return {
      message: 'some initial value'
    }
  }
}
</script>
The above code will instantly update the displayed text as you type. You can use a watcher over the variable message to detect every update for extra functionality.
Component lifecycle
In the lifecycle of vue apps each vue component has multiple points where you can hook your own code. Refer to the following diagram to learn the hooks:
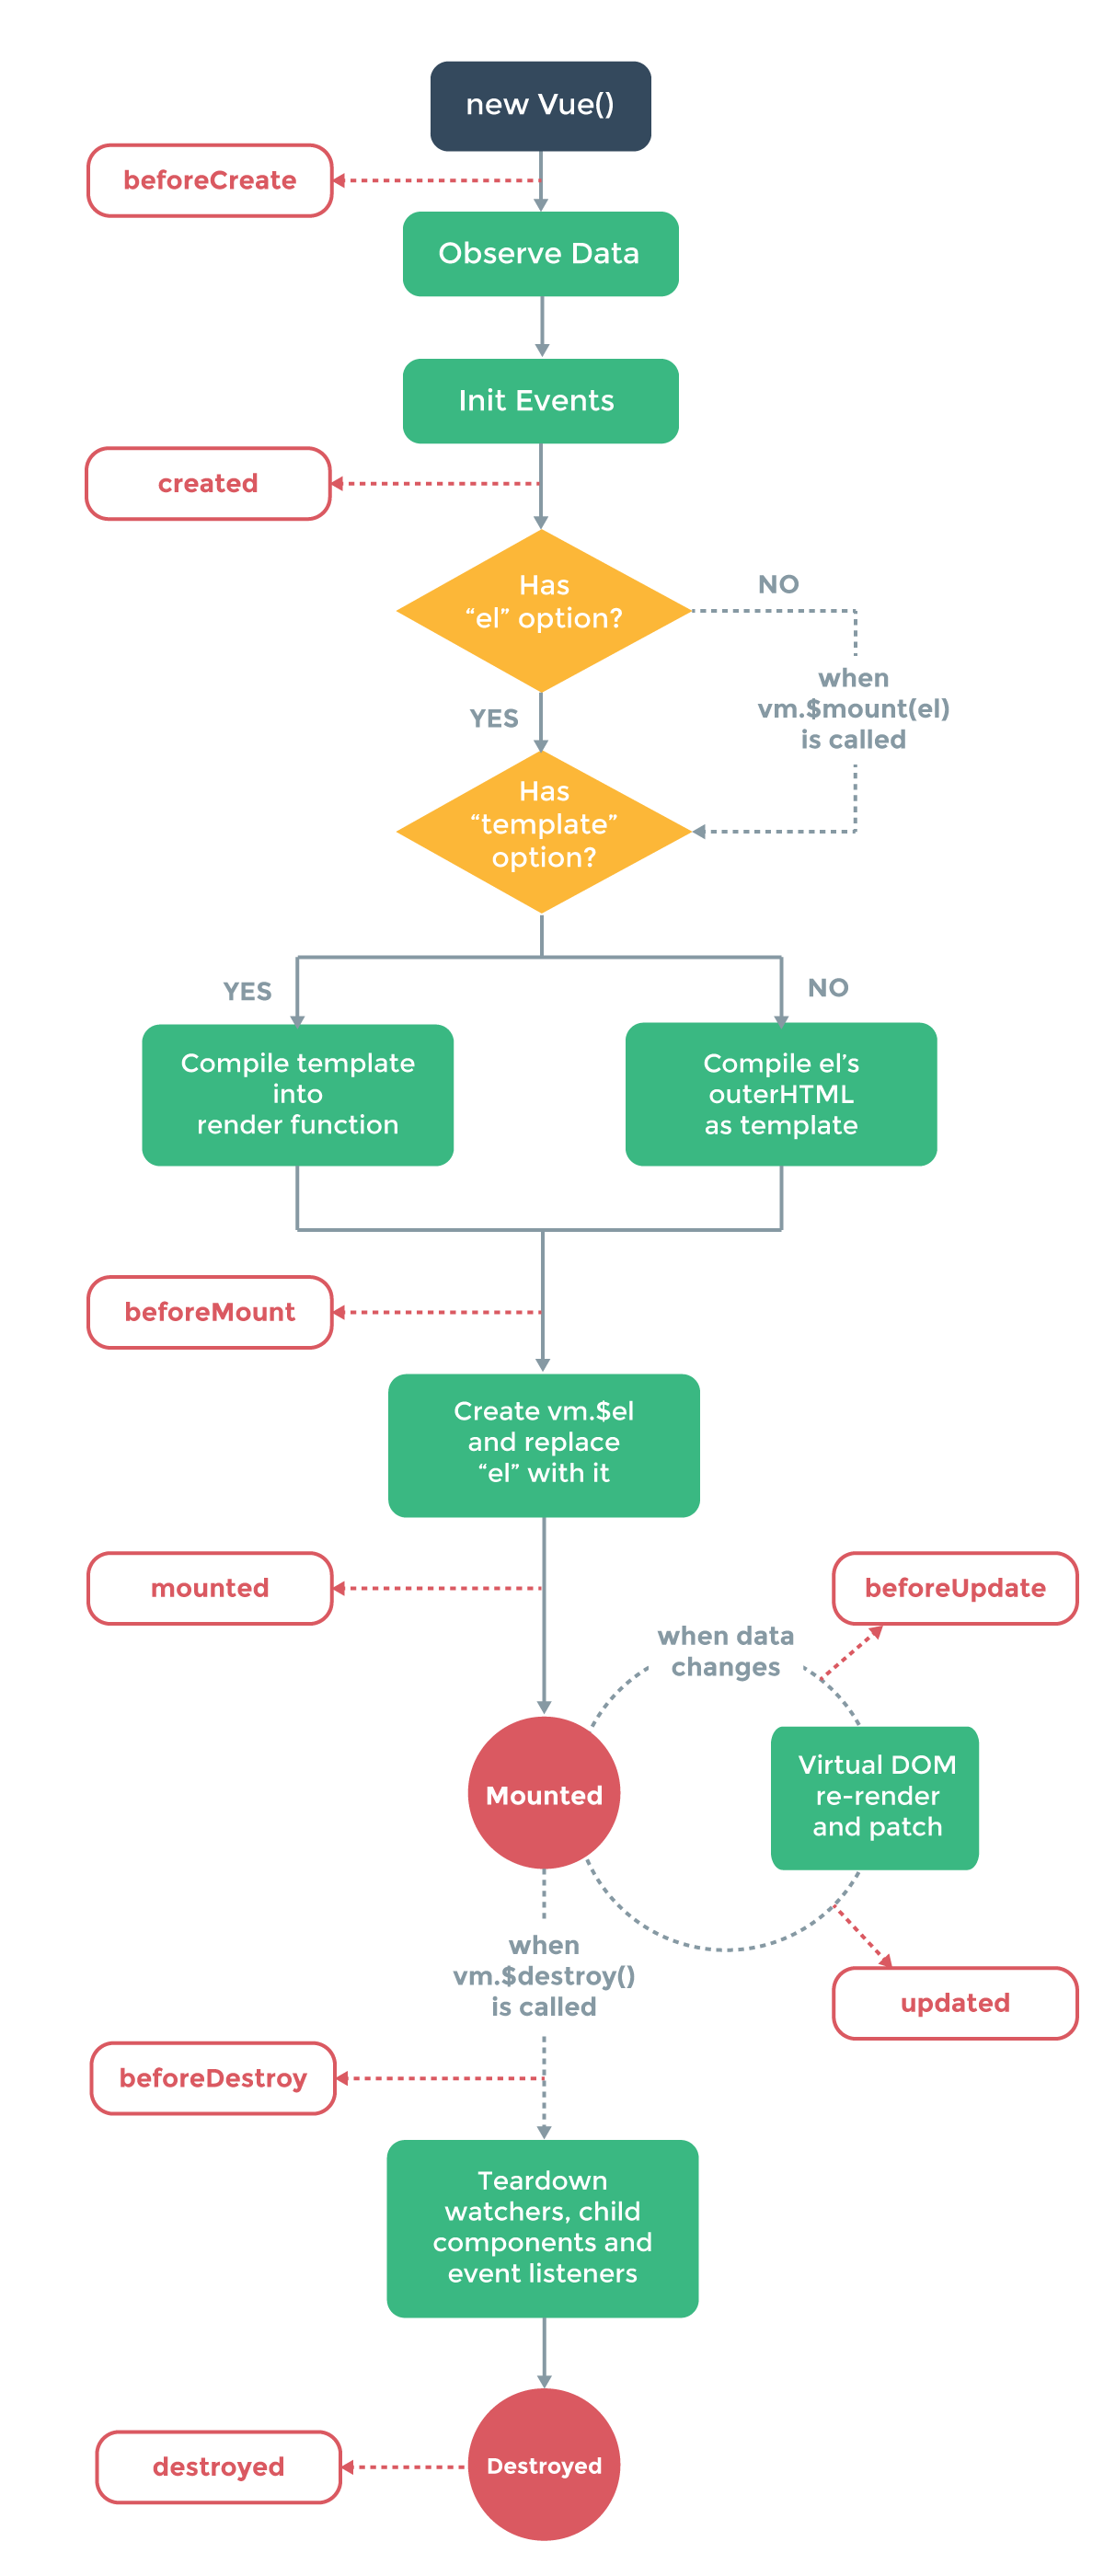
Note that data does not exist in the before event hook so our firs opportunity to play around with stuff is in creates
export default {
  data() {
    return {
      property: 'Blank'
    }
  },

  computed: {
    propertyComputed() {
      console.log('I change when this.property changes.')
      return this.property
    }
  },

  created() {
    this.property = 'Example property update.'
    console.log('propertyComputed will update, as this.property is now reactive.')
  }
}
Tasks
- Create a new vue project using vue-cli (if you can't install the component globally for any reason it will install in the node_modules/.bin folder) or you can download the generated project here (and run npm install or run install after)
- Create a to do list app:
- Create a component that will represent a todo-list item that should have
- text showing the description of the todo-list item
- delete button that emits an event to parent to remove the item
- a state variable in data() that represents view mode and edit mode of the item
- an edit button that switches item to edit state and makes the item editable
- an save button that emits the new value to the parent and switches back to the view state
- use v-if toe design the 2 states inside the <template>
- Use the previously defined component in Home.vue to list an array of items you define in Home.vue
- Create an input that you will use to create new list items by appending to your array
- Your final solution should look like this (you will need to run install again if you download this solution)
- Modify Home.vue to initialize the array of items from localStorage with localStorage.getItem and update the localStorage with localStorage.setItem on edits (or localStorage.removeItem if it needs to be deleted). Your final solution should look behave like this
Feedback
Please take a minute to fill in the feedback form for this lab.
