Table of Contents
Lab 01 - Web Basics
The web is the backbone of the internet, and the largest application platform today. This is all due to a core characteristic:
The web is simple.
Think about it - when you want to check Facebook, you just type facebook.com in your browser, press Enter, *poof* and you suddenly know what all your friends ate this morning. This simplicity isn't apparent - although there are some complex things going on, most of the behind-the-scenes stuff is pretty easy to understand.
This lab aims to help you learn the bare minimum that you need to know in order to develop a website. You'll see how the browser works, you'll learn how the server knows what data to send, and you'll find out how designers make websites look pretty.
Let's dig in!
🌍 The browser
A web browser (commonly referred to as a browser) is a software application for accessing information on the World Wide Web. Each individual web page, image, and video is identified by a distinct URL, enabling browsers to retrieve and display them on the user's device.
That's Wikipedia's definition of a web browser. Pretty boring, ain't it ? Let's define it a different way:
A web browser is the vehicle that allows you to view, interact and discover everything from what's going on in the USA to some guy that loves hats.
We all know how to use a web browser - you're using it right now to view this page. You probably also have other pages open in the background, such as YouTube or Facebook. Some of those pages might send you notifications, or play media content such as video and audio. But what exactly makes it tick ?
How does the browser know what to render
If you hit Ctrl + U in this page, you'll see something similar to this:
<!DOCTYPE html>
<html lang="en" class="no-js">
  <head>
      <meta charset="utf-8">
      <meta name="viewport" content="width=device-width,initial-scale=1">
      <meta http-equiv="x-ua-compatible" content="ie=edge">
      <meta name="lang:search.language" content="en">
      <link rel="shortcut icon" href="../../assets/images/favicon.png">
      <meta name="generator" content="mkdocs-0.17.3, mkdocs-material-2.8.0">
      <title>Browser - .js Summer Course</title>
............................................................................
This code is called HTML, and is the language that defines the “scaffolding” of any webpage. We'll dive into HTML later, but for now you only need to know that the elements that are between <> brackets (like <meta>) are called tags, and are the building blocks of the language.
HTML and its tags define a tree, which represents the structure of our web page. That is why we call it our “scaffolding”: it builds our page like a resistance structure builds a house.
If you dive deeper into the source code of any webpage, you'll come across something like this:
.md-nav__title {
  display: inline-block;
  margin: .4rem;
  padding: .8rem;
  font-size: 2.4rem;
  cursor: pointer
}
This is HTML's counterpart, CSS. While HTML defines our page's structure, CSS tells the browser how elements are supposed to look. We'll look into CSS in depth a bit later.
How does rendering actually happen ?
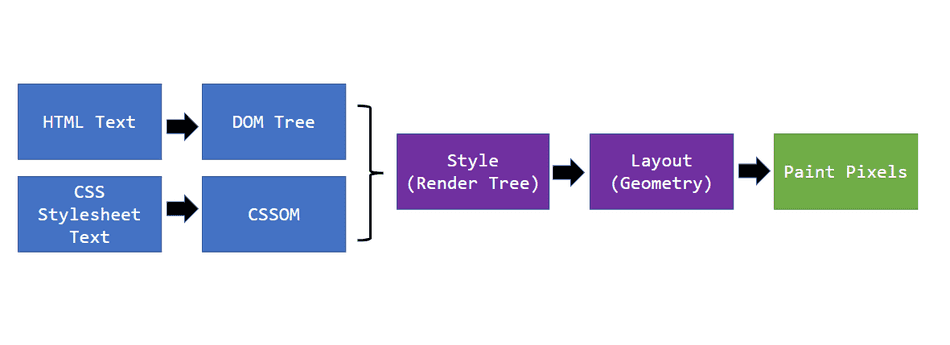
The browser goes through several steps to transform HTML and CSS code into what you see on screen. This process is known as the browser rendering pipeline, and it looks like this:

Here’s what happens at each stage:
- (HTML Text → DOM Tree) → The browser parses the HTML document and builds a Document Object Model (DOM) — a structured tree that represents all elements on the page.
- (CSS Stylesheet Text → CSSOM) → In parallel, the browser parses all CSS rules to create the CSS Object Model (CSSOM), which defines how each element should look.
- Style (Render Tree) → The DOM and CSSOM are then combined into a Render Tree — a structure that contains only the visible elements and their computed styles.
- Layout (Geometry) → The browser calculates the position and size of each element on the page. This step is also known as reflow.
- Paint Pixels → Finally, the browser paints the pixels on the screen according to the layout and styles.
The browser may repeat parts of this process when content changes (for example, if JavaScript updates the page). The most important stages for understanding performance are the DOM/CSSOM construction, layout, and painting — represented by the blue and purple boxes above.
Examples
A visualisation of this process for an older version of the Twitter site:
As you can see, the browser first positions the elements in the top-left corner of the parent element (most of the time this is the browser window), renders the contents, applies the required CSS and then positions the element correctly in the page.
Another visualisation of a more complex website is here:
Notice how the browser begins to render a lot of elements between 0:20 and 1:30 ? Those are the individual options available in the dropdown menus (day, month, year) that we need to have ready to display when the user toggles the dropdown.
As you can see, the browser does a huge amount of work in a short amount of time in order to present you a website. And this is just the structure and painting - we haven't gotten to interactivity yet.
For a more in-depth look at how the browser renders our page, check out this talk by Ryan Seddon at JSConf EU 2015:
Also, if you are interested in learning more about the specifics of how the browser renders a page, check out this artucle from Mozilla Hacks.
💫 HTTP and APIs
We've seen how the browser renders the page that we see, but how do the files get from the server to our browser, in order to be rendered ?
The magic behind this is a protocol called HTTP. Let's see what MDN has to say about HTTP:
Hypertext Transfer Protocol (HTTP) is an application-layer protocol for transmitting hypermedia documents, such as HTML. … HTTP is a stateless protocol, meaning that the server does not keep any data (state) between two requests.
Let's break this definition down:
- application-layer protocol - this just means that is a protocol intended to be used by an application (e.g. a browser, a server, etc.) as opposed to a protocol intended to use by hardware devices
- hypermedia documents - hypermedia is a term extended from hypertext, and basically means any text and media (e.g. images, videos) that can be linked using hyperlinks (URLs)
- stateless protocol - as the rest of the definition says, this means that the server doesn't keep any state between two requests. In real life use, this means that HTTP provides no way for the server to know that a request is part of a longer chain of requests, or that a specific request is associated to an user.
Although it might seem daunting at first, you'll see that HTTP is a very simple, text-based protocol. Communication in HTTP is request-response based: the client sends the server a request, and the server replies with a response. There are a few extra cases, but most of the time this is the way the protocol works.
The protocol only specifies a couple of things, the most important being the format of the request and the response.
The HTTP Request and Response formats
When the client makes a request to a server, the packet it sends needs to have the following fields:
- A
requestline - Zero or more
headerfields - An empty line
- An optional message body
A complete request looks something like this:
GET /hello.html HTTP/1.1
User-Agent: Mozilla/4.0 (compatible; MSIE5.01; Windows NT)
Host: www.facebook.com
Accept-Language: en-us
Accept-Encoding: gzip
The following line:
GET /hello.html HTTP/1.1
is the request line. This specified the HTTP method (GET), the resource we want to request (/hello.html) and the protocol version that we are using (HTTP/1.1).
A resource in HTTP terms is any object that we can manipulate on a server. This is usually a text file (HTML, CSS, etc.) but can also be dynamic media such as images, photos or video streams.
The rest of the lines in the request are the header fields. These have the format of Key: Value, and are always entered each on one line. There are two more interesting header fields in the request above:
User-Agent: Mozilla/4.0 (compatible; MSIE5.01; Windows NT)
Host: www.facebook.com
The first line tells the server a bit about the client that is sending the request. In this way, the server can, for example, send plaintext metadata about an image if the requester is a command-line browser, and send the complete media file if the server is a graphical one.
The next line specifies the host that we are connecting to. The resource path in the request line is relative to the Host value.
The following lines are examples that set various parameters about the client so that the server has an easier time sending a correct response.
An HTTP response looks similar to the request. The required information that the server has to include is:
- A
statusline - Zero or more header fields
- An empty line
- Optionally, a message body
HTTP/1.1 200 OK
Date: Mon, 27 Jul 2009 12:28:53 GMT
Server: Apache/2.2.14 (Win32)
Last-Modified: Wed, 22 Jul 2009 19:15:56 GMT
Content-Length: 88
Content-Type: text/html
Connection: Closed
Here we can see fields such as Date and Server that tell us information about the server, Last-Modified and Content-Length that tell us information about the content we have requested, and more.
The most important part of the response though is the very first line:
HTTP/1.1 200 OK
This tells us the HTTP version (which usually matches the one the client sends in its request) but also the status code and its meaning.
HTTP Status Codes
In order for the server to inform us about how the request went, HTTP specifies a Status Code directive. These codes are numerical values ranging from 100 to 500 that have associated human-readable strings to explain what went wrong (or right) with the request. These codes are categorized based on the first number in the code:
- 🔵 1xx codes Informational codes. These codes usually tell us that the request has been received and we must wait.
- ✅ 2xx codes Success codes. These codes confirm that the request was completed without problems.
- 💫 3xx codes Redirection codes. These codes tell us that we must do something else (such as make another request at a different address) in order to complete the operation.
- 💬 4xx codes Client error codes. These codes mean that the request that we sent was wrong or cannot be fulfilled for some reason.
- ⛔ 5xx codes Server error codes. These codes mean that the server had trouble fulfilling our request
Most of the time you'll only interact with a couple of codes:
| Code | Message | Meaning |
|---|---|---|
| 200 | OK | Request fullfilled successfully |
| 301 | REDIRECT | You'll find what you're looking for at a different address |
| 404 | NOT FOUND | What you requested isn't on this server |
| 500 | SERVER ERROR | The server failed to deliver your request |
HTTP Methods
Apart from status codes, the HTTP protocol also defines a couple of methods used to communicate with the server. Think of these as remote functions that you call on a server. Although the protocol defines many methods, in daily use we only need a couple of these:
- GET - Requests a resource from the server (e.g.
GET /index.html) - POST - Adds a new resource to the server (e.g.
POST /users/new) - PUT - Edits a resource from the server (e.g.
PUT /users/ion) - DELETE - Deletes a resource from the server (e.g.
DELETE /users/andrei)
PUT and POST accept message bodies that detail, for example, how exactly a resource is to be edited, or what the new resource should contain. The GET and DELETE requests usually get all their information from the resource's location.
The browser usually makes GET requests when retrieving web pages, but it also makes POST requests when, for example, you submit an online form.
What is an API ?
An API is simply an HTTP server that, instead of responding with HTML, CSS and JS files, accepts and responds with data-specific formats such as JSON or XML. Most of today's online APIs use JSON as their format of choice. They usually are documented and are intended to be used by software programs.
APIs that respect the HTTP method descriptions above are called REST APIs, or Representational State Transfer APIs.
✨ The languages of the web
We've seen how the browser renders a page, and we've seen how the browser interacts with the server in order to provide us with all that the web offers us. Now, let's dive in a bit deeper and see how exactly do these languages work.
HTML
HTML is the language that defines a web page's structure. As we've seen, HTML uses tags and attributes in order to define a webpage. A simple HTML page example:
<!DOCTYPE html>
<html>
  <head>
    <title>Page Title</title>
  </head>
  <body>
    <h1>This is a Heading</h1>
    <p>This is a paragraph.</p>
  </body>
</html>
We can see here a couple of elements:
- The
<!DOCTYPE html>declaration - this defines the document as a HTML5 file - The
<html>element - this is the root element of the document, similar to how/is the root folder in a Linux filesystem - The
<head>element - this element contains information about the document, such as the page's<title> - The
<body>element - this element contains everything that is visible on the page
HTML tags are standard and describe well-defined elements, for example:
<p>- defines a paragraph box.<div>- defines a generic element that can contain anything<h1>- defines a title (heading)
There are also more specific tags, such as <article> or <nav>. It is important to learn the correct HTML tags to use, as these help the browser and automated tools (such as search engines) make correct assertions about our page.
Some HTML tags also support attributes. You can think of attributes as being similar to function parameters. For example, to embed an image we can use a code that looks like this:
<img src='https://comotion.uw.edu/wp-content/uploads/2017/06/image.jpg' />
Here we are using the img tag's src attribute to specify the source of the image, or, in other words, where is the image located. The browser will then go ahead and retrieve the image, and display it for us.
But let's say that we want to make that image have rounded corners, or be centered, or have a shadow. How would we do that ?
CSS
CSS, standing for Cascading Style Sheet, is the language we use to specify how an element will look like. CSS is a simple language, and it looks something like this:
html {
  margin: 0;
  padding: 0;
  background-color: red;
}

body {
  font-size: 16px;
  font-family: 'Segoe UI', sans-serif;
}
As you can see, we pick an HTML tag and say what properties it should have. We define things such as the size of the font, or background color, or spacing between it and other elements.
Classes
We've seen that, in CSS, we can apply rules to elements based on their tag. For example, this rule:
div {
  background-color: red
}
will make all the div elements on the page have a red background color.
But what if we want to target a specific element ? That's where the class attribute comes in - it allows us to select all elements that have that specific class. For example, given this HTML code:
<div>
  <p> I am a paragraph </p>
  <p class='red'> I have red text color </p>
</div>
We can make the second paragraph have the text color red by applying these CSS rules:
.red {
  color: red
}
This will result in something like this:
I am a paragraph
I have red text color
You can also be more explicit, and specify that a certain rule should only be applied to paragraph tags with the .red class that are under a div tag:
div .red {
  color: red;
}
With the following HTML, this is the result that will appear:
<div>
  <p class='red'> I have red text color </p>
</div>
<p class='red'> I have red class but no red text color </p>
<p style="color: red"> I have red text color </p>
I have red class but no red text color
The Box Model
CSS relies on what is called a box model. When we say that the HTML tags are rendered as boxes, these boxes have certain properties that define how they relate to elements around them. An easy way to view the box model is this graphic that you can find in most browser's developer tools menu:

There are four basic components of a box:
- The
widthandheight- these define the baseline size of the element - The
padding- this defines the spacing between the element's contents and its effective border - The
border- this defines the separation between an element's content and the spacing around it - The
margin- this defines the spacing around the element
In CSS, you can define them exactly as written above: width, height etc. You can also specify border, margin or padding for just one side of the box, like so:
  padding-top: 5px;
  padding-right: 4px;
  padding-bottom: 3px;
  padding-left: 2px;
Or you can use a shorthand form and define them all in one go:
  padding: 5px 4px 3px 2px;
           |   |   |   |
           |---|---|---|---- top
               |---|---|--------- right
                   |---|--------------- bottom
                       |---------------------- left
Animations!
CSS also allows us to animate HTML elements. Let's bring back the photo above:
If we take a look at the CSS applied inside the iframe, we can understand how CSS animations work:
.box {
  width: 100px;
  height: 100px;
  background: #4a90e2;
  animation: image-animation-example 2s infinite;
}

@keyframes image-animation-example {
  from { border-radius: 0; transform: scale(1); opacity: 1; }
  50% { border-radius: 100px; transform: rotate(180deg); opacity: 0; }
  to { border-radius: 0; transform: rotate(360deg); opacity: 1; }
}
As you can see, we use a few key properties:
- animation-name – specifies which animation sequence to apply
- animation-duration – defines how long the animation lasts (2 seconds in this case)
- animation-iteration-count – controls how many times the animation repeats (here, it loops infinitely)
These three rules are the bare minimum needed in order to add an animation to a HTML element. But we still need to define how the animation will look like. We do this by using a @keyframes declaration, followed by the animation name (the one we set in the animation-name property).
The body of the @keyframes declaration defines the animation steps. These steps can be:
fromorto- this defines the initial and final state of the object- a percentage - this percentage is the part of the animation, for example 50% is the middle of the animation
We can use the transform property to manipulate an element in various ways, such as:
scale()- makes the item bigger or smallerrotate()- rotates the item clockwise or counterclockwisetranslateX(),translateY(),translateZ()- moves the element in 3D space
You can see more examples of the transform property here.
Defining the animation origin point
By default the origin point of the animation is at the center:
But what if we want to obtain something like this ?
It's simple: we use a rule called ''%%transform-origin%%'':
transform-origin: 0 50%;
This rule takes two parameters: the first represents the horizontal distance from the top left corner, and the second represents the vertical distance from the same corner.
Taiwlind
Tailwind CSS is a modern, utility-first CSS framework that helps developers build stylish, responsive websites without writing custom CSS. Instead of defining styles in separate CSS files, you apply predefined utility classes directly to your HTML elements. What makes Tailwind different?
Traditional CSS requires writing custom class names and defining them in a stylesheet. For example:
<button class="btn">Click me</button>
.btn {
  background-color: #1d4ed8;
  color: white;
  padding: 0.5rem 1rem;
  border-radius: 0.375rem;
}
With Tailwind, the same button can be styled directly in HTML using ready-made classes:
<button class="bg-blue-600 text-white px-4 py-2 rounded-md hover:bg-blue-700">
  Click me
</button>
Here’s what happens:
- bg-blue-600 sets the background color
- text-white sets the text color
- px-4 py-2 adds horizontal and vertical padding
- rounded-md gives the button rounded corners
- hover:bg-blue-700 changes the background color when hovered
How to use Tailwind (CDN method) To quickly use Tailwind in a project, include it via CDN in your <head> tag:
<script src="https://cdn.jsdelivr.net/npm/@tailwindcss/browser@4"></script>
Now we can use tailwind css classes:
<div class="min-h-screen flex flex-col items-center justify-center bg-gray-100">
  <h1 class="text-4xl font-bold text-indigo-600 mb-4">Hello, Tailwind!</h1>
  <p class="text-gray-700 text-lg">This layout was built without a single line of CSS.</p>
</div>
Tailwind in 100 seconds
Why use Tailwind?
Tailwind offers speed, consistency, and simplicity. It allows designers and developers to work faster, maintain cleaner projects, and focus more on building — not styling.
JavaScript
JavaScript is the programming language of the web. It runs in the browser, as well as on the server, and even on Arduino-like hardware. The syntax of JavaScript is very similar to C++, with a few small differences. Here's a small example:
let iceCream = 'chocolate'
if (iceCream === 'chocolate') {
  alert('Yay, I love chocolate ice cream!')
} else {
  alert('Awwww, but chocolate is my favorite...')
}
A couple of things are worth mentioning about JavaScript:
- Java has no relation to JavaScript. The name was just an unfortunate market-based decision made by Netscape in the early years of the language.
- As opposed to other languages such as C++ or Java, JavaScript has no types - any variable can take any value. The following is valid JavaScript code:
let x = 1
console.log(x) // prints 1

x = 'hello'
console.log(x) // prints 'hello'
- You'll see a lot of code examples on the internet using
varfor variable declarations. We recommend that you uselet. If you want to learn more about the why, read this great article from hackernoon. - You don't need any development environment to write JavaScript - you only need your browser and a simple text editor such as Notepad! Of course, a better text editor such as Visual Studio Code or Atom will improve your experience greatly.
- Semicolons in JavaScript are optional. We recommend using something like prettier-standard paired with an editor such as Visual Studio Code when developing in JavaScript.
We will delve deeper into JavaScript in the next lab.
jQuery is not JavaScript
A common mistake is to mix jQuery with JavaScript. This is caused by historic reasons and poor online documentation. What you need to know is that jQuery is written in JavaScript. It's just a library that provides extra APIs for interacting with the browser. In the early days of the internet, where each browser had a slightly different syntax, jQuery was necessary, but nowadays it's more of an impediment rather than a useful thing to use.
GitHub Pages
Tasks
Task 1 - Modify the task.css file from Task 1 to make the human do something (e.g. jump).
Task 2 - Modify the task2.html from Task 2 and center a box (div) on the screen using three different Tailwind approaches.
Task 3 - Create a personal page and host it using GitHub Pages. Here are two examples of personal pages:
Feedback
Please take a minute to fill in the feedback form for this lab.