Table of Contents
Arduino Guitar Tuner
Introducere
Descriere generală
The tuner works as follows:
The sound generated by the guitar is converted to a frequency, then it is compared with the frequency of the note “in-tune”. When the sound is emitted from a string, a yellow LED corresponding to playing that string lights up. Then, according to the accuracy of the note, one of 3 other LEDs will light up: a GREEN LED in the middle (if the note is in tune) / a RED LED to the left (if the sound's frequency is too low) / a RED LED to the right (if the sound frequency is too high).
Block Diagram:
Hardware Design
Components that were used:
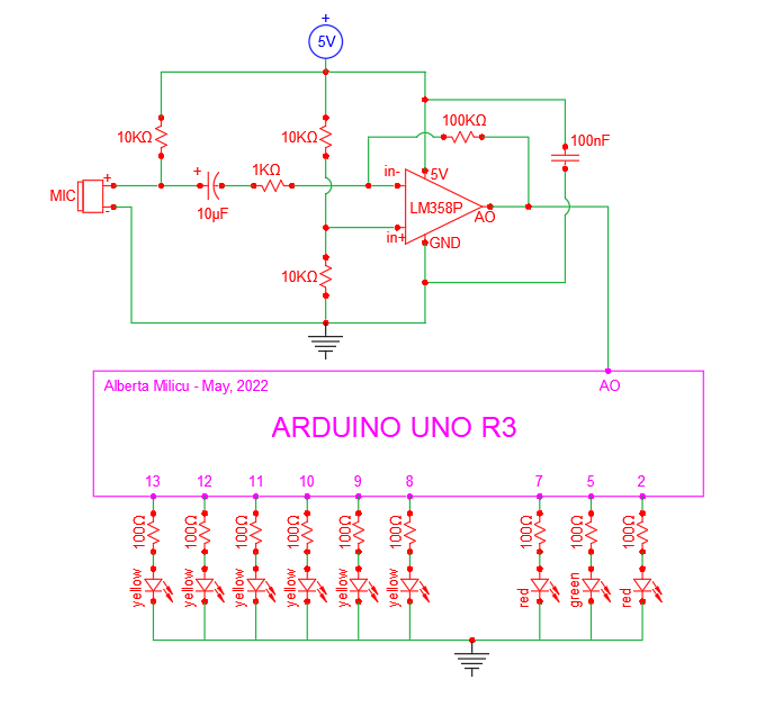
Electric schematic:
The circuit:
The two main parts of the circuit are:
- the acquisition circuit where the sound is captured from the guitar and amplified
- the actuator circuit where the frequency is compared with the reference frequencies and leds give indications on the string being played and which way the string should be tuned
Acquisition circuit
This circuit has essentially 2 parts:
• Electret microphone preamplifier
The basic electret mic circuit consists of the mic itself, a resistor and a capacitor. That circuit is provided by the manufacturer.
• Operational amplifier
The op-amp is 1/2 of an LM358 dual op-amp and it operates off a single 5V supply
The amplification follows this formula:
Vs is the voltage coming from the mic 10 µF capacitor and Vo the voltage in the op amp output. Rf corresponds to the 100kΩ resistor and Rs to the 1kΩ resistor.
So, the gain will be Rf / Rs = 100 / 1 = 100.
Finally, the signal enters the Arduino A0 analog input pin.
Actuator circuit
The output is based on LED indications.
There are six yellow LEDs, each one corresponding to a different guitar string and each one connected to a different Arduino digital output (8-9-10-11-12-13).
The other three (one green and two red) are the indicators of the tuning accuracy.
The green LED, connected to the pin 5, lights up when the string is tuned in a very tight interval around the reference frequency and the other two red LEDs light up if the string is too tight (pin 2) or too lose (pin 7).
The string frequencies of standard tuning are:
As all LEDs are powered through 5V digital signals, and they need to have a voltage drop of around 2V, there should be a resistor producing a 3V voltage drop. Furthermore, the current through the LEDs should be around 20mA. So, the formula to calculate the resistor is: R = V/I = 3 / 0.020 = 150 ohms. The nearest resistor value we had was 100 ohms.
Software Design
The way the code works:
The code consists of two main parts, an autocorrelation algorithm that will be useful for detecting periodic signals, and a peak detector for detecting the peaks from the output of the autocorrelation function.
Distance between peaks = period of incoming signal.
The code calculates the frequency as:
freq_per = sample_freq/period;
Here are e few relevant snippets of my code (which can be found in full in the DOWNLOAD section below):
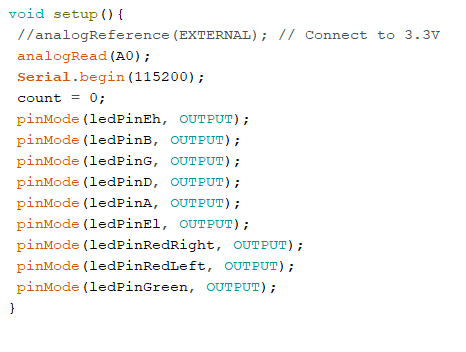
The setup:
Autocorrelation:
Peak detection:
Tuning sample for E low:
Disclaimer
Part of the code is based on a similar project in this website: http://www.akellyirl.com/arduino-guitar-tuner/ (link is found in Bibliography)
Rezultate Obţinute
Concluzii
This has been a pleasant and challenging experience that has taught me a lot about what can be done with creativity and a couple of wires (and the internet :D).
This has been a great opportunity for me to work with 2 things I like a lot (music and coding) and it has definitely inspired me to try out other projects like this is the future.
Download
Jurnal
The set-up of the amp:
Setting up the LEDs (part 1):
Setting up the LEDs (part 2):
Connecting to Arduino:


